

Your best chance to show customers the value of your products is on the Shopify product page. An effective product page needs more than just being eye-catching. However, before you go to the optimized step, you need to clearly know what and how to add a new product on the product page.
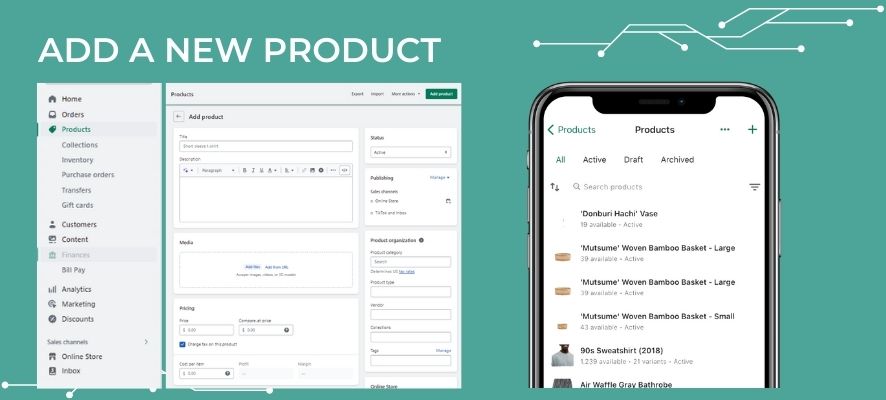
Add A New Product
Firstly, we need to create a new product page.
On Desktop:
Step 1 – From your Shopify admin, go to Products
Step 2 – From the Products page, click Add product
Step 3 – Enter a title for your product, along with additional details
Step 4 – Click Save
On Mobile – iOS:
Step 1 – From the Shopify app, go to Products > Products
Step 2 – From the All Products screen, tap the + button. Tip: You can also add a product by tapping the + button on the Products screen, and then tapping Add product
Step 3 – Enter a title for your product, along with additional details
Step 4 – Tap Save
On Mobile – Android:
Step 1 – From the Shopify app, go to Products > All products
Step 2 – From the Products screen, tap the + button
Step 3 – Enter a title for your product, along with additional details
Step 4 – Tap the check mark to save your product
Note: If you have over 50 store locations, then you need to save your product first before adding inventory quantities.
Product Details
Title & Description
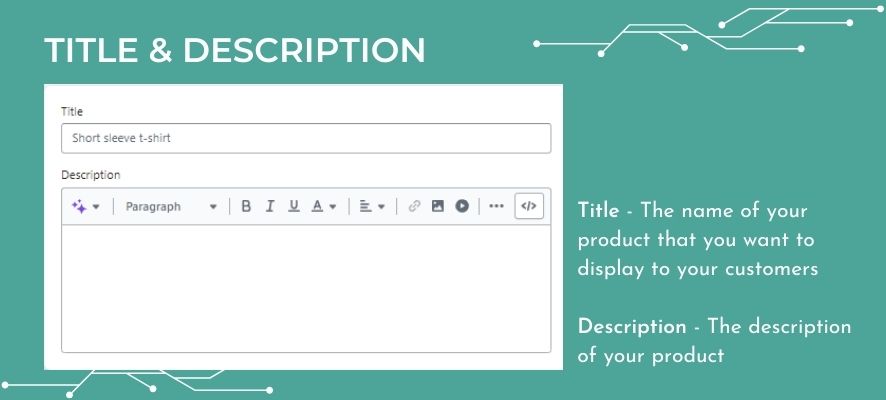
Title – The name of your product that you want to display to your customers
Description – The description of your product. To inform and persuade your potential customers, describe what you have to offer in great detail. If you’re a reseller, avoid using a manufacturer’s exact description because you want search engines to recognize your products as being unique
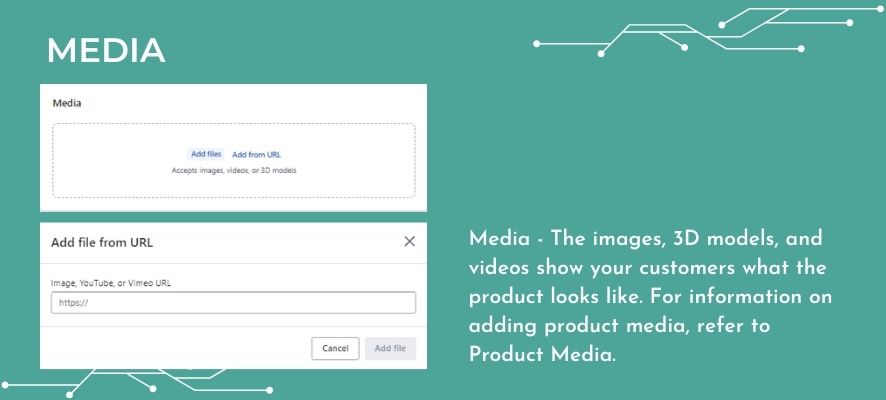
Media
Media – The images, 3D models, and videos show your customers what the product looks like. For information on adding product media, refer to Product Media.
You can add up to 250 images, 3D models, or videos to a product. The first media item for each product is known as the featured, or main, media item. The main media item is shown on the collection pages, the cart page, the checkout page, and your homepage.
On Desktop:
Start in Shopify Admin and go to Products. Then, click on a product to see its details page. Add an image, 3D model, or video in one of the following ways:
- Click Add and then select the file that you want to upload.
- Drag and drop the file that you want to upload onto the Media section.
- Click Add media from the URL, and then enter the image URL or video URL of the product hosted on YouTube or Vimeo.
On Mobile:
Step 1 – From the Shopify app, go to Products > All products
Step 2 – From the All products/Products screen, tap a product.
Step 3 – From the product details screen, under Media, tap +
Step 4 – Select one of the following options:
- Camera: Take a photo or video of the product in the ideal aspect ratio
- Embed video from URL: Add a video of the product hosted on YouTube or Vimeo
- Import from files app: Add an existing product file from another source
Step 5 – After you’ve selected the media, tap Done
Step 6 – Go back to the product details page and tap Save
Note: If you want to customize the way that product media are displayed in your online store, then you can use Metafields to create a file reference Metafield for your products. File reference meta fields support uploading images to display your products, or all other file types for your customers to download. You can display JPEG, PNG, WEBP, SVG, HEIC, or GIF images in meta fields on your online store. A meta field can contain only one file at a time.
Pricing
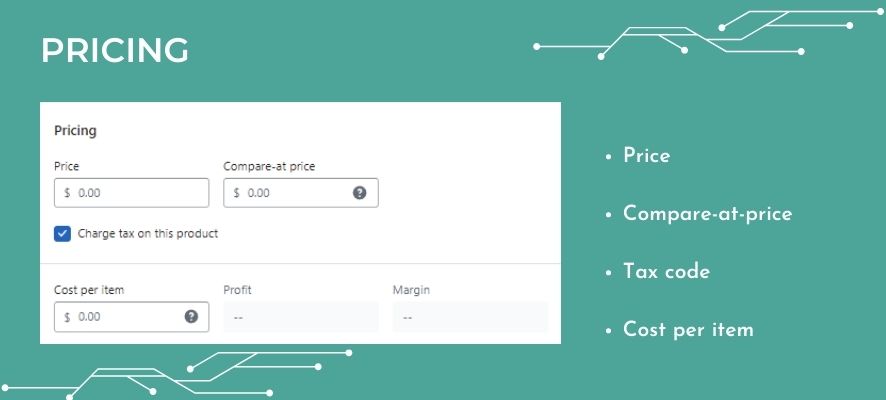
Price – The price that you’re charging for the product. You set the currency on the General Settings page. If you are selling in multiple currencies, then click Available in other currencies. Manage currencies to view your currency settings. Click Charge taxes on this product if the product is taxable.
Compare-at-price – The original price for a product that is on sale. When you enter a compare-at price, the product displays a sale price. To show a sale price in your online store, your product details need to include a sale price and the original price. When you put a product on sale for a lower price, your customers can see the original price and sale price at the same time, so they see the price comparison.
Tax code – For Shopify Plus plans, you can use a third-party tax service. If you use the service, then the tax code for the product is shown here.
Cost per item – This is the cost of your product or variant. It included fees that you paid the manufacturer, excluding taxes, shipping, or other costs. Entering the cost per item is optional. The cost per item doesn’t apply to gift card products.
The margin is calculated as ([price – cost] / price) x 100). For example, if your price is $50 and your cost is $30, then the margin (calculated as ([50 – 30] / 50) x 100) is 40%.
Inventory
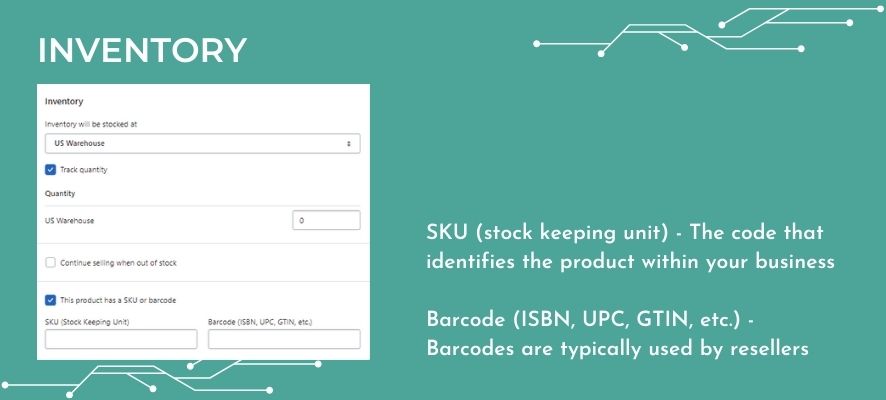
Inventory – The quantity of a particular product that is available for sale.
SKU (stock keeping unit) – The code that identifies the product within your business. For effective tracking and sales reporting, each SKU needs to be unique. SKUs are optional. You can create your own SKU format.
Barcode (ISBN, UPC, GTIN, etc.) – Barcodes are typically used by resellers. The identifier needs to be a new or existing Global Trade Item Number (GTIN). Some sales channels require a GTIN before a product can be published using the channel.
Inventory policy – The setting for inventory tracking.
Available – The number of units in stock. If you are managing your inventory across multiple locations, then the quantity is shown for each location.
Incoming – The number of incoming units.
Committed – The number of units that are part of an order but aren’t yet fulfilled. Inventory units that are part of draft orders aren’t counted as committed until the draft order becomes an order
Shipping
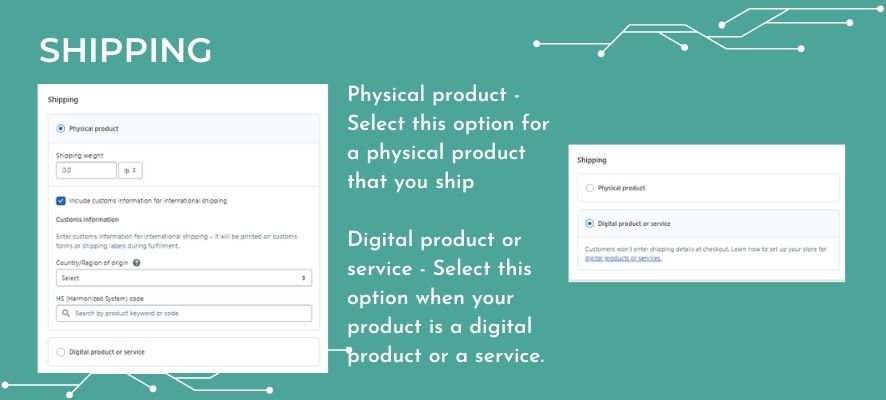
Physical product – Select this option for a physical product that you ship.
Ready-to-pack product dimensions (Early Access) – The product’s dimensions when it’s ready to be packed in the shipping package. This field only appears when a Physical product is selected.
Weight – The product’s actual weight. This field only appears when a Physical product is selected. Product weight needs to be exact because it’s used to calculate shipping rates.
Default package (Early Access) – The shipping package you use for single-item orders of the product. This field only appears when a Physical product is selected.
Include customs information for international shipping – checking this allows you to save information that is required when shipping products internationally. This field only appears when a Physical product is selected.
Country/Region of origin – The country where the product was manufactured or assembled.
HS code – If you want to ship the product internationally, then enter the harmonized system (HS) tariff code. These codes provide customs with information so that the correct tariffs can be applied to the order. You can find the HS code for your product by searching using a keyword in the HS code field of the product details page.
You can add the product’s country of origin as well as the harmonized system tariff code. This is used by Customs to ensure the correct tariffs are applied to international orders.
Digital product or service – Select this option when your product is a digital product or a service.
Variants
This section lists the available options for a product, which include variations such as color and size.
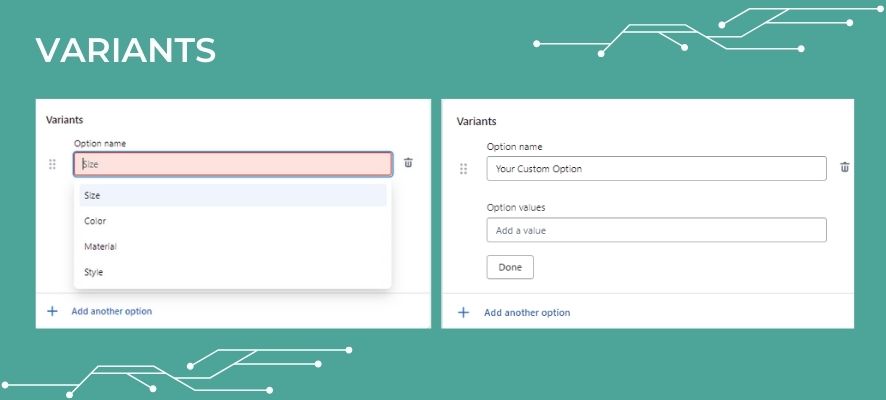
A product can have up to 100 versions created for it. There are a maximum of 3 options for each product. Options could differ from one product to another. One product could include style, color, and size, while another might use material, weight, and finish.
Add variants while creating a product:
Step 1 – In the Variants section of the Add product page, click + Add options like size or color
Step 2 – In Option name, enter a name for the option, for example, Size. Customers see this name
Step 3 – In Option values, enter each option value in a separate field, for example, Small, Medium, or Large. Customers see these option values when they choose a variant
Step 4 – If your variants differ in more than one way, then click + Add another option. You can have up to 3 options for each product
Step 5 – Optional: As you add the product options, a list of variants appears. Check the boxes next to any combination of options that you don’t sell and click Actions > Delete variant. You can also click Actions to edit prices, quantities, SKUs, barcodes, HS codes, country/region of origin, and locations for individual variants, or use the defaults based on the product details
Step 6 – Click Save
Step 7 – Optional: Add a different product image for each variant
Purchase options
Pre-orders, subscriptions, and try-before-you-buy options are only a few of the purchase options you can add to your products.
If a purchase option has been applied to a product or any of its variants, the relevant purchase option settings are displayed in the Purchase Options section of the product page.
You may set up both the buy option and the one-time purchase option, or you can decide to limit a product’s availability by turning off the purchase option.
There are three purchase options you can offer your customers: subscriptions, pre-orders, and try-before-you-buy (TBYB).
Subscriptions – sell products and charge your customers for them, regularly.
Pre-orders – customers can purchase or reserve items that aren’t ready for fulfillment yet, but that they will fulfill at a later date.
Try before you buy – customers can order items without paying right away. You fulfill TBYB orders like a regular order, but customers pay at a future specified date after they try out the product.
Search engine listing preview
A preview of your product’s appearance in search engine results. To edit the preview, click Edit.
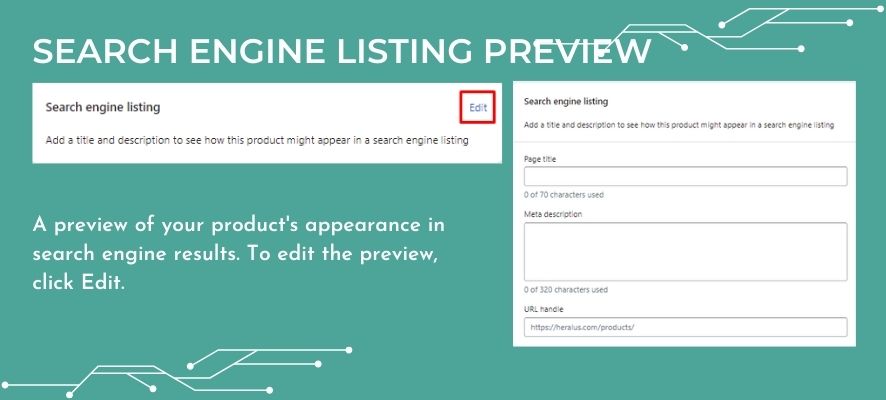
The product title, the item’s online store URL, and part of the description make up the preview. You can edit a search engine listing preview on the product’s details page:
Step 1 – In the Search engine listing preview section, click Edit website SEO.
Step 2 – In the Page title field, enter a descriptive title. This title will display as a link in search engine results. You can enter up to 55 characters in the title.
Step 3 – Enter a description for the search engine listing. Make sure to include relevant keywords to help new customers find your link, and to include your business name. You can enter up to 320 characters in the description.
Step 4 – In the URL and handle section, you can edit the web address. In most cases, you won’t need to make changes to the web address. If you do make changes, then make sure that you set up URL redirects from the old web address. The URL can’t contain any spaces. Handles are used in theme design.
Step 5 – Click Save.
Product status
Product status determines if a product is ready to be sold. The default setting for the product status for newly created products is Active. The default setting for the product status for duplicated and unarchived products is Draft.
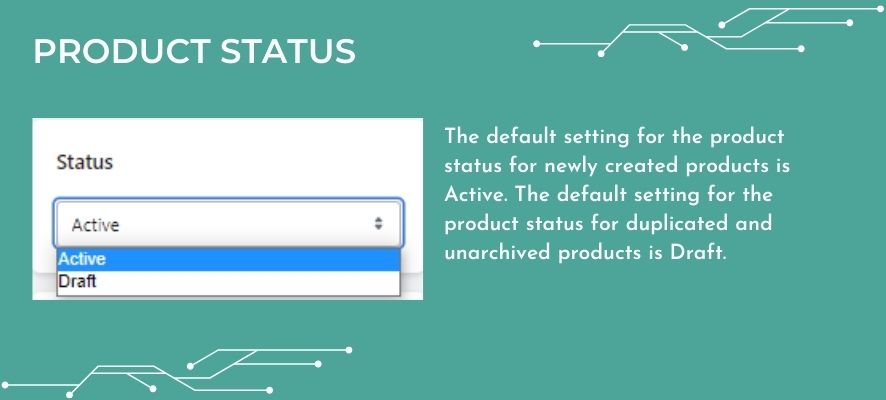
You can set the following statuses:
Active: The product details are complete and the product is ready to be sold.
Draft: The product details need to be completed before it can be sold.
Archived: the product details are complete, but the product is no longer for sale. Archiving a product hides it from your admin and any customers.
A list of your sales channels and markets is shown when you publish. For Shopify Plus merchants, this is where your B2B catalogues are listed as well. To include or exclude products from a sales channel or market, click Manage. The default selection includes every market and sales channel. You can’t include or exclude individual product variants.
Organization
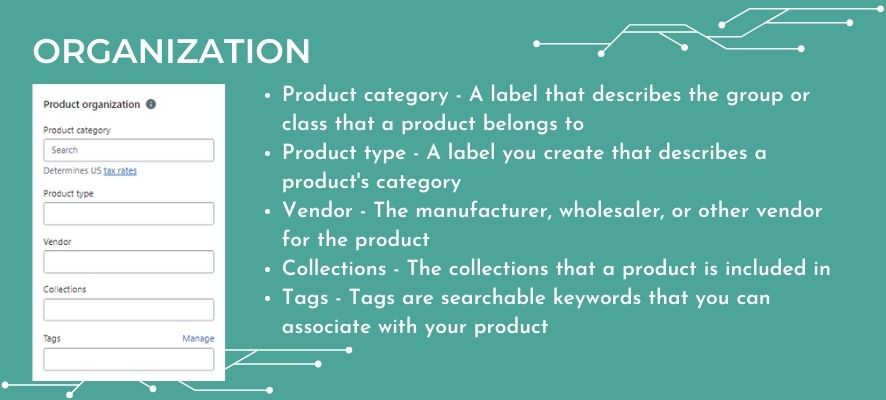
Product category – A label that describes the group or class that a product belongs to. The product category is selected from the Shopify Product Taxonomy, a predefined, standardized list.
The product category is used for determining the rate at which it is taxed in the US ( if using Shopify Tax), managing your products better within Shopify, and making it easier to sell products in other channels that require a standardized product type.
A product can only have one category that includes all of its variations. If it helps you choose a product category for the first time, a recommendation will be shown wherever it is possible. You can approve it or make changes. Product categories are optional.
Product type – A label you create that describes a product’s category. The product type enables the use of product categories that are not included in the list of created product categories. There can only be one custom product type per product.
Vendor – The manufacturer, wholesaler, or other vendor for the product.
Collections – The collections that a product is included in. You can use this field to add the product directly to a manual collection. Automated collections include the product when it matches the collection conditions.
Tags – Tags are searchable keywords that you can associate with your product. Tags can help customers find your product through your online store search, and you can also use them to create automated collections
Note: Tags aren’t used by search engines, so don’t use tags to try to improve search results for your online store.
In Conclusion
These are the basic elements you need to know and fill in while uploading a product on Shopify online store. Next, if you need more information about the tips for a better product page, read Tips For Listing Shopify Product Page On Your Online Store.

