

When you have many items to import into a Shopify store or when you switch to Shopify from another platform, using a CSV file (Comma-separated Values) to import products into your Shopify online store can be helpful. In this blog, we will explain clearly how to import products to Shopify’s online store faster with a CSV file.
What Is A CSV File?
Before we start importing a CSV file to a Shopify online store step-to-step, we need to know what a CSV file is.

A Comma Separated Values (CSV) file, a file format (.csv) for spreadsheets, is a plain text file that contains a list of data. These files are often used for exchanging data between different applications.
A CSV file allows you to quickly import and export a huge number of products and their details. You can use CSV files to import and export products, customers, inventory, orders (export only), and discounts (export only).
Each entry in a CSV file refers to a cell in a spreadsheet, each line to a new row, and each comma to the beginning and end of an entry. Shopify recommends that you use Google Sheets to work with your CSV files.
Note: There is a file size limit of 15 MB per file for items and supplies and 1MB per file for customer data when importing content using an a.csv file. You must import the data in batches if your.csv files are larger than these limits.
How To Import & Export CSV Files Into Google Sheets
When you export a CSV file from your Shopify admin, it opens as a .csv file in your computer’s native text editor. However, you can also use Google Sheets to edit the Shopify template.
You can download Shopify’s sample CSV templates for products and customers here.
Steps for importing a CSV file into Google Sheets:
Step 1 – Log in to your Google account.
Step 2 – On the Google Sheets page, click Blank in the Start a new spreadsheet section.
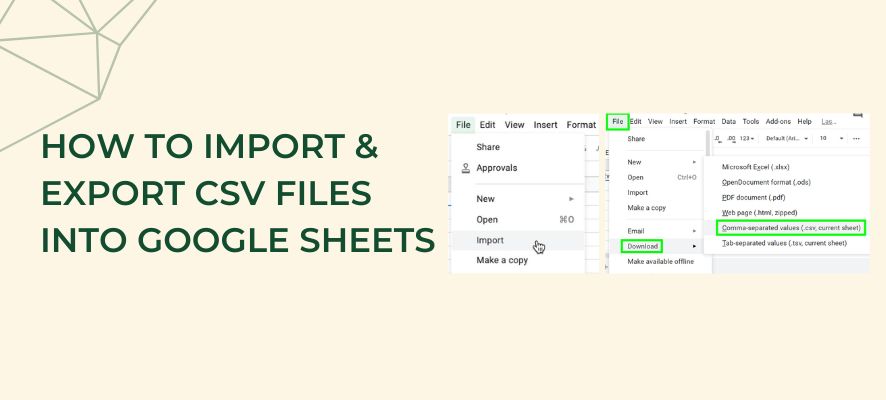
Step 3 – From the Untitled Spreadsheet page, go to File > Import
Step 4 – Locate and select the CSV file that you want to edit.
Step 5 – In the Import file dialogue, select your preferred options under the Import action, Separator character, and Convert text to numbers and dates sections.
Step 6 – Click Import.
From here, you can edit your CSV with Google Sheets. After you complete the editing, you can export as a (.csv) file.
From your CSV spreadsheet page, go to File > Download > Comma-separated Values (.csv, current sheet).
Columns In The CSV File That Contain Values
Column | Default value created when the column is blank |
Handle | This value is created based on the value in the Title column.
Handles have unique names for each product. They can contain letters, dashes, and numbers, but no spaces, accents, or other characters, including periods. Handles are used in the URL for each product.
For example, if the value in the Title column is Black Sunglasses, then the value in this column is black-sun-glasses. |
Title | The title of your product. |
Body (HTML) | The description of the product in HTML format. |
Vendor | The name of the store as you entered it when you created your Shopify account. For example, John’s Apparel or johns-apparel. This is the same store name that you use when you log in to Shopify. |
Product category | A label that describes the type of product and is used to calculate a product’s tax rate in the United States. This label must be taken from the predefined, standardised list of product categories.
You can input the standardised product category in either of the following ways: using the full path from the Shopify Product Taxonomy, for example Home & Garden > Linens & Bedding > Bedding > Bed Sheets using the numerical ID, for example, 371 |
Type | A label that describes the category of a product. This label doesn’t need to conform to any predefined format. |
Tags | A comma-separated list of tags used to tag the product. Most spreadsheet applications automatically add quotes around the tags for you. If you use a plain text editor, then you need to manually add the quotes. For example, “tag1, tag2, tag3”. |
Published | TRUE, which means that this product will be published and available in the online store sales channel, or FALSE if the product is not available on your online store. |
Option 1 Name | If a product has an option, then enter its name. For example, Color.
If a product has only one option, then this value should be Title. |
Option 1 Value | Caution: Changing the data in this column deletes existing variant ID values, and creates new variant IDs. Any change to variant ID values can break third-party dependencies on variant IDs.
If a product has an option, then enter its value. For example, black
If a product has only one option, then this value should be Default Title. |
Option 2 Name | If a product has a second option, then enter its name. |
Option 2 Value | If a product has a second option, then enter its value. |
Option 3 Name | If a product has a third option, then enter its name. |
Option 3 Value | If a product has a third option, then enter its value. |
Variant SKU | The SKU of the product or variant. This is used to track inventory with inventory tracking services. This field can’t be left blank if you’re using a custom fulfillment service . |
Variant Grams | The weight of the product or variant in grams. Don’t specify a unit of measurement or use decimals.
Shopify always imports and exports the weight in grams, even if you specify a different unit. You must use accurate weights if you intend to offer carrier-calculated shipping or use a third-party fulfillment service. |
Variant Inventory Tracker | Include your inventory tracking for this variant or product. Valid values include shopify, shipwire, amazon_marketplace_web, or blank if inventory isn’t tracked.
If the existing inventory tracking options are removed, then inventory is no longer tracked. |
Variant Inventory Quantity | The number of items you have in stock of this product or variant. This column is only used for Shopify stores that have a single location. Note: This column is only available for stores that have only one location.
If your store manages inventory at multiple locations, then this column isn’t included. If you want to import or export inventory quantities, then use the inventory CSV file. |
Variant Inventory Policy | Variants with a continuing inventory policy can be purchased after their inventory level reaches zero, allowing for negative inventory levels.
When the value is denied, it indicates that the product can’t be purchased after its inventory level reaches zero. |
Variant Fulfillment Service | The product or variant fulfillment service used. The following are the valid values for this column:
manual shipwire webgistix amazon_marketplace_web |
Variant Price | The price of the product or variant. Only include the price, and don’t include any currency symbols. For example, 9.99. |
Variant Compare-at Price | Compare-at Price The “Compare-at Price” of the product or variant. Only include the price, and don’t include any currency symbols. For example, 9.99. |
Variant Requires Shipping | TRUE
When the value is TRUE, it indicates that the product is a physical product. |
Variant Taxable | FALSE |
Variant Barcode | The barcode, ISBN, or UPC of the product. |
Image Src | Enter the URL for the product image. Shopify downloads the images during the import and re-uploads them into your store. These images aren’t variant-specific. The variant image column is where you specify variant images.
You can’t change the image file name after that image has been uploaded to your store. Don’t upload images that have _thumb, _small, or _medium suffixes in their names. |
Image Position | Enter the number that represents the order in which you want the image to appear on the product’s page. The images appear in order from smallest to largest, starting with an image position value of 1. For example, if you want the image to appear first for that product, then enter 1. |
Image Alt Text | Alt (alternate) text describes an image and is an important part of a product description. If an image can’t load for any reason, then alt text is shown instead. It’s also used by assistive technology to describe an image to a customer who’s visually impaired. Including alt text will boost your website’s SEO. Keep your alt text brief and descriptive. The maximum length is 512 characters, but the optimal length is 125 characters or fewer. |
Gift Card | Indicates whether the product is a gift card. Valid values are TRUE or FALSE. The addition of this column also allows you to edit other gift card details, such as the Body or Tags columns, and then import these changes. A gift card can only be created and activated in the Shopify admin. You can’t create a gift card through a product CSV file import. |
SEO Title | The SEO Title is found on a product’s details page under the Search engine listing preview header in the Page title field. The SEO Title is alphanumeric and can include up to 70 characters. If you leave this column blank when you import a product, then the value in the Title column is entered into the Page Title field on the product’s details page. |
SEO Description | The SEO description is also found on a product’s details page under the Search engine listing preview header in the Description. The SEO description is alphanumeric and can include up to 320 characters. If you leave this column blank when you import a product, then the value in the Body (HTML) column is entered into the Description field on the product’s details page. |
Variant Image | The URL for images of variants. If you add an URL, then it must be a functioning image URL. |
Variant Grams | The weight of items. If you want to leave it blank, use 0.0 |
Variant Weight Unit | Valid values are g, kg, lb, and oz. |
Cost per item | How much it costs you for the product or variant. Only include the cost. Don’t include any currency symbols. For example, 9.99. |
Price / International | If you sell internationally, then this is the price of the product or variant. Only include the price. Don’t include any currency symbols. For example, 9.99. |
Compare-at Price / International | If you sell internationally, then this is the “Compare-at Price” of the product or variant. Only include the price. Don’t include any currency symbols. For example, 9.99. |
Status | active: the product is active and ready to be sold
draft: the product is a draft and needs to be completed
archived: the product is archived and no longer available to sell
If this column is present, then it needs to have a value. If the column isn’t present, then the product status is automatically uploaded as active. |
Advanced: Things You Need To Remember When Editing
When you format your CSV file in a text editor, observe the following considerations:
- Column headers must be separated by commas (for example, First Name,Last Name,Email,Company, and Address 1).
- The list of tags must be wrapped in quotation marks (for example, “tag 1, tag 2, tag 3”).
- Tags are not case sensitive.
- Different records must be separated by line breaks.
If you need to edit the settings for a large number of products, then you might want to do a bulk update. For this, export the products that need to be updated as a .csv file, then edit the columns shown in the table:
Variant Requires Shipping | Set to TRUE if the variant is a tangible item. Otherwise, set it to FALSE or leave it blank. |
Variant Taxable | Set it to TRUE if the variant is taxable. Otherwise, set it to FALSE or leave it blank. |
Variant Grams | Enter a non-zero value if Variant Requires Shipping is set to TRUE. Leave blank or set to zero if Variant Requires Shipping is set to FALSE or is blank. |
When you’ve finished editing your .csv file, import it to your store. Be sure to check the option Replace any current products that have the same handle.
How To Import Products Using A CSV File On Shopify Online Store
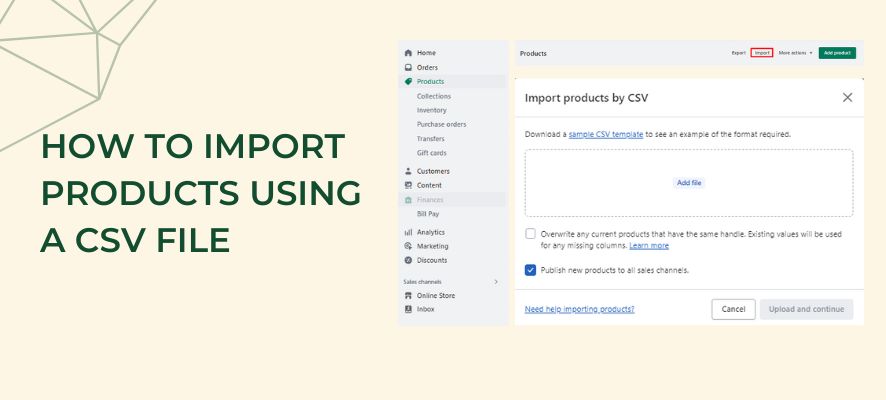
Step 1 – From your Shopify admin, go to Products.
Step 2 – Click Import.
Step 3 – Click Add File, and then select the CSV file that you want to import.
Step 4 – Optional: If you want to publish new products only to your online store instead of to all of your sales channels, then deselect Publish new products to all sales channels.
Step 5 – Optional: To change the URLs by overwriting the values for the existing handles, select Overwrite any current products that have the same handle. Existing values will be used for any missing columns.
Step 6 – Click Upload and Continue.
Step 7 – Review the details about the import, and then click Import products.
After your CSV file is uploaded, you receive a confirmation email from Shopify at the email address used to set up your Shopify store.
Tips: To avoid common problems when you upload your product CSV file, use the Google Chrome browser.
In Conclusion
In this blog post, we have found ways to import products on Shopify’s online store and sections that you need to focus on and fill in the CSV file. If you have any problems while importing a CSV file, you can check Solutions To Common Product CSV Import Problems.

