In the competitive world of e-commerce, trust is key. That’s why the “Shopify Trust Badge” has become an important tool for building customer trust and peace of mind. Here, we will learn the concept of a trust badge and how to add a Shopify trust badge to custom positions, helping you enhance credibility and boost conversions.
What is Trust Badge?

A Trust Badge is a small icon or image placed on a website to represent the trustworthiness, security, and safety of an online store. They are often placed in important places on the website, like the product page, shopping cart, or checkout page, to convince and reassure customers when making online transactions.
As online shopping doesn’t involve face-to-face interactions, people can only assess trustworthiness based on outward appearance or intuition. They lack direct interaction with storekeepers, which means they need some other kind of evidence to ensure safety, and this is exactly where trust badges come into play.
Trust badges often entail a connection to an external service that verifies the credibility of your store. Companies providing such services might charge a fee, but that’s a small price to pay for happy and trusting customers.
Why Trust Badges Matter

Trust badges are visual indicators that your online store is trustworthy. They communicate to customers that their personal and financial information is protected and that transactions are conducted in a secure environment.
Trust badges, when correctly placed, can help assuage concerns and encourage visitors to make a purchase. You may adapt their exposure to your particular design and layout by adding them to custom positions on your Shopify store.
7 Types Of Trust Badges
Trust badges are especially important for e-commerce sites that want customers to provide their credit card information. However, they are also relevant in other situations. Let’s look at some trust badges you’ll need!
- SSL Badges: SSL (Secure Sockets Layer) badges indicate that the website’s connection is secure and encrypted, protecting sensitive data such as credit card information and personal details.
- Security Certifications: Icons from security certification bodies like Norton, McAfee, and Trustpilot indicate that your site has been tested and adheres to high-security standards.
- Payment Security Badges: These are symbols from reputable payment providers such as Visa, Mastercard, and PayPal. They demonstrate the store’s ability to process payments safely and securely.
- Return and Refund Policies: These badges show the store’s commitment to refund policy or product warranty. This helps create trust and peace of mind for customers when shopping.
- Shipping and Delivery Badges: For online shopping, on-time and reliable delivery are very important. Badges from major delivery partners such as DHL, FedEx, and UPS will demonstrate the store’s ability to provide quality delivery service.
- Customer Reviews and Ratings: Displaying a positive or high rating icon from previous customers shows that the store has a history of good and reliable service.
- Guarantee Badges: These badges often highlight guarantees like “Money-Back Guarantee” or “Satisfaction Guaranteed,” providing customers with reassurance that their satisfaction is a top priority.
How To Add A Shopify Trust Badge To Your Product?
To add a Shopify Trust Badge to your product pages, you’ll need to edit your Shopify theme’s code. Here’s a step-by-step guide on how to do it:
Method 1: Manually edit the product page
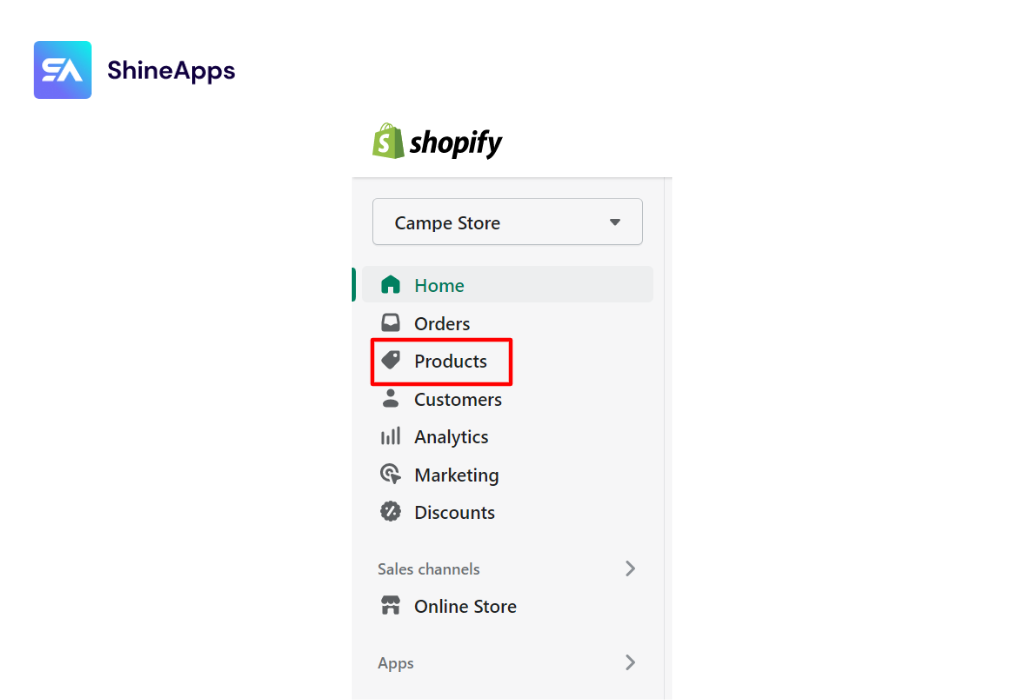
First, go to the Shopify dashboard, navigate to Products, and then select the product page where you wish to add the trust badge.
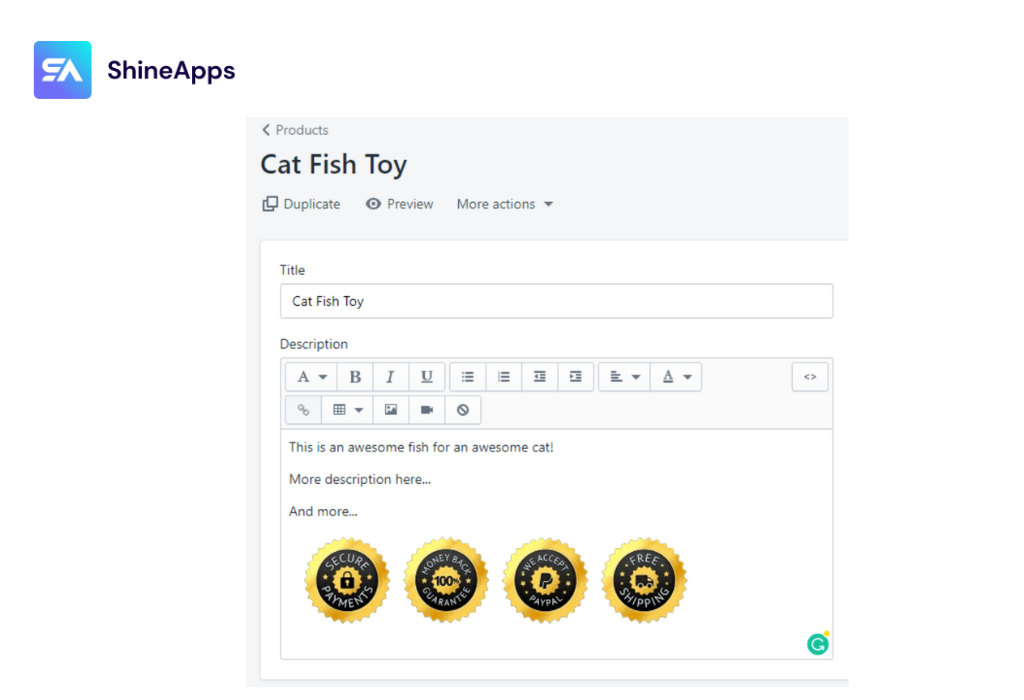
Simply add a trust badge image by clicking the tiny image icon on the product page.
Method 2: Use code
Perhaps your Shopify store contains 1,000 products. Do you want to add a trust badge to each product page separately? I am confident that the answer is NO.
If you want to add a trust badge to every product but don’t want to do it manually, this method may be appropriate. You must change the code on your product page in order for a trust badge to appear on every product.
Keep in mind that this method requires editing the theme’s code. As a result, before you do so, I recommend that you create a backup of your theme to avoid any unexpected complications.
Step 1: Access Theme Code: Go to your Shopify admin, navigate to “Online Store,” and click on “Themes.” Then, click “Actions” > “Edit Code” for your current theme.
Step 2: Locate the Product Template: Find the product template file (usually named “product.liquid” or similar) in the code editor.
Step 3. Insert HTML Code: Insert the HTML code for the trust badge in the desired position within the product template. This code is usually provided by the badge provider.
					“<div class="trust-badge">
    <img decoding="async" src="path-to-your-badge-image.png" alt="Trust Badge">
</div>”
Step 4: Style the Badge: Apply CSS styles to the badge if needed to control its appearance (size, position, etc.).
Step 5: Save and Publish: Save your changes and publish your theme for the badge to appear on your product pages.
Method 3: Using a Third-Party App (Recommended)
Using Shopify product label apps eliminates the need for manual coding, making it easy to add trust badges to your Shopify product pages. The apps offer a user-friendly interface and customization options to help you enhance your online store’s reputation and build trust with your customers.
Below is a guide on how to add Shopify badges with ShineTrust that you can refer to.
How to add a Trust Badge with ShineTrust?
Adding Shopify product badges using the ShineTrust app is a straightforward process. ShineTrust is designed to help you easily display trust badges on your product pages. Here’s how you can do it:
Step 1. Install the ShineTrust App:
- Log in to your Shopify admin.
- Go to the Shopify App Store and search for “ShineTrust” or Product Labels & Badges Shine.
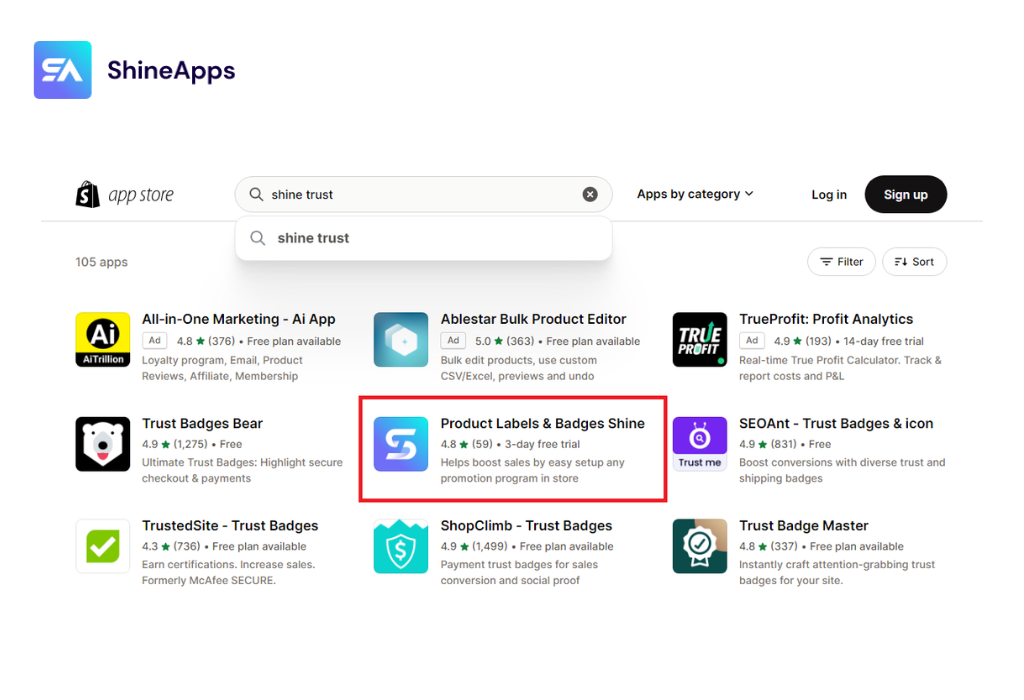
- You can also install the ShineTrust app here.
Step 2. Access the ShineTrust Dashboard:
- Once the app is installed, access the ShineTrust dashboard from your Shopify admin.
- Choose “App” and search for “Product Labels & Badges Shine”.
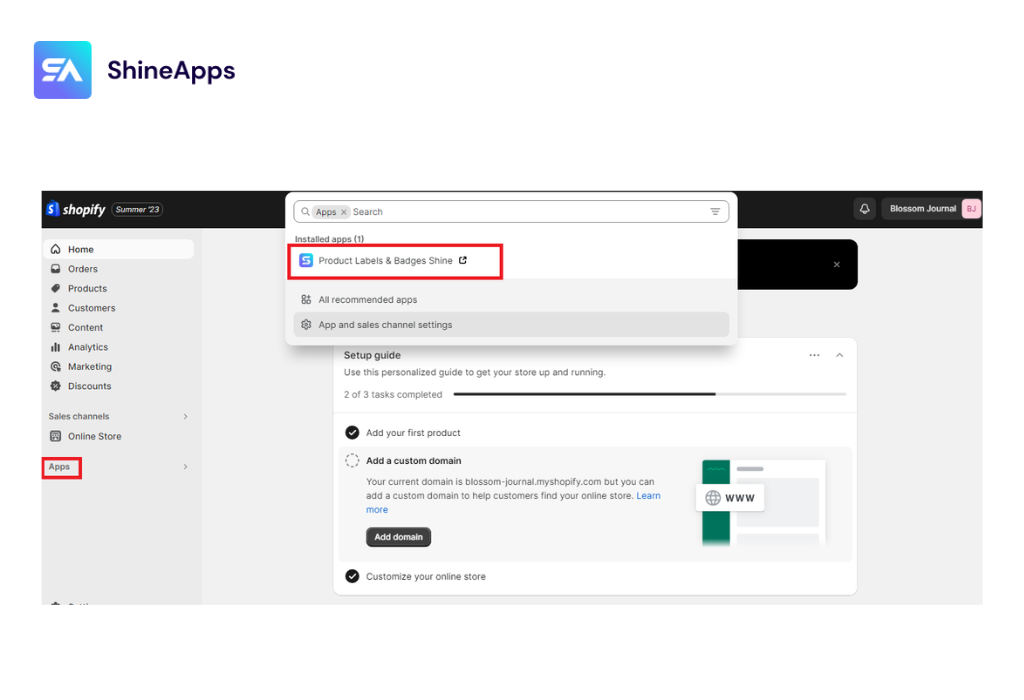
Step 3. Choose Badge Types:
You will then be directed to a screen like the one below:
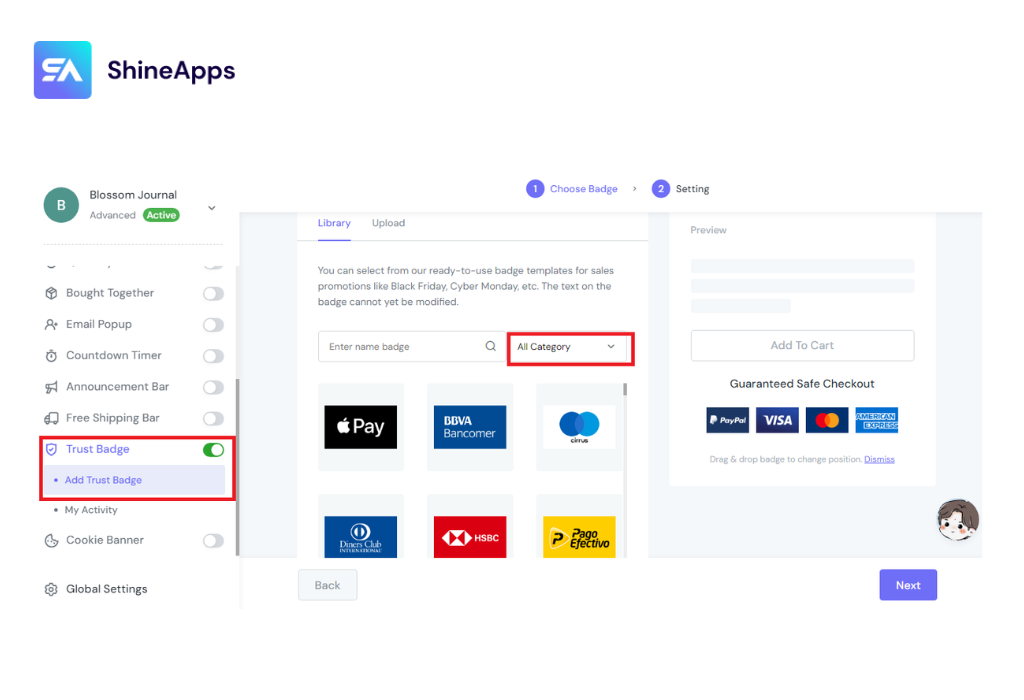
In the ShineTrust dashboard, select “Add Trust Badge” and “Add Trust Badge” > click “All Category” and select the types of trust badges you want to display on your product pages. These could include shipping, badges, payment badges, security badges, guarantees, and more.
Step 4. Customize Badge Styles:
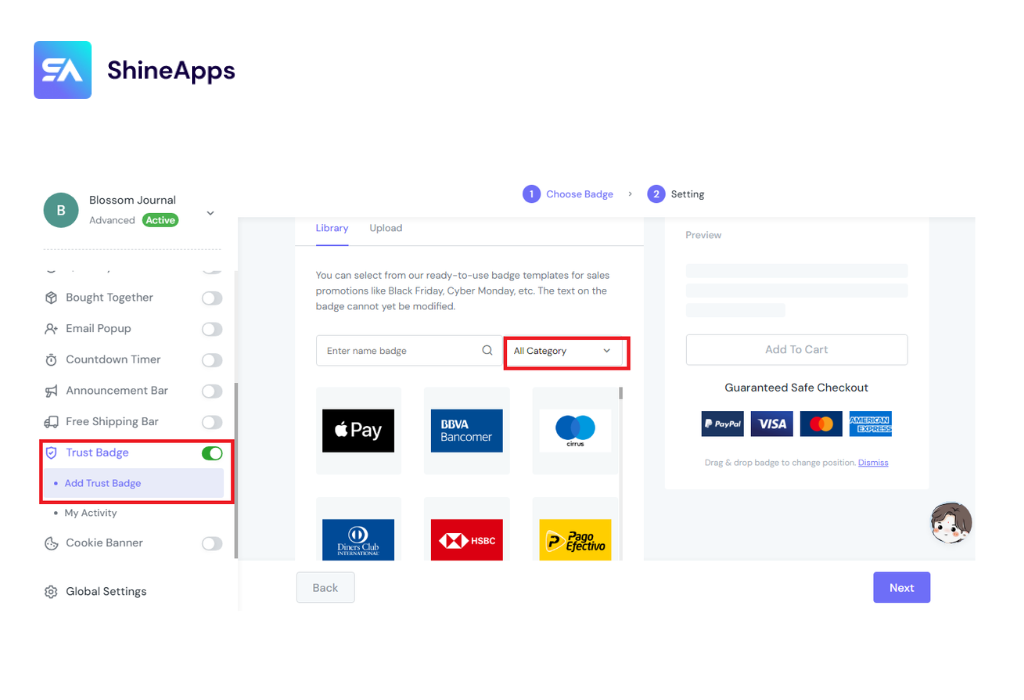
Customize the appearance of the badges to match your store’s branding. You can choose badge colors, sizes, and positions.
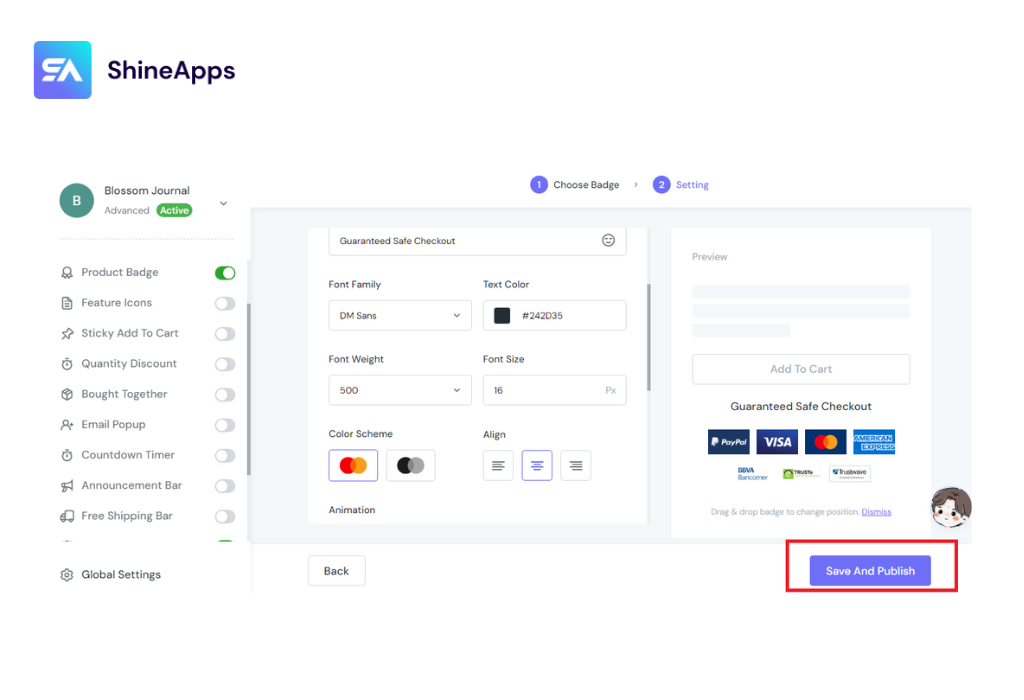
Step 5. Save And Publish
Once you’re satisfied with the badge settings, save your changes within the ShineTrust app and then publish them.
Step 6. Check Product Pages:
Visit your product pages to ensure that the ShineTrust trust badges are displaying correctly on the selected products.
How to add Shopify Trust Badge to custom Positions?
Adding a trust badge to a custom position on your Shopify store involves a few steps to ensure the badge appears where you want it. Here’s a general guide on how to do it:
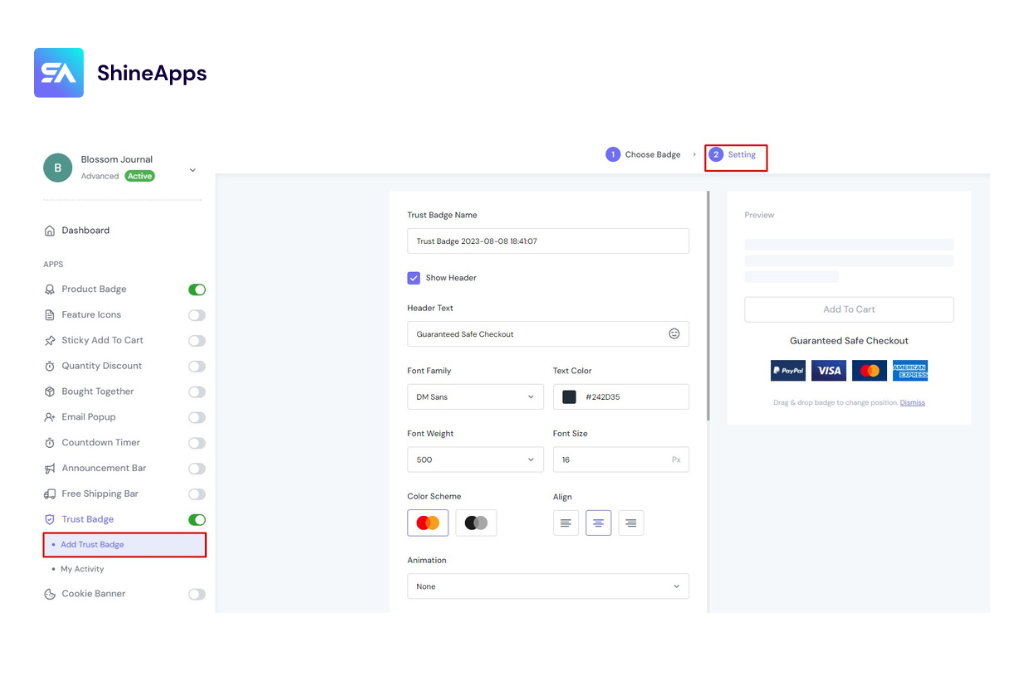
Step 1: Access ShineTrust dashboard > Select Add Trust Badge > then choose Setting.
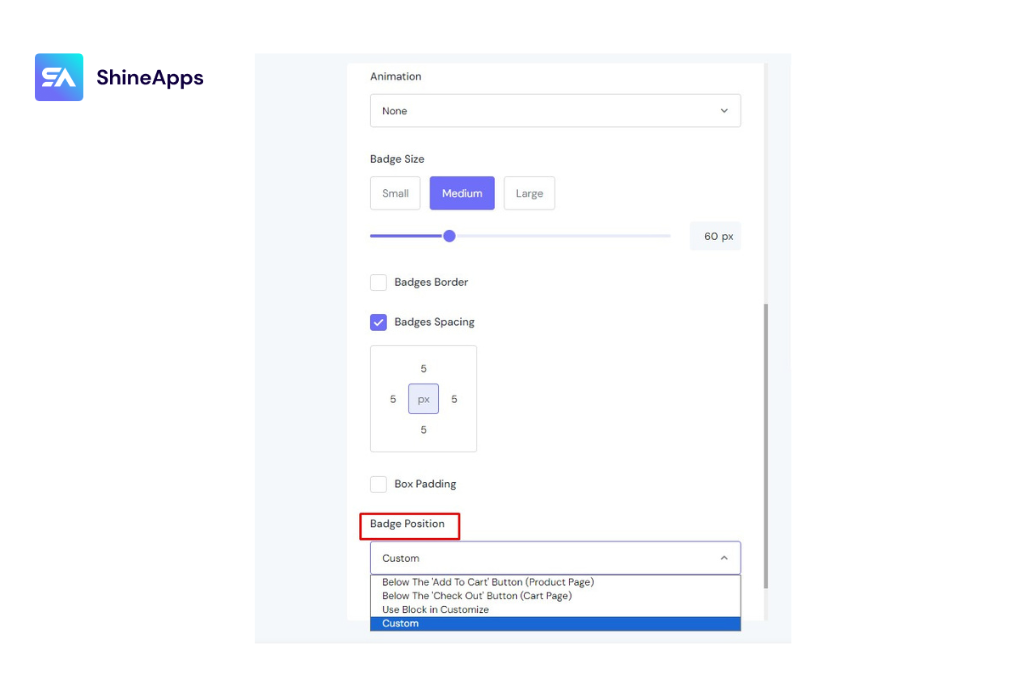
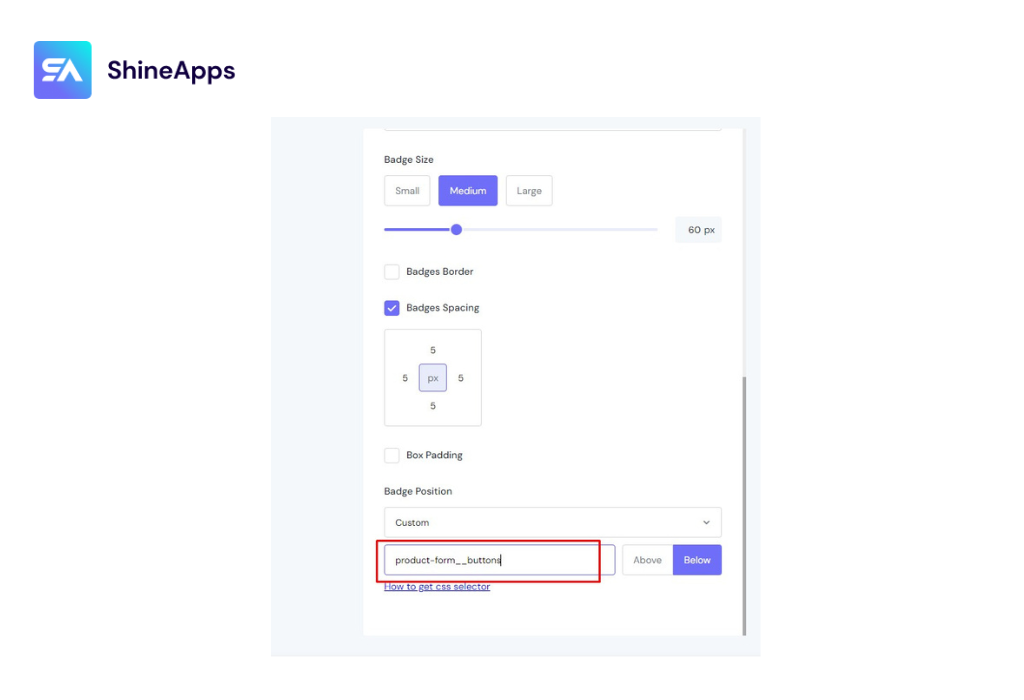
Step 2: Scroll down and click Badge Position > then select Custom.
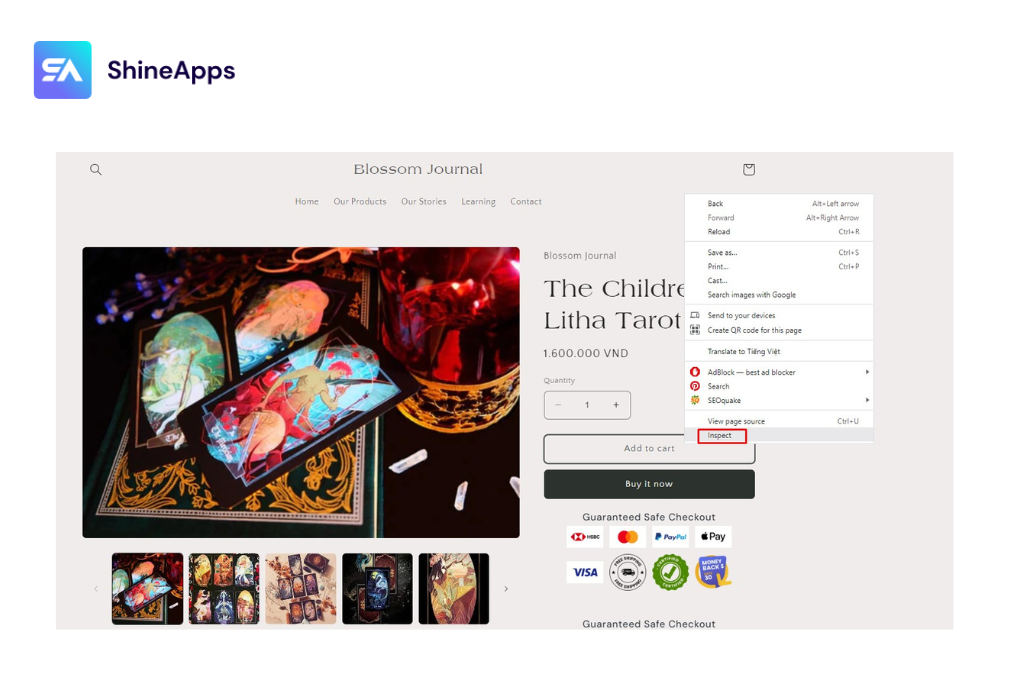
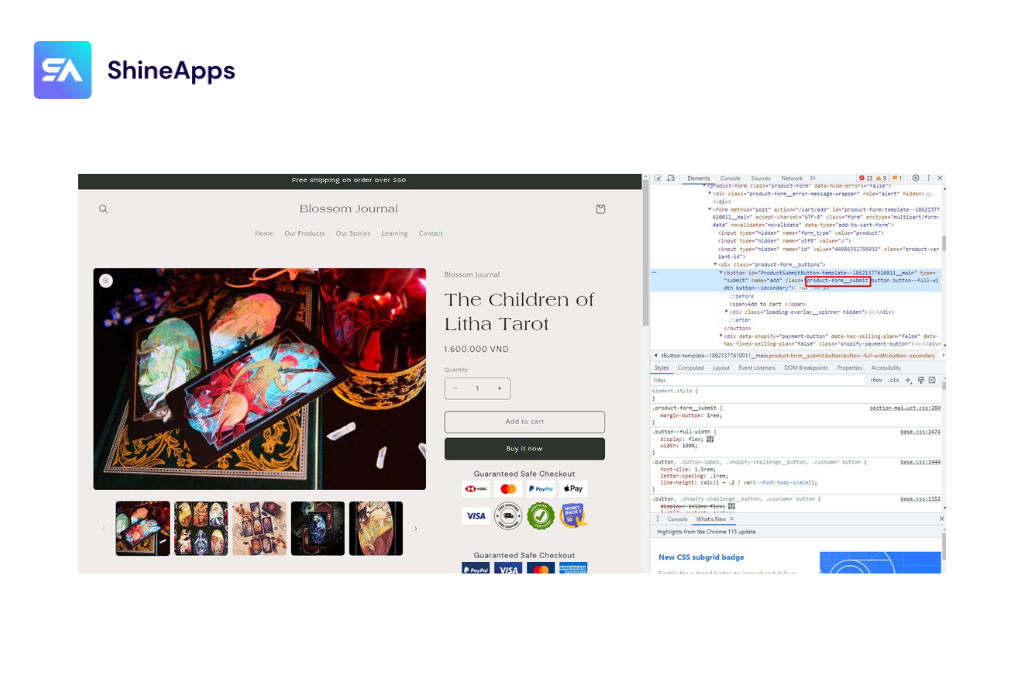
Step 3: Go to your store online and choose the product you want to custom badge position. Click Add to Cart > Right-click and select Inspect. You will then see the screen below.
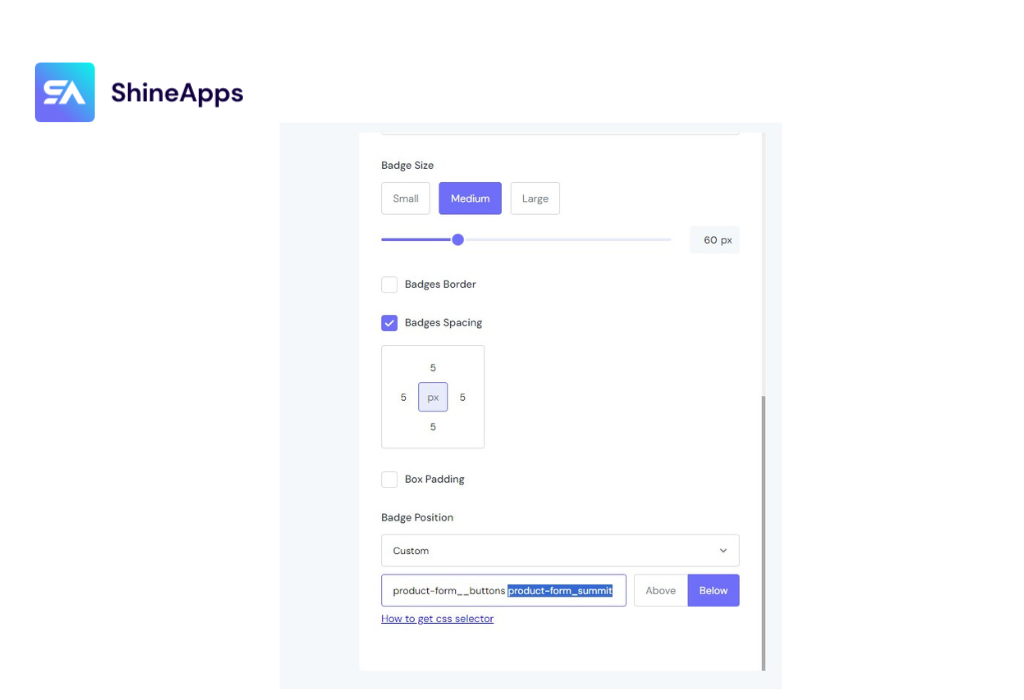
Step 4: Copy the code “product-form__buttons“. Go back to the ShineTrust dashboard and paste that code in.
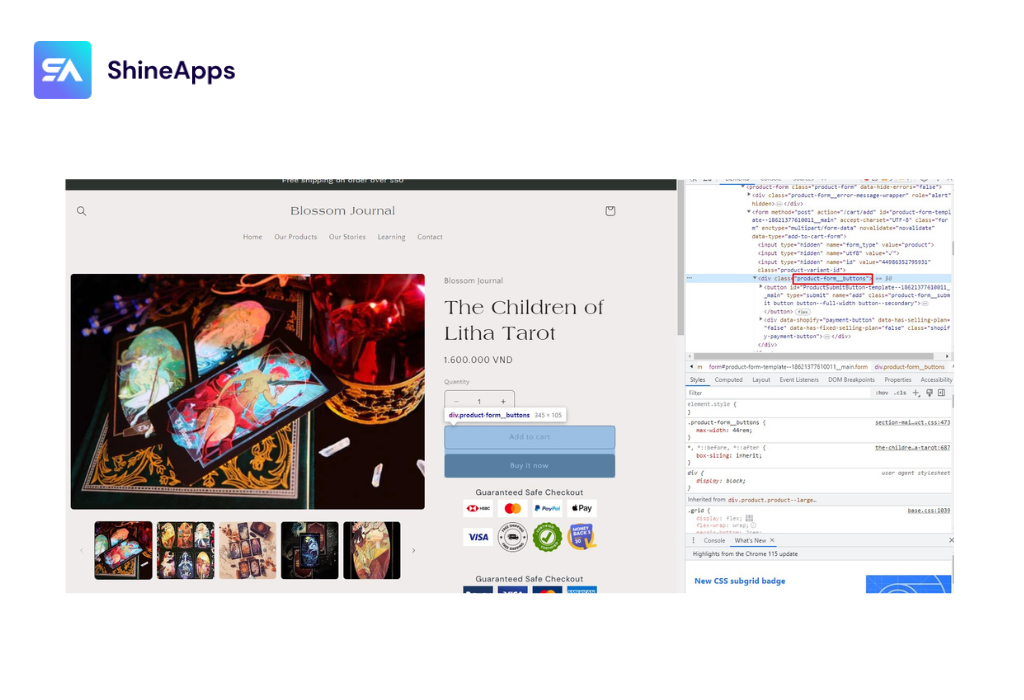
Step 5: Continue to copy the code “product-form_summit“, and paste it as instructed.
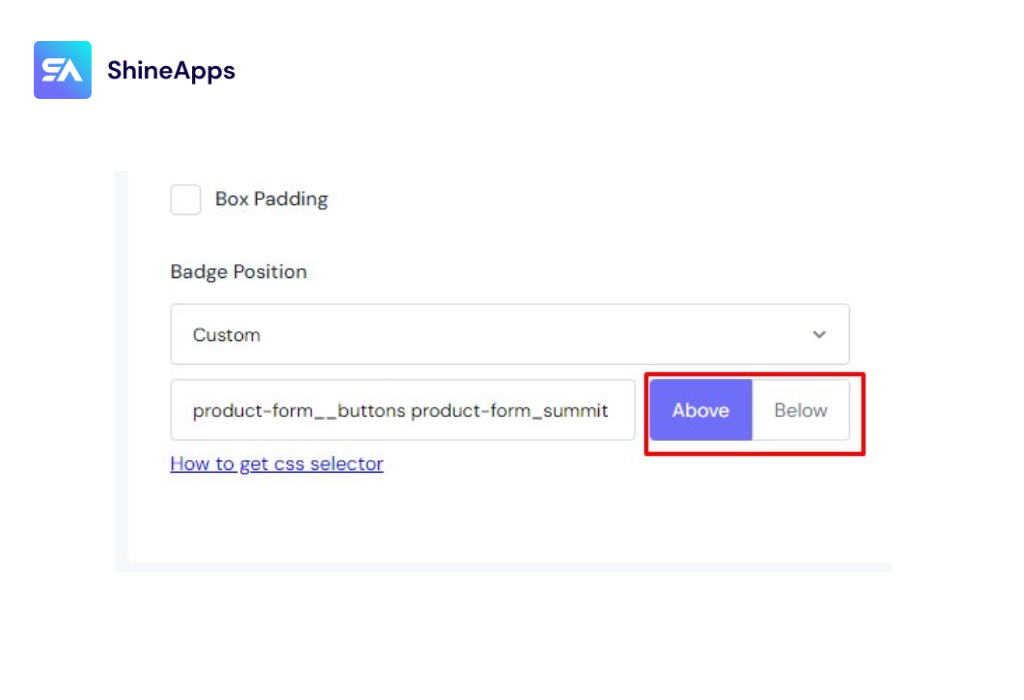
Step 6: Choose where you want the badge to appear above or below. Then click “Save“.
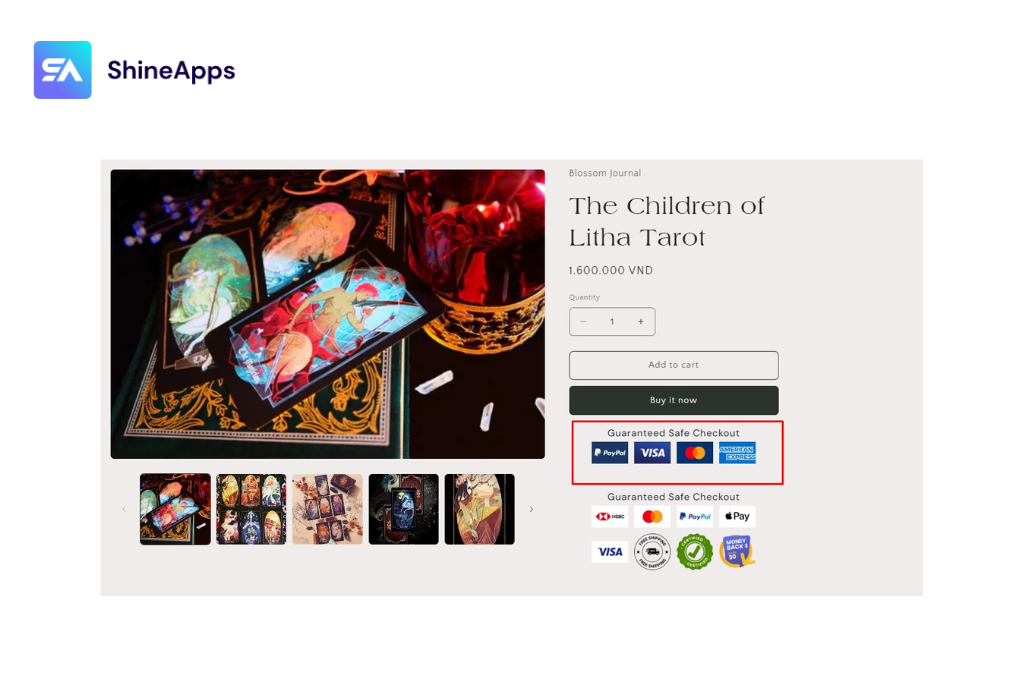
Step 7: Come back to your product pages to make sure that the ShineTrust trust badges are displaying correctly on the selected products.
Wrapping up
The Shopify Trust Badge is an important tool for building trust and driving sales in e-commerce. By leveraging these icons, you can demonstrate the reliability, security, and quality of your store, thereby creating peace of mind and driving business growth. Remember that tracking and optimizing badge placement and design can contribute to building a strong brand reputation in the competitive world of e-commerce.


