How To Mark A Product As “Sold Out” Using Shopify Product Badge Successful (2023)
By
Laelia
Marketing & Conversion
How To Mark A Product As “Sold Out” Using Shopify Product Badge Successful (2023)
By
Laelia
By using the product badge feature, customers might be attracted to your Shopify online store. Product badges can be used to notify customers of the availability of a product, for example, “Sold Out” or “Out Of Stock,” in addition to catching their attention on purchases. To find out how to mark a product using the product badge feature, read this guide.
What is a “Sold Out” Badge?
“Sold Out” or “Out of Stock” is a product badge that notifies the available inventory of products. Sometimes, it is also a way to imply that this is a hot product that is hard to buy and that customers have to wait until it restocks.
Three Ways To Add Product Badges To Products
The addition of product badges to your store is a good idea, but how do you put them on your products? You can add Shopify product badges, for example, “Sold Out” or “Out Of Stock,” to your store in three different ways.
Add Product Badges By Coding
You can customize the theme that comes with your Shopify store. You can make your product badges if you know how to code in Liquid, the coding language that Shopify uses for its themes. Since you must know how to produce code, it is the more difficult solution, but it is also the least expensive.
You may follow these steps to add product badges using a code to your Shopify store:
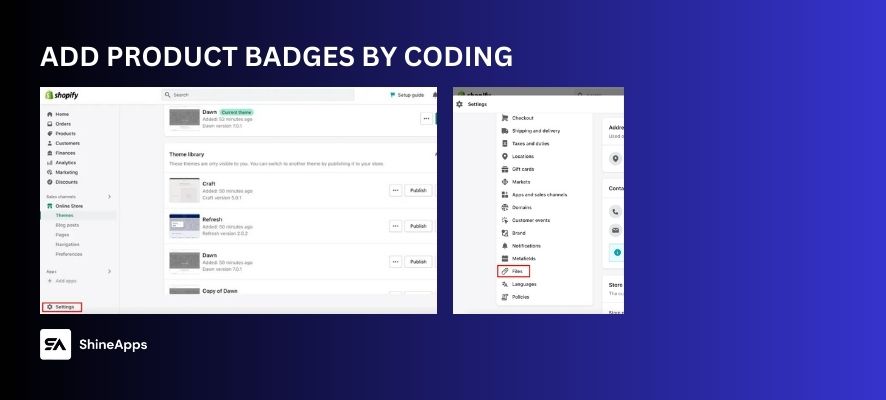
Step 1: Select Settings in the left corner of the screen.
Step 2: Click Files.
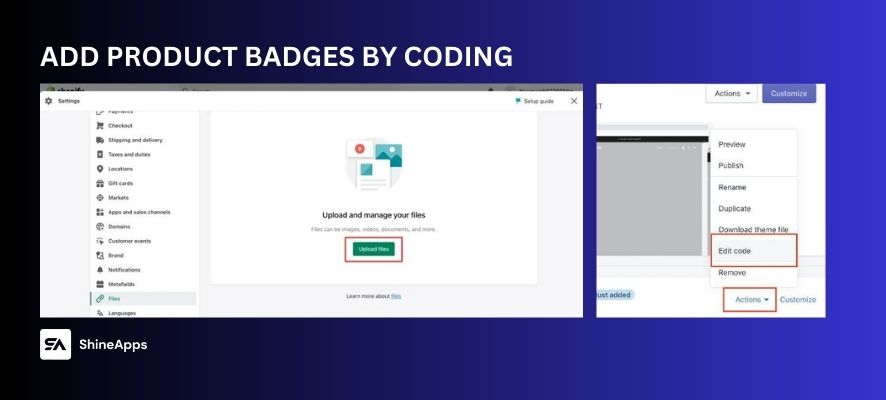
Step 3: You should then upload your badge image and copy the link shown later.
Step 4: Go back to Theme and click Edit Code as guided.
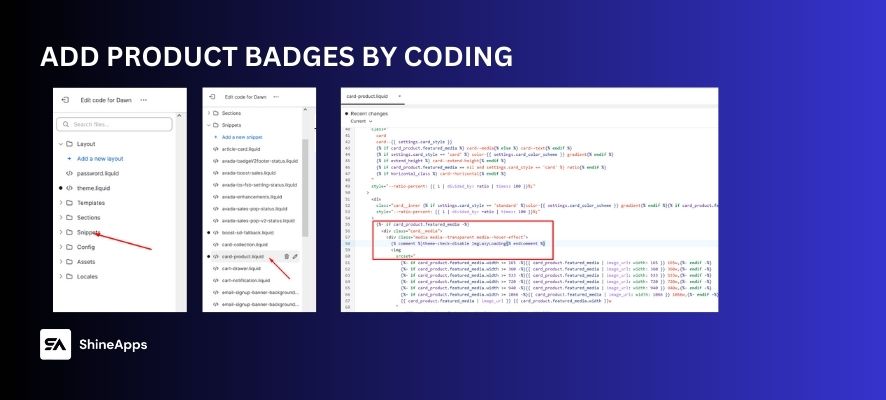
Step 5: Select Template in the pop-up interface and look for liquid.
Add the below code after ‘<div class=”card__media”>’.
					{%- if card_product.collections -%}
         <ul class="st-collections">
            {%- for collection in card_product.collections -%}
                <li class="st-collection-item">{{ collection.title }}</li>
            {%- endfor -%}
         </ul>
      {%- endif -%}
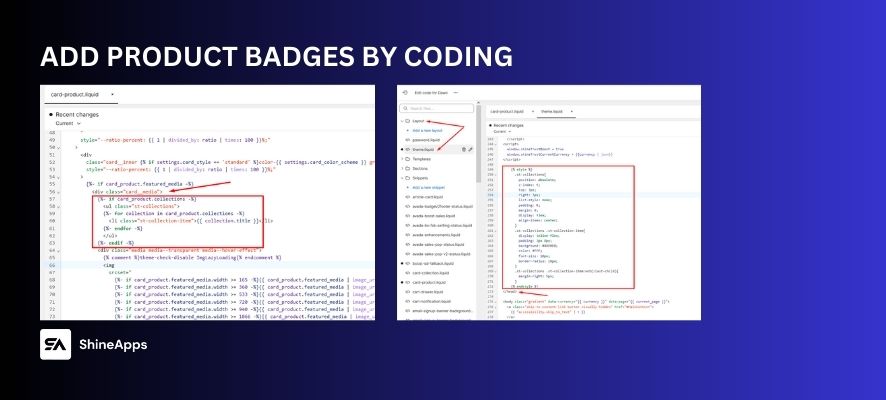
Open the file ‘theme.liquid’ by clicking Layout, then choosing theme.liquid and adding the below code text before the </head>.
Step 6: Copy the code to your uploaded badge and place it in any relevant location.
Step 7: Click Save.
Add Shopify Automatic Badges
If you use Shopify to sell items online, it’s important to understand how to show sold-out items on your website. This can help you manage your inventory and ensure that customers are notified when a product is out of stock. You can do this in many different ways, and we will discuss each one below.
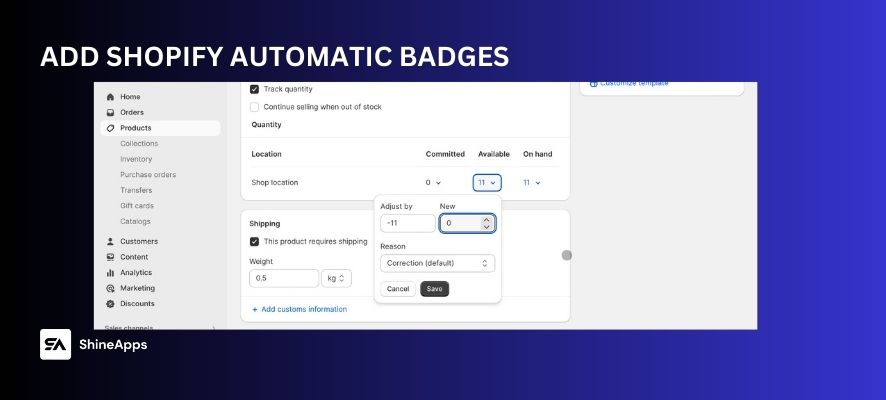
If you want to mark “Out Of Stock” or “Sold Out” for one product, you just need to click on the item you want to edit. Then, in the Inventory section, change the available number to zero in the New section. Click Save to finish.
In case you want to change multiple products, choose the Inventory section below the Products section. You can edit the number of products in three ways here:
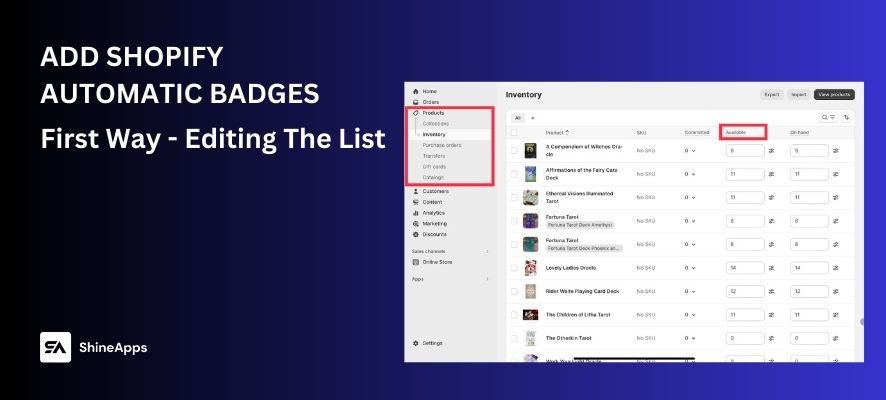
First Way - Editing The List
In the Inventory section of the dashboard, you can see the list of products that have been listed in your online store. On the Available column, you can change the current number of quantities to zero.
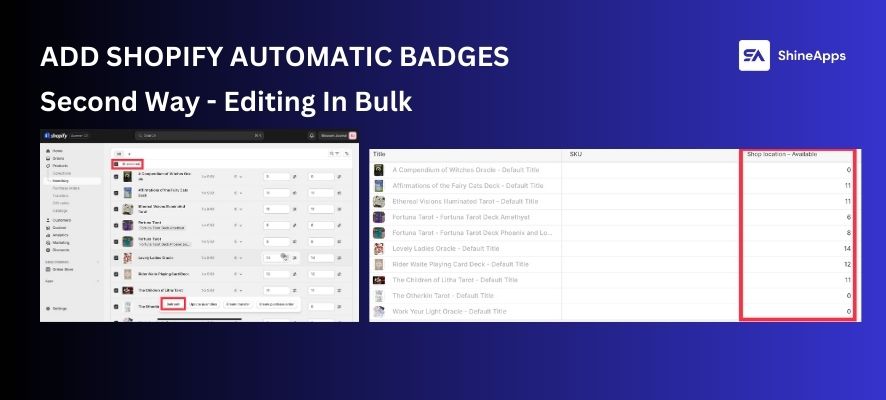
Second Way - Editing In Bulk
Start by choosing the products that you want to mark with “Sold Out” or “Out of Stock” product badges. You can choose some or all of the products by checking the boxes on the left side column.
Then choose Bulk Edit. After that, you will see a table that shows the available quantity of the product. Do the same as the first way to change the current number to zero.
Finally, click Save to save the variants, and click Back to go to Dashboard.
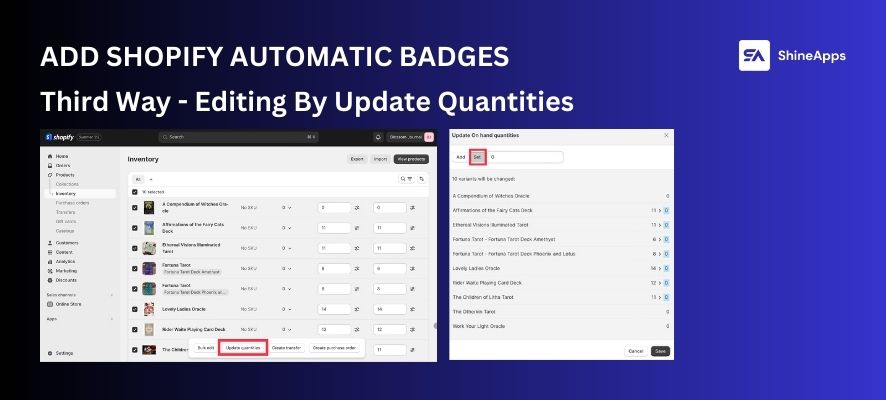
Third Way - Editing By Update Quantities
In our opinion, this is the fastest way to set the quality to zero. After choosing the products you want to mark as “Out of Stock” or “Sold Out” product badges, click on Update Quantities.
Click on the Set button, then type “0” in the section beside it. You can see in the preview below that all the quantity numbers will be transferred to zero.
Click Save to complete!
Tips For Faster
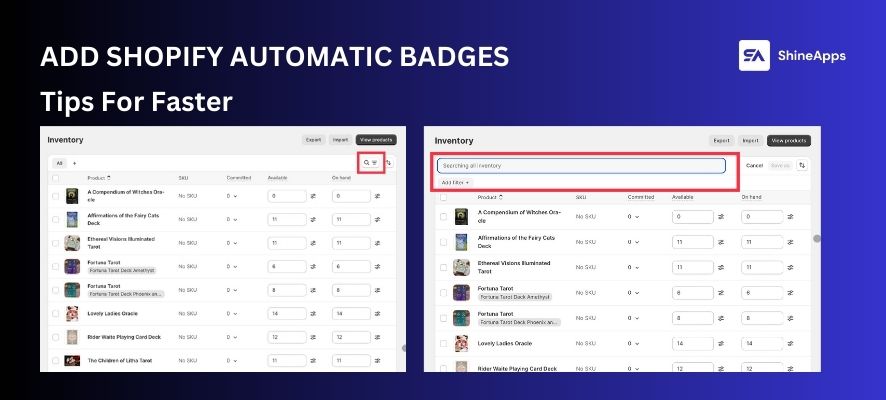
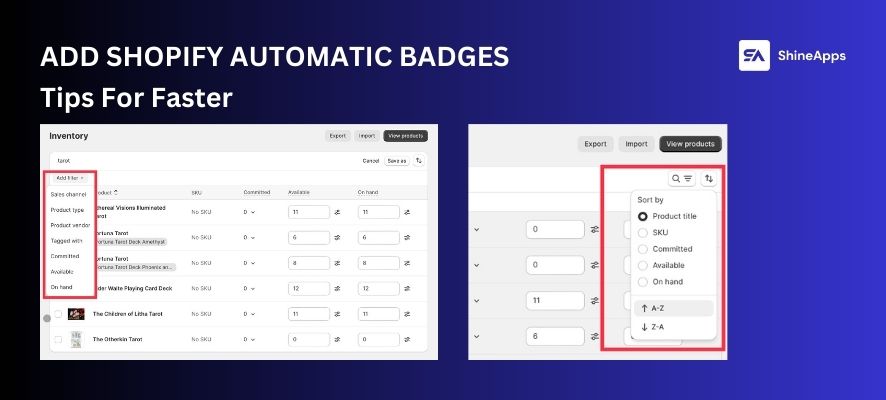
Despite scrolling to find products, you can search by the product name or SKU (if you have them in listings). Then, you can add filters for more specifics. Pick one or more products by checking the boxes in the left-side column.
Additionally, you can also use the Sort filter to find products by Product title, SKU, Committed, Available, on hand, from A to Z, or from Z to A.
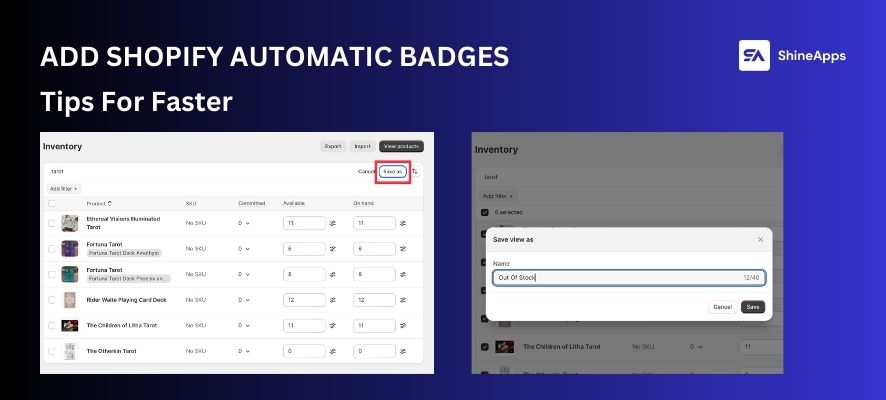
On the other hand, you can also name the collection of products you have chosen and edited by clicking on Save and then leaving the name you want. Remember that you only have 40 characters.
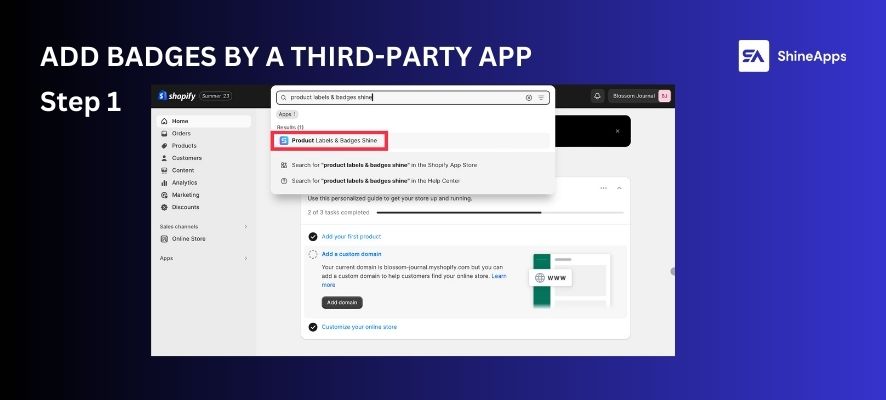
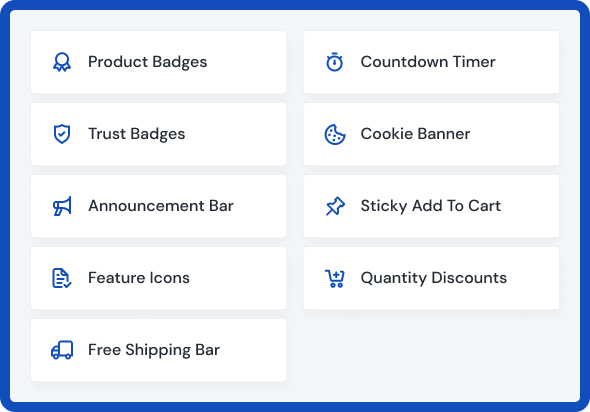
Add Badges By A Third-party App
There are multiple third-party apps to support you in adding product badges to your products. However, each app will have its own way to be used. In this guide blog post, we will use Product Labels & Badges Shine as an example.
Step 1 – Find and install the app Product Labels & Badges Shine to your online store.
Step 2 – Enter your store name or URL link of your store.
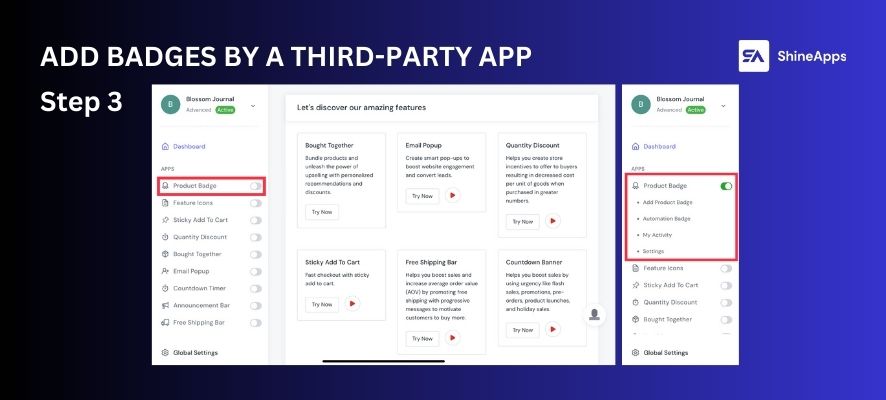
Step 3 – After going to the Dashboard, turn on the Product Badge.
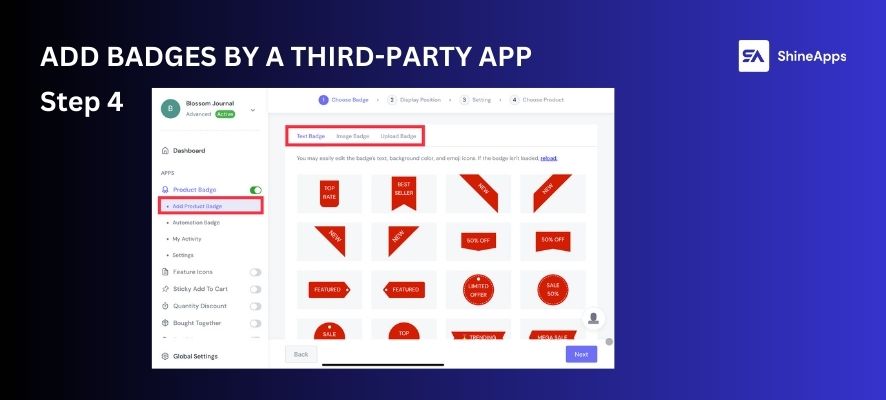
Step 4 – Then, click on the Product Badge, after that, choose Add Product Badge to start.
There are three types of badges: Text Badge, Image Badge, and Upload Badge.
Text Badge – Find and choose the pre-designed “Sold Out”.
Image Badges – Among multiple image choices, you can search “Sold Out” or “Out of Stock” on the search bar to find your favorite one.
Upload Badges– You can drag files from your folder into this section. In addition, click Browse to submit your badges. The supported file types are JPG, JPEG, PNG, SVG, and GIF.
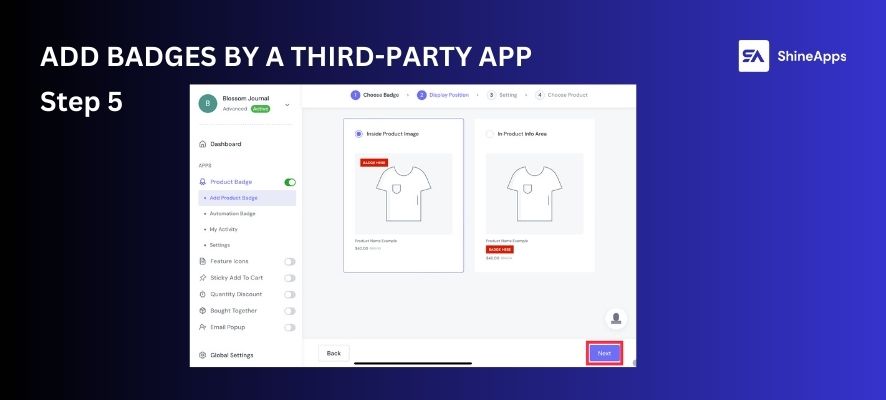
Step 5 – After choosing your favorite one, click Save to go to the Display Position choosing step. There are two positions you can choose from: Inside Product Image and In Product Info Area.
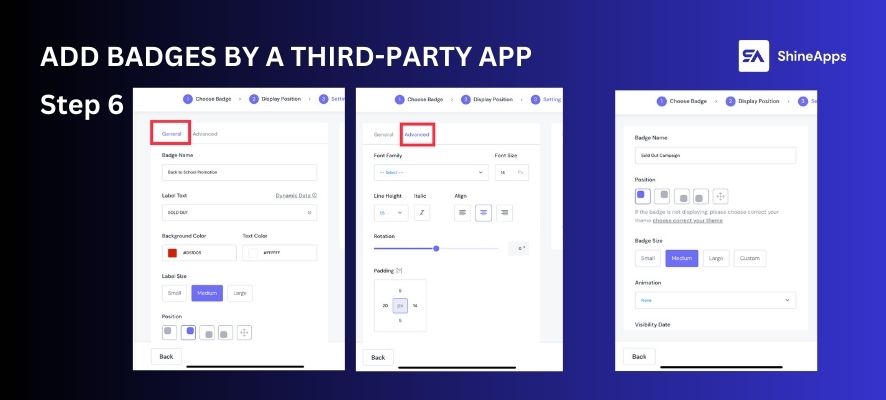
Step 6 – Now we are coming to the Setting step. In this step, you can customize your “Sold Out” or “Out of Stock” product badges based on your favorite style. This custom step can be quite different between Text Badge, Image Badge, and Upload Badge.
In this step, you can customize the following fields:
Badge Name
Position
Badge Size
Animation
Visibility Date
Show On Page
Note: Text Badge will have General and Advanced Setting, while Image Badge and Upload Badge don’t.
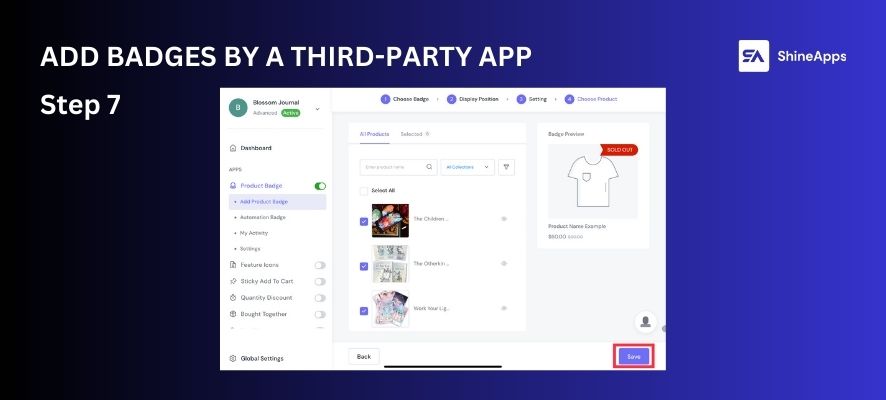
Step 7 – Click Save to go to the Choose Product step. Now, you can choose the product you want to mark as “Sold Out” or “Out of Stock”. Then, click Save to finish.
In this section, you can use the search bar to search for products by name or SKU.
Otherwise, using filters by collections is a good choice to save time.
Define to select all the products or tick the checkbox of each individually.
Note: You can check and edit the product badge in My Activity.
On the other hand, in case you can’t imagine these steps, check out the video guide.
Based on your coding skill or personalized purpose, you can choose one of three ways to apply a “Sold Out” or “Out of Stock” product badge to your Shopify online store.