With a Shopify countdown timer, you can show customers how much time they have left to take advantage of a limited-time offer. This can help to encourage them to buy now rather than wait.
What is Shopify Countdown Timer?

Shopify countdown timer is a simple tool that displays the amount of time remaining until a specific event, such as the end of a sale or the launch of a new product. When customers see a countdown timer, they are reminded of the limited time to take advantage of a particular offer. This can create a sense of urgency and scarcity, leading to more sales.
- Increase sales during sales and promotions.
- Boost conversions on product pages.
- Drive traffic to your store.
- Upsell and cross-sell products.
How to show a countdown timer on the product title?

Using code
- Specify a valid end date.
- Calculate the time remaining.
- Convert the time into a format that can be easily utilized.
- Produce an object that stores clock information for later use.
- Exhibit the clock on the page and cease its movement once it hits zero.
Here is an example code for a Shopify countdown timer with CSS using JavaScript:
<!DOCTYPE html><html>
<head>
<!– Add style/CSS –>
<style>
body {
text-align: center;
background: #00ecb9;
font-family: sans-serif;
font-weight: 100;
}
/* Styling for heading */
h1 {
color: #396;
font-weight: 100;
font-size: 40px;
margin: 40px 0px 20px;
}
#clockdiv {
font-family: sans-serif;
color: #fff;
display: inline-block;
font-weight: 100;
text-align: center;
font-size: 30px;
}
#clockdiv > div {
padding: 10px;
border-radius: 3px;
background: #00bf96;
display: inline-block;
}
#clockdiv div > span {
padding: 15px;
border-radius: 3px;
background: #00816a;
display: inline-block;
}
/* Style for visible text */
.smalltext {
padding-top: 5px;
font-size: 16px;
}
</style>
</head>
<body>
<!– Title or heading –>
<h1>Countdown Clock</h1>
<div id=”clockdiv”>
<div>
<!– Show No. of days –>
<span class=”days” id=”day”></span>
<div class=”smalltext”>Days</div>
</div>
<div>
<!– Show no.of hours –>
<span class=”hours” id=”hour”></span>
<div class=”smalltext”>Hours</div>
</div>
<div>
<!– Show no. of minutes –>
<span class=”minutes” id=”minute”></span>
<div class=”smalltext”>Minutes</div>
</div>
<div>
<!– Show seconds –>
<span class=”seconds” id=”second”></span>
<div class=”smalltext”>Seconds</div>
</div>
</div>
<p id=”demo”></p>
<!– Adding JavaScript code –>
<script>
// Getting formated date from date string
let deadline = new Date(
“dec 31, 2023 15:37:25”
).getTime();
// Calling defined function at certain interval
let x = setInterval(function () {
// Getting current date and time in required format
let now = new Date().getTime();
// Calculating difference
let t = deadline – now;
// Getting values of days,hours,minutes, seconds
let days = Math.floor(
t / (1000 * 60 * 60 * 24)
);
let hours = Math.floor(
(t % (1000 * 60 * 60 * 24)) /
(1000 * 60 * 60)
);
let minutes = Math.floor(
(t % (1000 * 60 * 60)) / (1000 * 60)
);
let seconds = Math.floor(
(t % (1000 * 60)) / 1000
);
// Show the output time
document.getElementById(“day”)
.innerHTML = days;
document.getElementById(“hour”)
.innerHTML = hours;
document.getElementById(“minute”)
.innerHTML = minutes;
document.getElementById(“second”)
.innerHTML = seconds;
// Show overtime output
if (t < 0) {
clearInterval(x);
document.getElementById(
“demo”
).innerHTML = “TIME UP”;
document.getElementById(
“day”
).innerHTML = “0”;
document.getElementById(
“hour”
).innerHTML = “0”;
document.getElementById(
“minute”
).innerHTML = “0”;
document.getElementById(
“second”
).innerHTML = “0”;
}
}, 1000);
</script>
</body>
</html> And this will be the output:

When time’s up, it will be like this:

Using app (ShineTrust)
Another way to show a countdown timer on your product title is to use ShineTrust app. ShineTrust is a powerful app that allows you to create and customize countdown timers for your Shopify store in minutes. With ShineTrust, you can choose from different countdown timer types, styles, and positions and set up various rules and triggers to display them to your customers. You can also track and analyze the performance of your countdown timers and optimize them for conversions and sales.
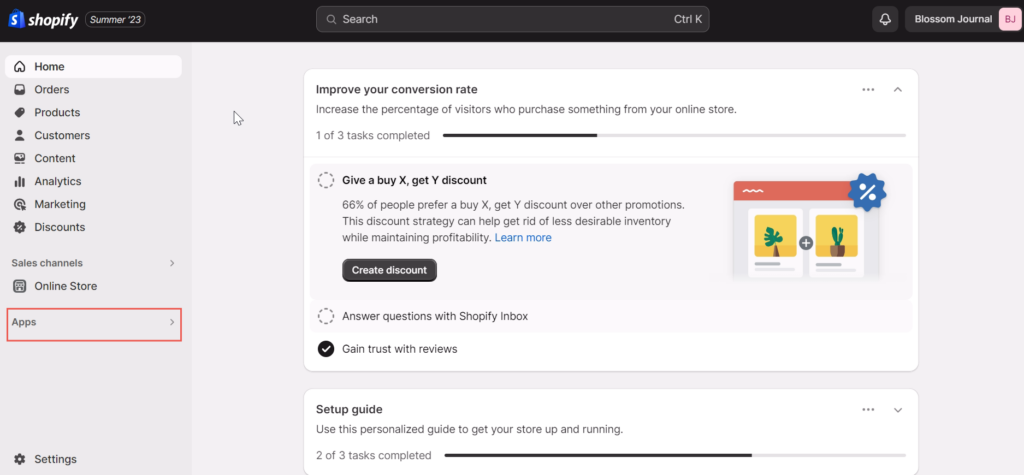
Step 1: Go to the Apps page in your Shopify admin.
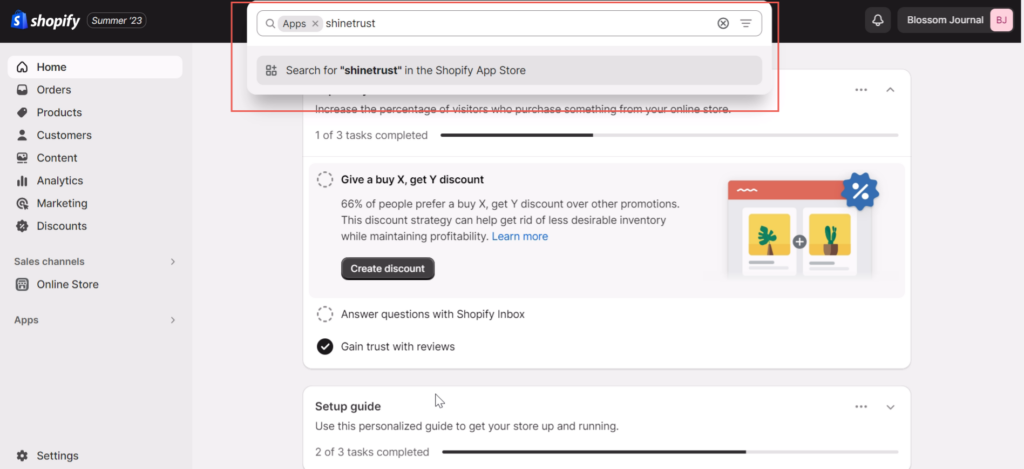
Step 2: Search for the “ShineTrust” app and install it for your store.
Step 3: Input your Shopify shop link and connect it to ShineTrust app.

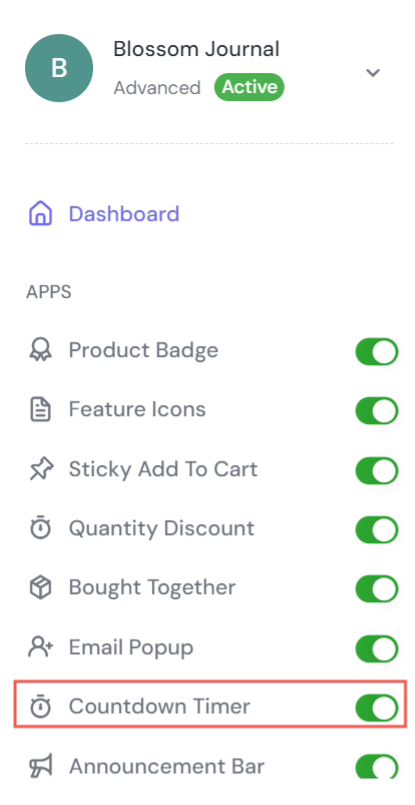
Step 4: After going to the Dashboard, turn on the ‘Countdown Timer’.
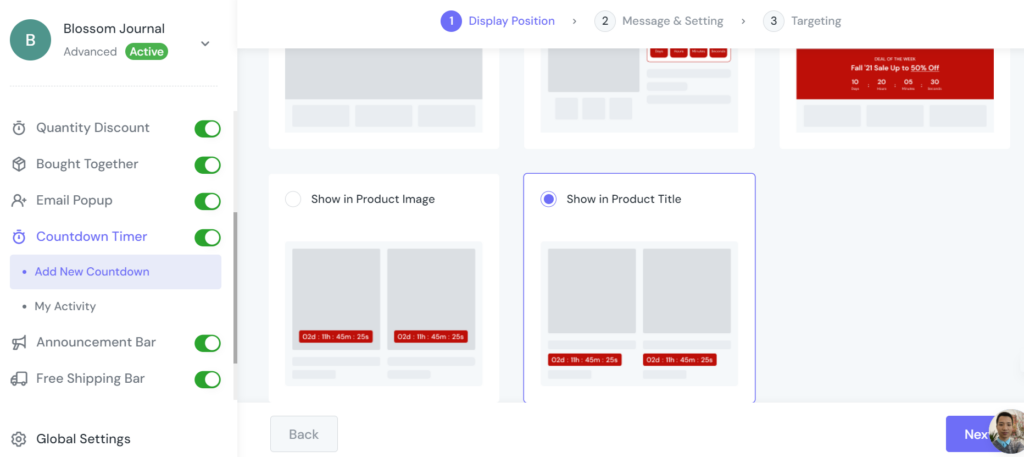
Step 5: Click ‘Add New Countdown’ on the left-side panel and choose ‘Show in Product title. Then click ‘Next’.
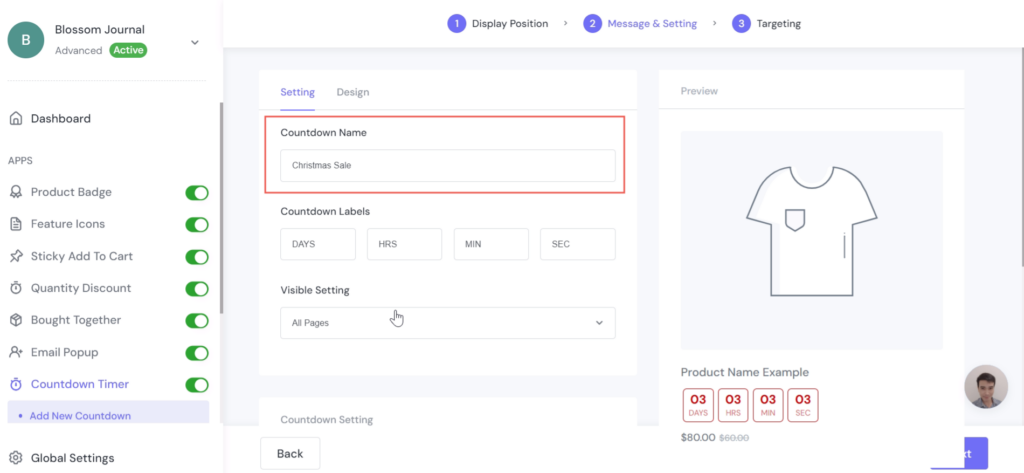
Step 6: In this example, I’ll create a timer for my Christmas campaign. So the countdown name is ‘Christmas Sale’.
In the ‘End time’, input the 26 Dec 23 – the day when Christmas is over. I keep other settings as default since it already meets my needs.
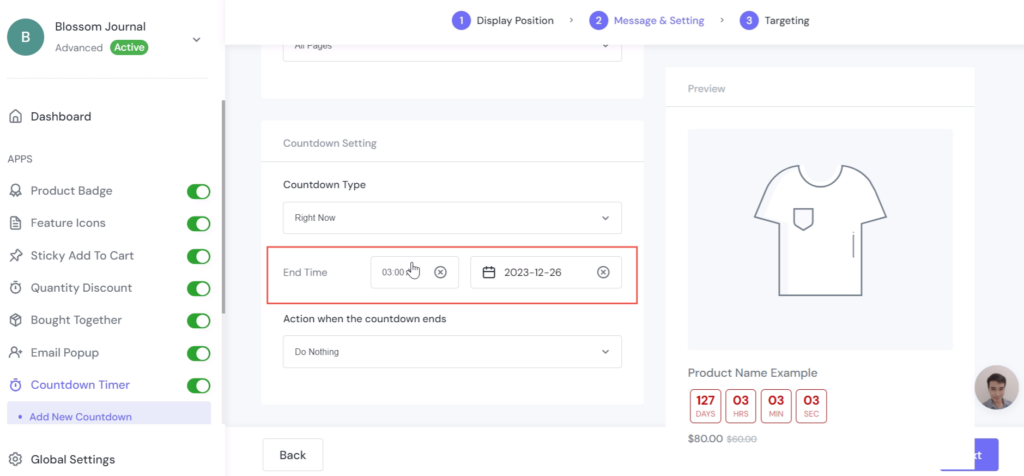
After that, click the purple button ‘Next’ in the bottom right corner of the page.
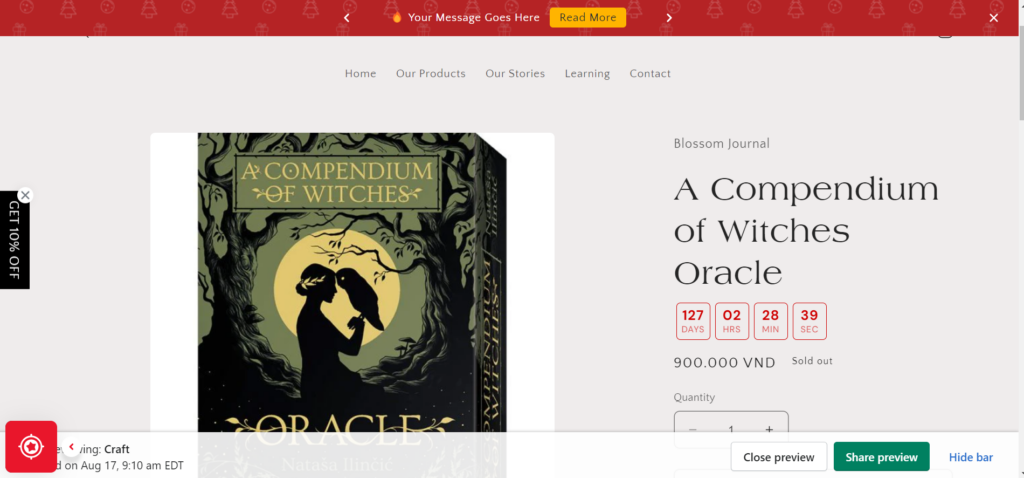
Step 7. Now I’m at the third stage: Targeting. For this example, I want to promote the book A Compendium of Witches Oracle for my Christmas sale, so I’ll only choose that book. The countdown will display on the right panel of the page.
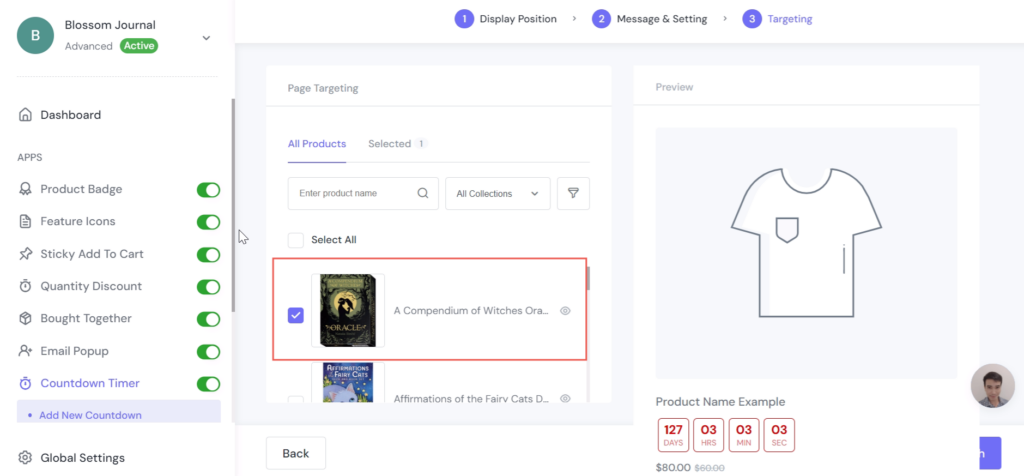
After that, I’ll click the purple button ‘Next’ at the bottom right of the page.
Step 8: Done! The countdown timer will now be displayed on my book A compendium of Witches Oracle product titles. As you can see, there is a countdown under my product title, which is counting towards my set end date (26 Dec 2023).
Final words
Adding a countdown timer to your Shopify product titles is a great way to increase sales. By creating a sense of urgency, you can encourage customers to buy your products now before it’s too late. So what are you waiting for? Start adding countdown timers to your product titles today!


