In the world of e-commerce, trust is an important factor for customers to shop with peace of mind. One effective way to do this is to add a trust badge to your Shopify store. A common place to display these trust badges is in the footer. In this post, we will learn how to add the Shopify Trust Badge to the page footer.
What is a Trust Badge?

Trust badges are symbols or images commonly displayed on an online store’s website. They are like signs that the store is trustworthy and safe for customers to shop at.
Trust badges are often associated with factors such as information security, secure payment methods, money-back guarantees, or even positive reviews from previous customers. When they see the trust badge, shoppers often feel more confident in their online transactions and interactions with the store.
Why Do You Need to Add Shopify Trust Badges to Your Store?

Adding a trust badge to your Shopify store is vital to your customer’s shopping experience and the growth of your business. Here are some reasons why this is so important:
- Building Trust: In an online environment, the lack of repetition and face-to-face interaction makes building trust a challenge. The Trust Badge helps create a sense of security and trust for customers, making them feel more comfortable when making transactions.
- Create Credibility: When customers see icons or badges from trusted partners such as payment providers, security organizations, or delivery services, they feel more secure about providing personal information and making transactions.
- Increase Conversion: The Trust Badge can boost conversions. When customers see a store with symbols that guarantee security and quality, they are more likely to complete the transaction.
- Positive Feedback: Customers are more likely to trust stores with a Trust badge and may feel more comfortable sharing personal information and product reviews after making a purchase.
- Enhance Store Reputation: The presence of the Trust badge helps stores create a positive impression and demonstrates their commitment to providing a safe and reliable shopping experience for customers.
- Protect Personal Information: The Trust Badge deals with privacy and the protection of personal information. When customers see that the store cares about protecting their data, they feel more secure about sharing personal information.
Where to Place Trust Badges in Your Shopify Store

Placing trust badges in your Shopify store can be done in a number of different locations to optimize their importance and visibility. Note that the specific location for the trust badge may vary depending on your store’s design and requirements. Most importantly, place them in locations where customers can easily see and trust them when shopping online.
- Home Page: Place a trust badge in the top or main footer of your homepage to make a first impression with customers when they visit your store.
- Product Page: Display a trust badge directly on the product page to build trust and drive shopping.
- Cart and Checkout Pages: Place trust badges in locations relevant to the checkout process, such as cart and checkout pages, to help customers feel secure when entering payment information.
- Page Header: Add a trust badge to your page headers or sublines to make them stand out and grab the attention of shoppers.
- Footer: Place a trust badge in the footer of your store to provide credit and credibility information to customers before they decide to shop.
How To Add Shopify Trust Badge To The Footer?
A common place to display these trust badges is in the footer, where visitors can easily see them. In this section, we’ll show you step-by-step how to add the Shopify Trust Badge to the page footer, improve your store’s reputation, and drive conversions. There are two easy ways you can refer to.
1. Use Shopify’s Built-In Trust Badges

Shopify comes with a number of built-in trust badges that you can enable in the store settings. Go to your Shopify admin and go to Settings > Checkout > Order Processing. Scroll down to the “Trust Badges” section and select whatever badges you want to enable.
After you’ve made your selection, remember to click Save.
Enabling Shopify’s built-in trust badges is quick and easy, and it doesn’t require any additional coding or development work. However, it’s important to note that these badges will only be displayed on the checkout page of your store. If you want to display trust badges on other pages of your site (such as your home page or product pages), you’ll need to use one of the other methods listed below.
2. Edit the Shopify payment methods in the footer
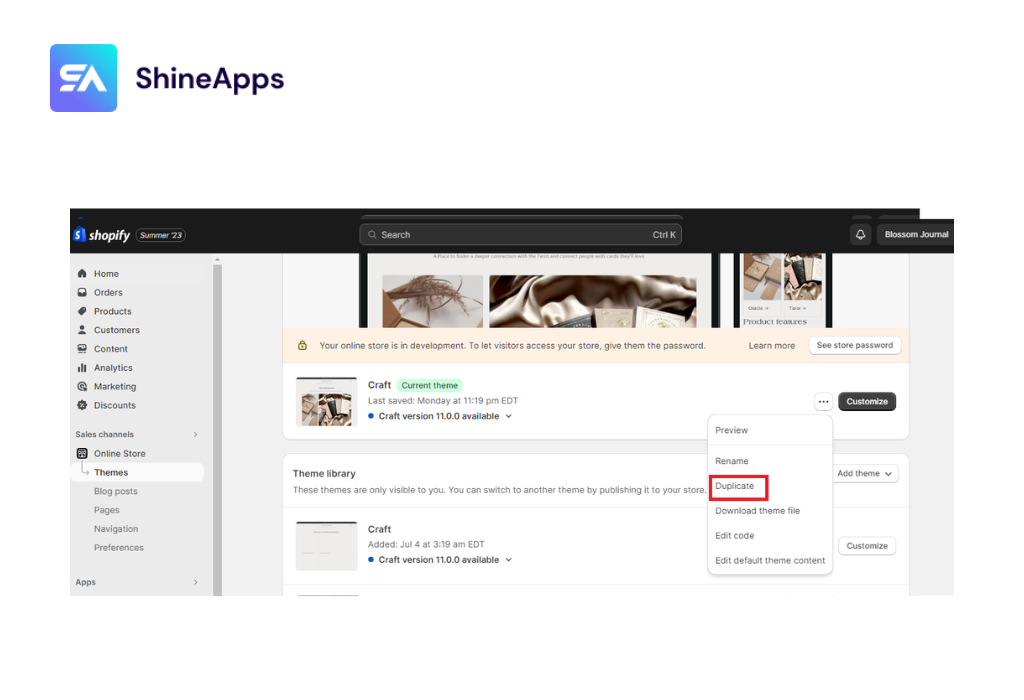
Step 1: Duplicate the theme
First, go directly to the Online Store and then go to Themes. In your theme settings, go to Actions > Duplicate.
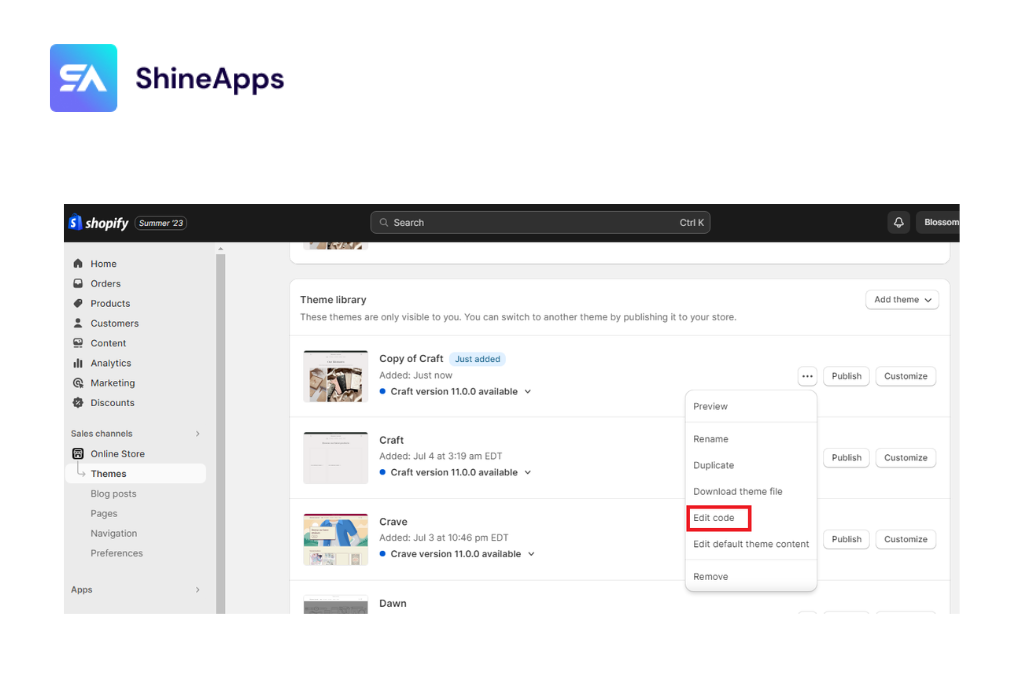
Step 2: Click Edit code
A duplicate version of your theme will be created below the live version. Then select Edit Code.
Step 3: Open footer.liquid file
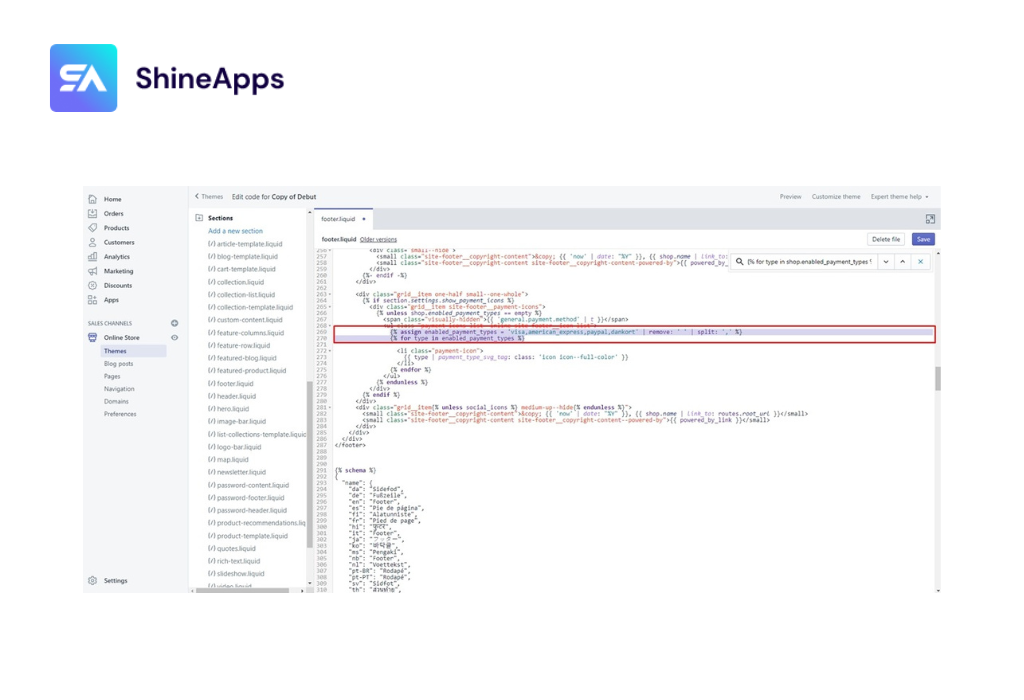
The line with the footer.liquid can be found under Sections. Open the file.

Step 4: Find the code
In the footer file, use Ctrl + F or command + F to find the below line of code:
{%- for type in shop.enabled_payment_types -%}

Step 5: Replace the code
Once you have found the code above, replace it with this:
					{% assign enabled_payment_types = 'visa,american_express,paypal,dankort' | remove: ' ' | split: ',' %}
{% for type in enabled_payment_types %}
Step 6: Save and Publish
After you edit the code, make sure to save your changes. Preview your changes to ensure everything looks as expected, and then click the “Publish” button to make your trust badges live on your website’s page footer.
3. Use a Shopify app
Adding trust badges to your store may be easiest if you use the Shopify App Store app. In this article, we will be using an application called ShineTrust, or “Product Labels & Badges Shine”. ShineTrust is designed to help you display trust badges on your Shopify store without manual coding.
Step 1. Install the ShineTrust App
- Log in to your Shopify admin.
- Go to the Shopify App Store and search for “ShineTrust” or Product Labels & Badges Shine.
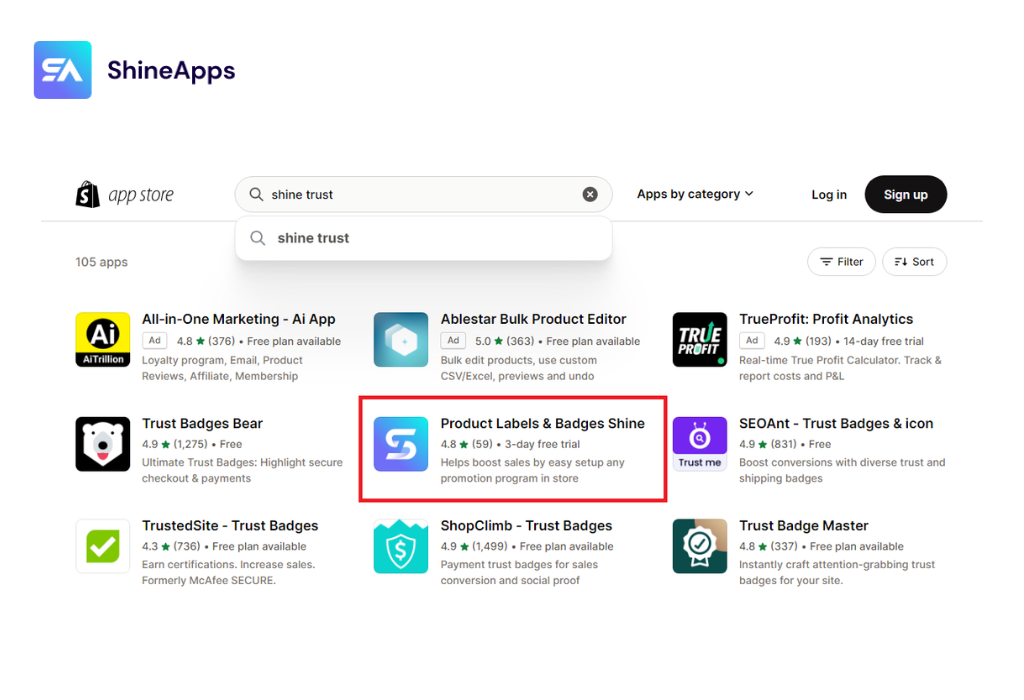
- You can also install the ShineTrust app here.
Step 2. Access the ShineTrust Dashboard:
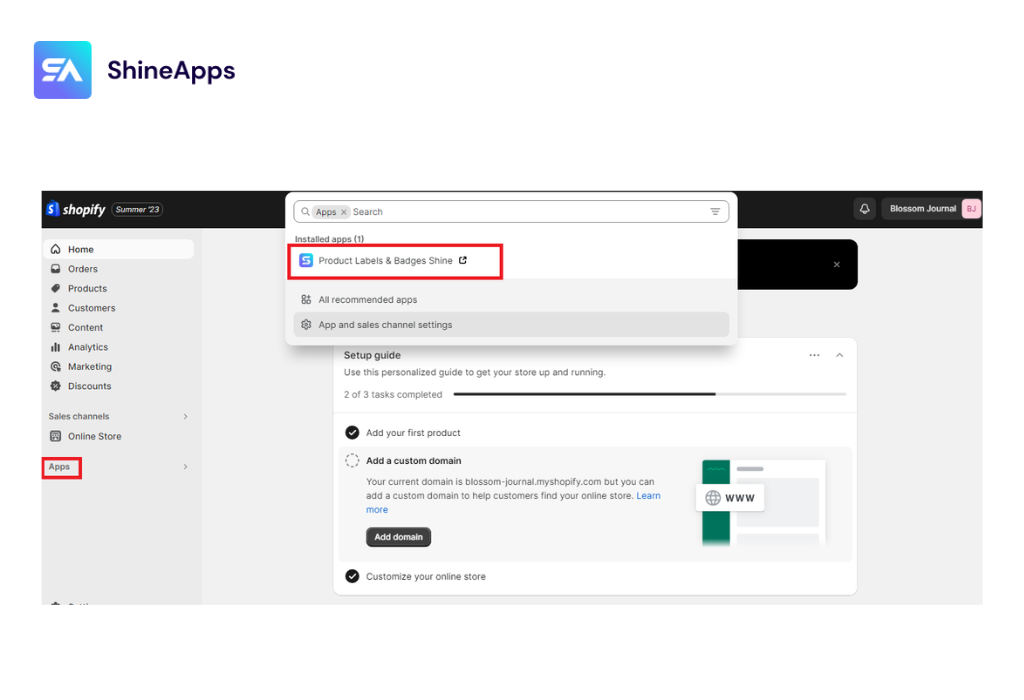
- Once the app is installed, access the ShineTrust dashboard from your Shopify admin.
- Choose “App” and search for “Product Labels & Badges Shine”.
Step 3. Choose Badge Types
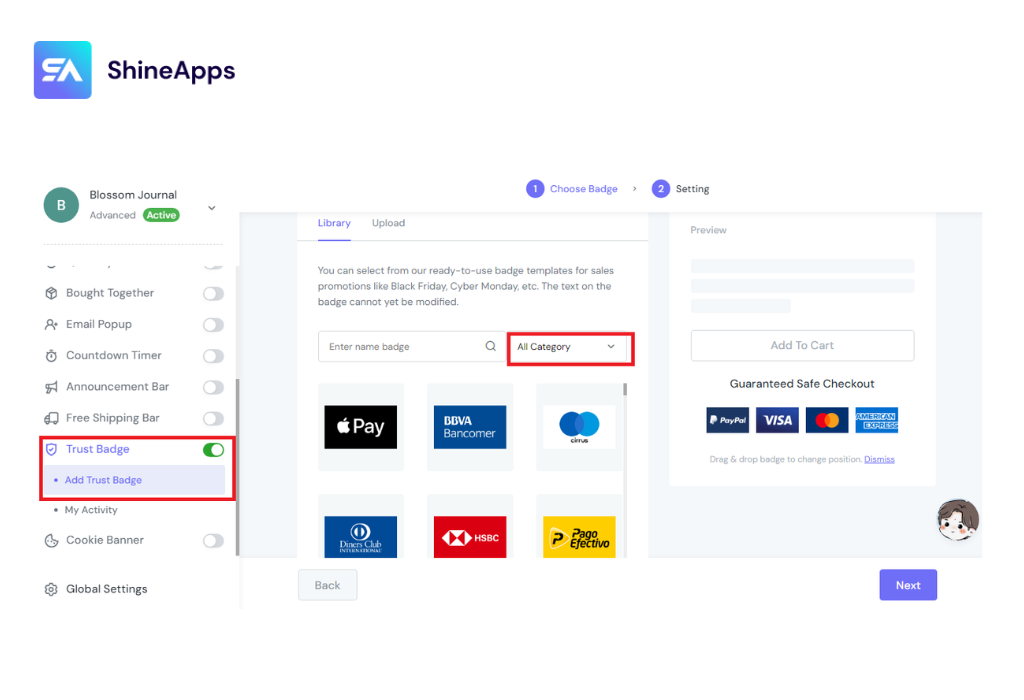
In the ShineTrust dashboard, select “Add Trust Badge” and “Add Trust Badge” > click “All Category” and select the types of trust badges you want to display on your product pages. These could include shipping, badges, payment badges, security badges, guarantees, and more.
Step 4. Choose Setting
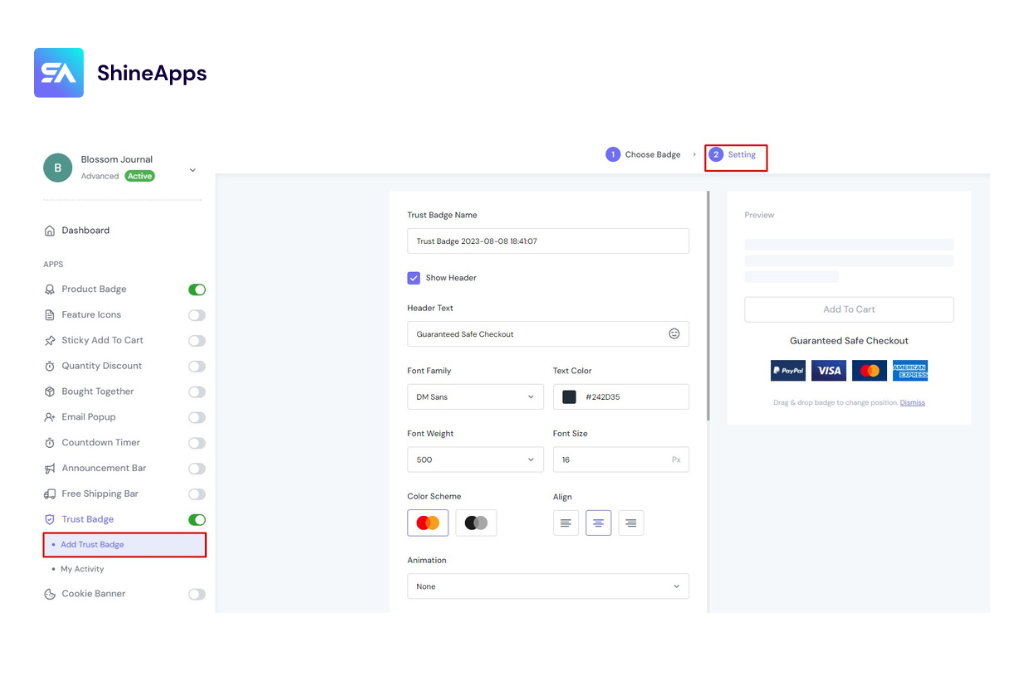
Step 5. Select Custom.
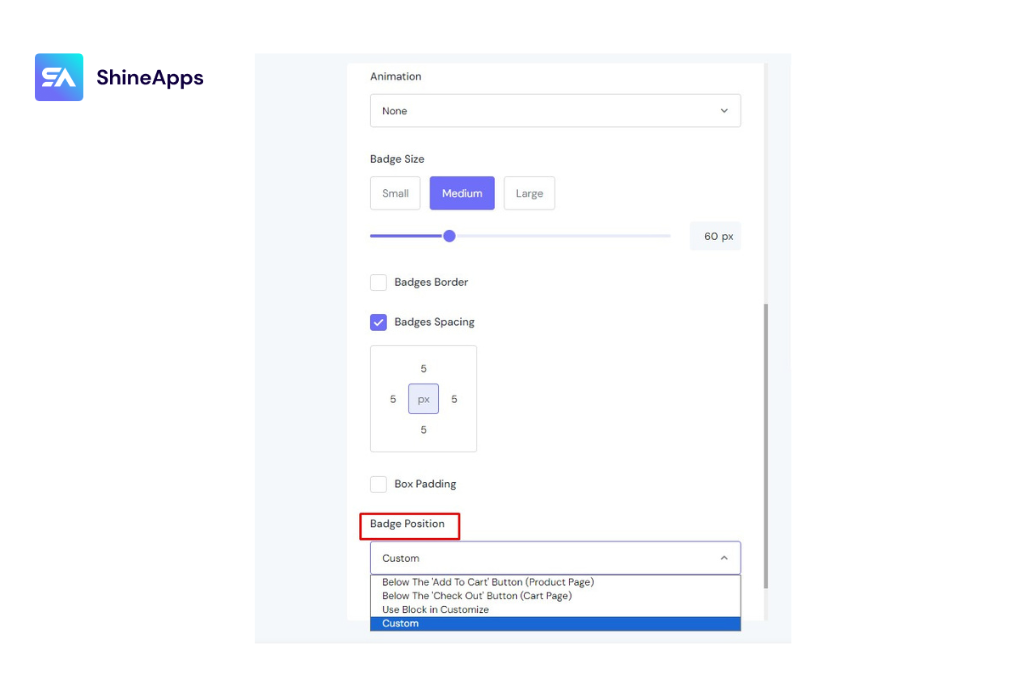
Scroll down and click Badge Position > then select Custom.
Step 6.
You want to add Trust badges to Footer, you just need to enter “footer.footer“. Choose where you want the badge to appear Above or Below. Then click “Save“.

This is a step-by-step guide to using shineTrust that we share in this article: How To Add Shopify Trust Badge To Custom Positions.
Conclusion
With that, you understand how to add the Shopify Trust Badge to the footer of your store. Not only is this simple, but it also brings a lot of important value to your e-commerce business.
By adding trust icons to the footer, you’ve created a subtle layer of protection, so your customers feel more secure during their shopping journey. This badge is not only part of the look and feel but also represents your commitment to the safety, authenticity, and trustworthiness of your online store.


