In 2021, over 2 billion people are predicted to be digital buyers worldwide. That represents more than 25% of the world’s population, which is close to 8 billion people.
The competition will only grow more ferocious as consumers move from physical stores to online retailers. And the benefits of staying on the cutting edge will increase.
The world of business is evolving quickly. As technology develops quickly, there are more and more opportunities to conduct business online. Online sales are possible, but they’re not always as simple as they might seem. Fortunately, you can change it.
You need to be increasingly creative and fully aware of what your rivals are doing if you want to succeed online. You should always be the customer’s first choice.
Let’s get right into how to customise Shopify like a pro, so hold tight and pay attention.
What Shopify theme do you have?
Your Shopify store will already be using Debut, their original default theme, if you set it up before the release of Online Store 2.0 and haven’t changed it.
It is designed to be simple and full of features so that you can start using it right away.
And your conversion rate is the percentage of visitors who complete the desired actions.
You might be starting with Shopify’s most recent default theme, called Dawn, if your store is older. The functionality of Dawn’s Online Store 2.0, which enables Shopify sections on every page, is the main distinction between these themes.
Both themes are ready to use right out of the box and are basic but powerful.
The only things left to do before launching your store are to add your products, customise your admin information, and add your own content.
With Shopify’s default theme, you can make some minor customizations, but if you want to give your store a more distinctive look, your options are limited. Particularly considering that the majority of Shopify stores use Debut or Dawn.
Discovering fresh, distinctive themes is one way to set your store apart. Some will naturally fit your brand better.
Where can you find new Shopify themes?
It’s not difficult to find fresh Shopify themes to add to your store. However, there are numerous themes available.
Finding out what theme a particular Shopify store is using and purchasing it yourself is simple if you really like the way it looks. The coolest themes from all marketplaces can also be found by looking through our collection of the top Shopify themes, which are helpfully organised by the industry.
To make your job simple and increase conversions, it’s crucial to find a theme that is appealing, practical, and mobile-friendly. In a few places, you can conduct independent searches for Shopify themes. You might start by checking the Shopify Theme Store. Additionally, there is a tonne of third-party theme marketplaces with a wide selection of premium themes.
Shopify Theme Store
The Shopify Theme Store is a selection of paid and unpaid themes that have been thoroughly examined by the Shopify team to ensure compatibility and proper operation.
With Shopify, personalization is fairly simple, but starting with a theme that more closely resembles the original vision for your company will make theme customization much simpler.
Simply go to Online Store > Themes and scroll down below you will see “Popular Free Themes” section for the option to access Free Themes. Besides, you can click “Visit Theme Store” for all themes or “Explore Free Themes” for the free selection to access the Theme Store from your Shopify dashboard.
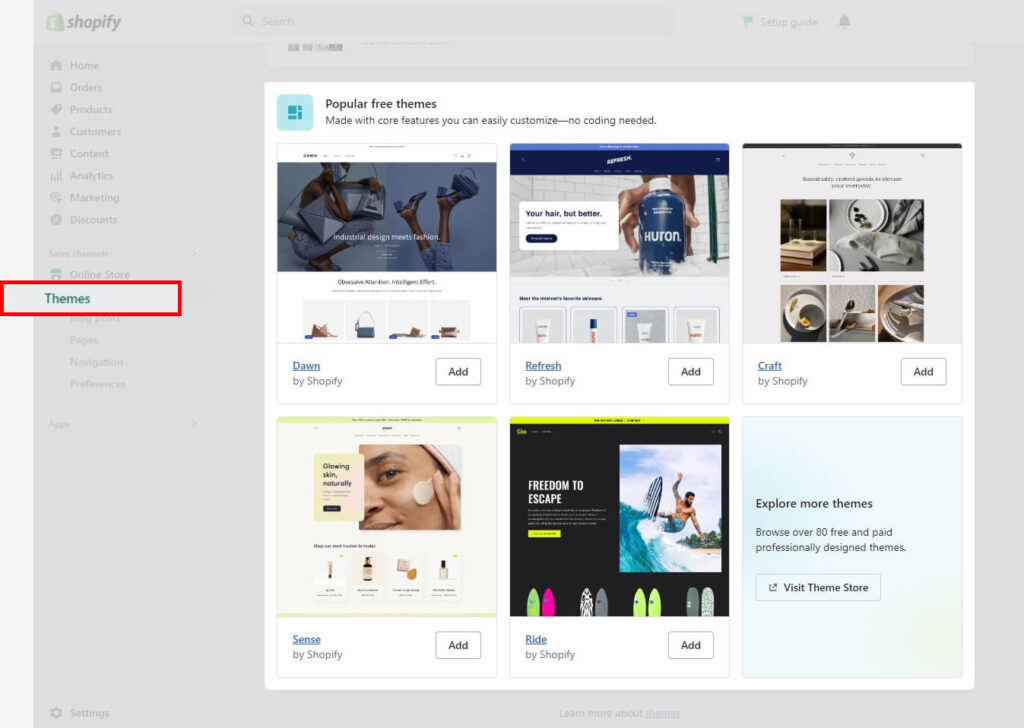
Depending on the circumstances of your store, a few categories of themes are available on the Theme Store homepage. Themes for stores that sell internationally, stores that sell in-person, or specific industries, for instance.
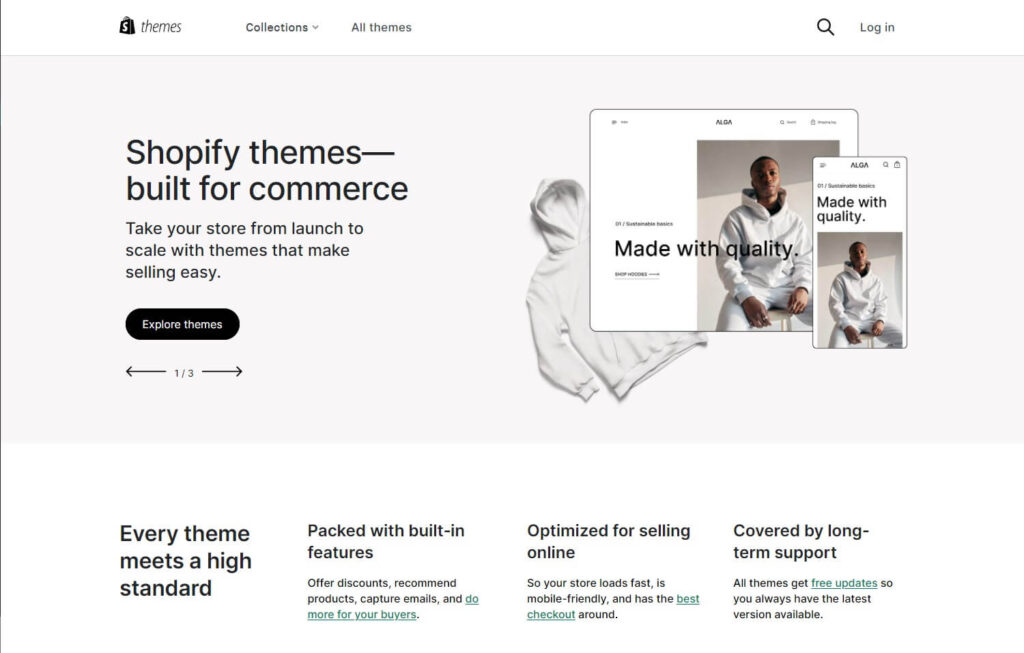
Additionally, you can select All Themes from the menu at the top to filter themes according to different categories, such as:
- Price
- Number of products
- Industry
- Layout complexity
- Design style
In particular, for stores that don’t require a customised store experience, selecting a pre-built premium theme can speed up Shopify theme customization.
Pre-built themes can also assist businesses in narrowing their focus before making the final customizations themselves or using a page builder.
Third-party websites and developers
If you can’t find a theme in the Shopify Theme Store that speaks to you, don’t worry. Other online stores provide themes made specifically for Shopify stores.
Third-party developers’ Shopify themes are available for purchase on websites like ThemeForest. Themes are typically peer-reviewed in such marketplaces, so you can sort by popularity and rating. or based on the best-selling themes.
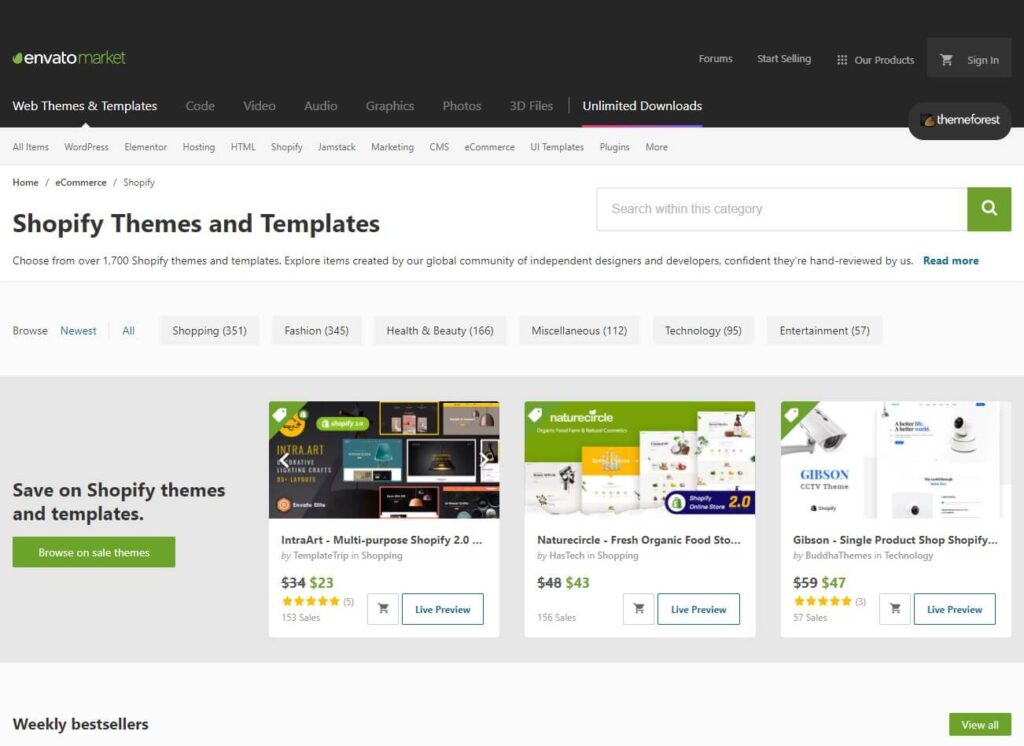
Any theme that you upload to your store can be easily customised, just like the Shopify themes.
Last but not least, if you are a master of Shopify development, you can always build a Shopify theme from scratch or hire a developer to do it for you. Although difficult, it would undoubtedly be different.
However, doing it this way can be much more expensive in terms of time and/or money than creating a theme from scratch.
How to upload your Shopify theme
You can access your theme right away in your Shopify dashboard’s theme library if you purchased it from the Shopify Theme Store.
You only need to click “Customise” in the theme to get started customising it. Simply click Actions and Publish to make it your current theme.
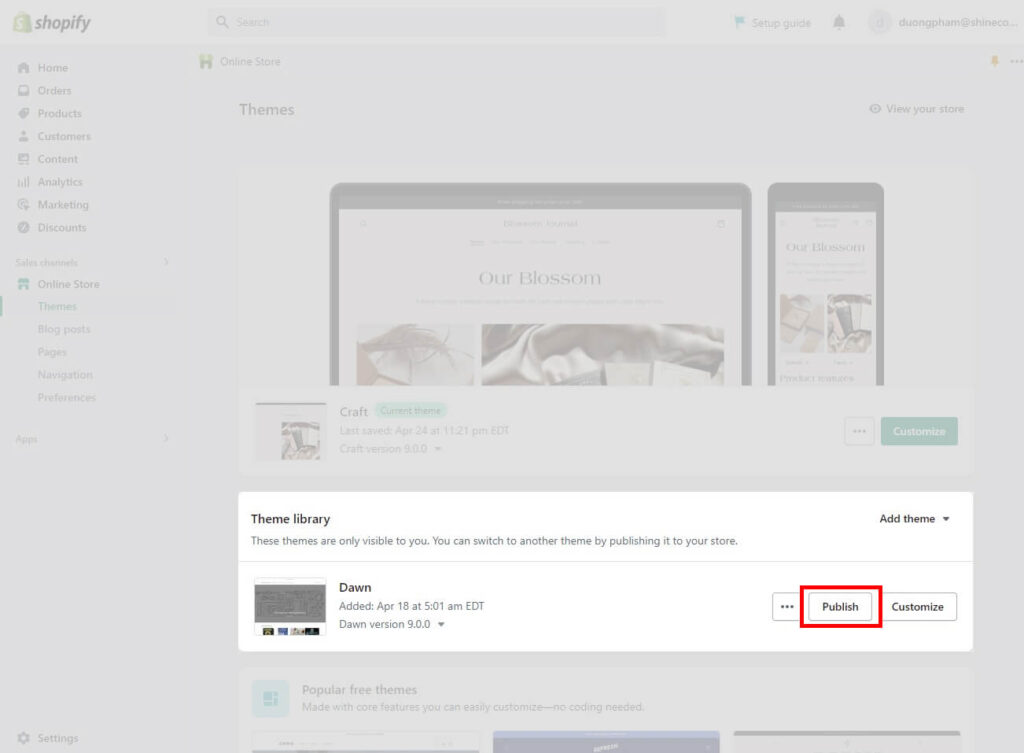
Before you can begin customising a theme that you have purchased from a third-party website or developer, you must upload the theme.
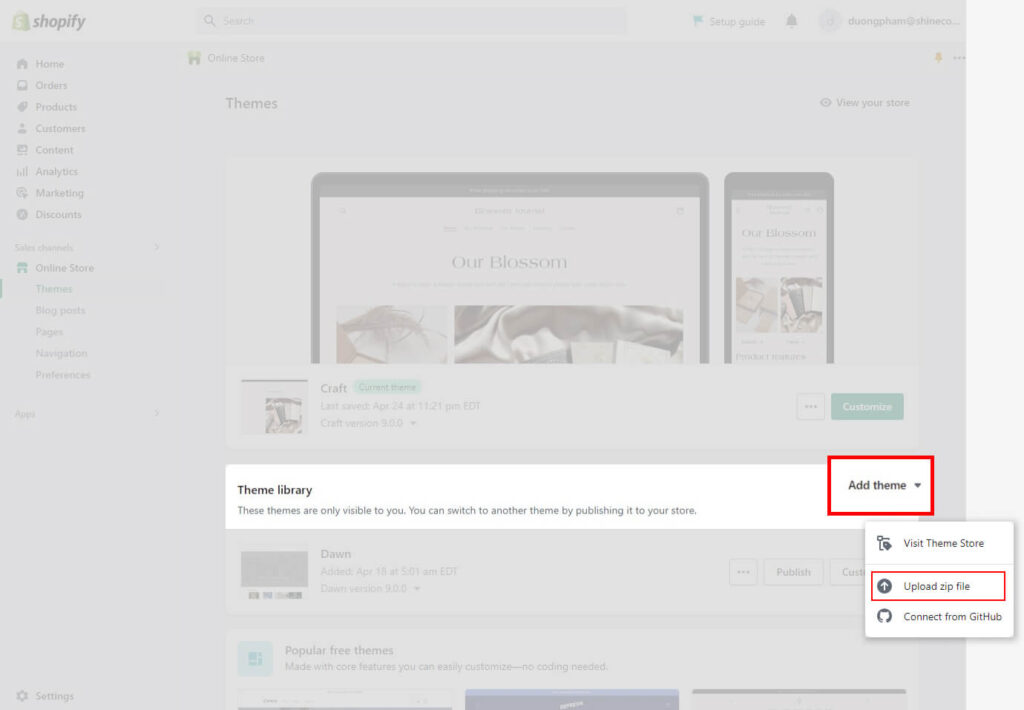
Go to Online Store > Themes to upload your theme. Click the “Add Theme” button under Theme Library. Either connect from GitHub or upload from a zip file.
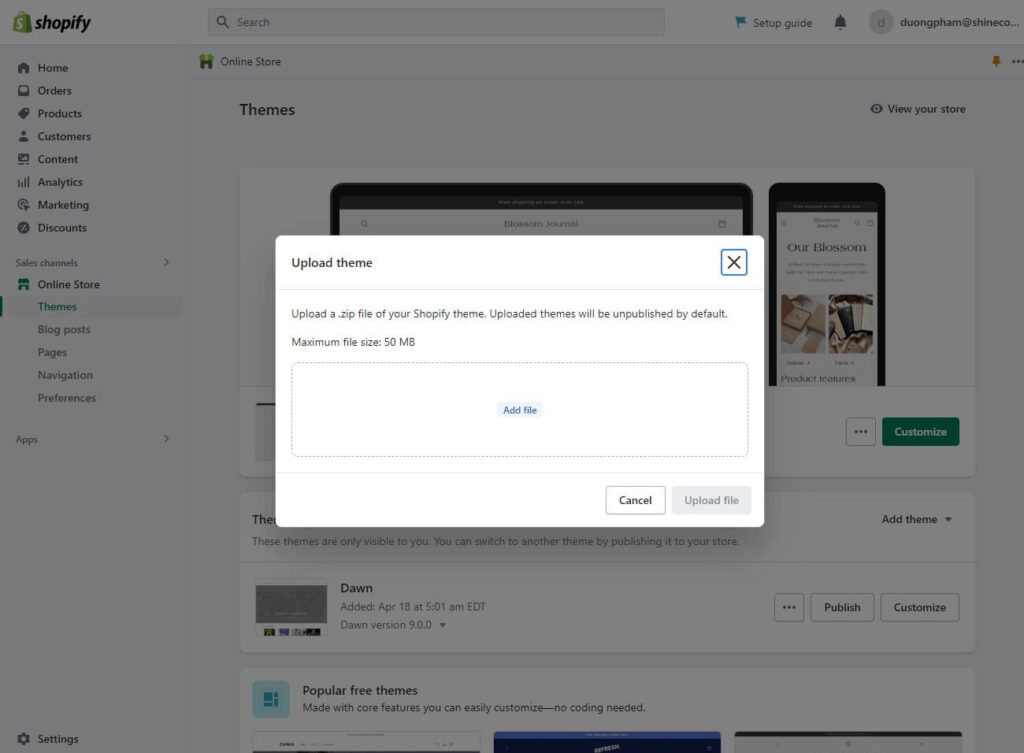
Drag the file into the available window by clicking “Add file,” then click “Upload file.” When it’s done, it will appear in your theme library.
Shopify customization: Hire a developer or do it yourself.
Working with a theme has the benefit of having many structural design decisions made for you. Within a complicated website structure, you don’t have to worry about how to organise your pages or where to place each image and paragraph.
However, you’ll need to add your own touch to make your brand stand out and your store looks its best. Consider it like decorating a house; the basic elements are all present, but you get to pick the colours and make minor adjustments to the furnishings.
Hire a Shopify developer
The number of options available to you, when you’re new to the world of web design, is astounding and may even feel overwhelming. Any colour that you choose may be used! Changing things up is as simple as clicking a mouse!
A professional’s assistance is clearly more cost-effective than fumbling through it on your own once you start dealing with the more complicated functionality and design options—especially when you take into account all the other crucial obligations you already have to take care of.
You can hire seasoned web designers through the Shopify Experts marketplace for professional advice or even to complete the design work for you. The best part is that they have experience with Shopify, so they know how to use the platform to its fullest potential.
Personalise your Shopify theme
The DIY method makes sense in some circumstances. Perhaps you’re starting your company from scratch, or you already possess the technical and creative know-how required to create a website on your own. Or perhaps you only require basic features at first, with future upgrades in mind.
Regardless of the motivation, you can easily alter the appearance and feel of your online store using Shopify’s theme editor without any coding or design expertise. Additionally, you can easily add engaging elements to your website with the help of tools like Sections Everywhere, Shopify app embeds, and page templates.
The basics of Shopify theme customisation
When you have your ideal base theme set up, it’s time to customise it to look exactly how you want.
You can access your Theme library and current theme from your Themes dashboard. A brief preview of how your current theme will appear right out of the box will be displayed.
Clicking the “Customise” button will allow you to make changes to the current theme or one that is waiting for you in your library.
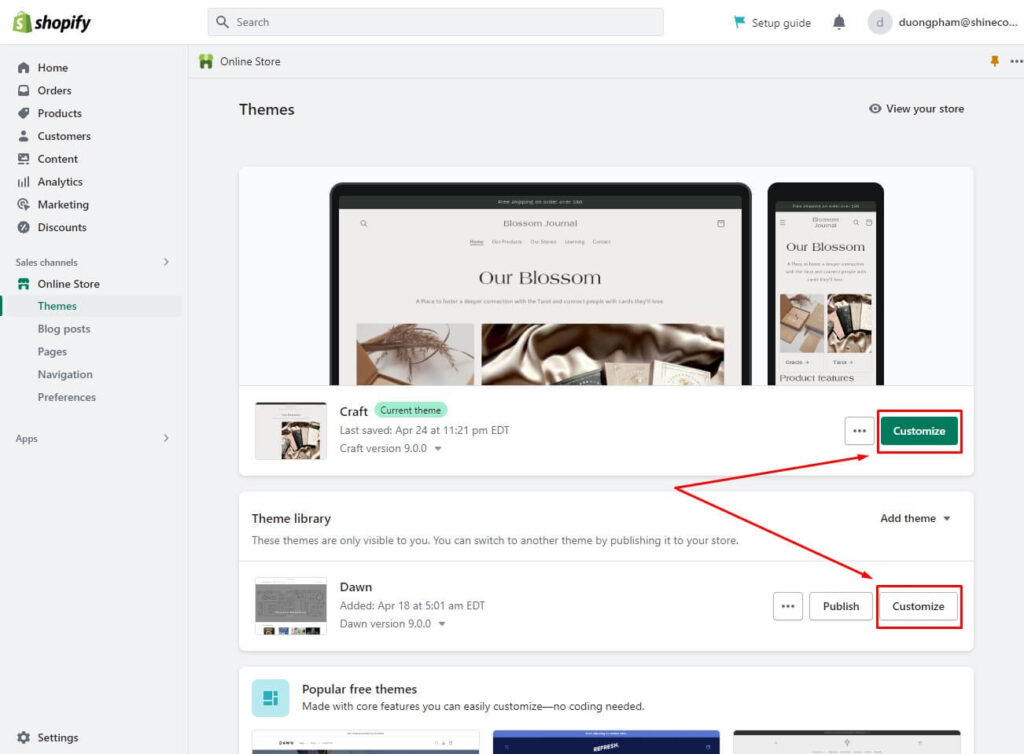
Editing page templates and changing theme settings are the two main ways to customise the theme for your store.
You can reuse the layout of different page types across your store by editing Shopify templates. For setting up your store, you will need templates with multiple pages.
Colour, typography, styles, and other elements will all change consistently throughout your store as a result of your general theme settings.
Starting with templates, let’s move on to the general theme settings.
Customising the Shopify template in the theme editor
A dropdown menu is located at the top of the theme editor. Although “Homepage” is the default, you can edit any page template.
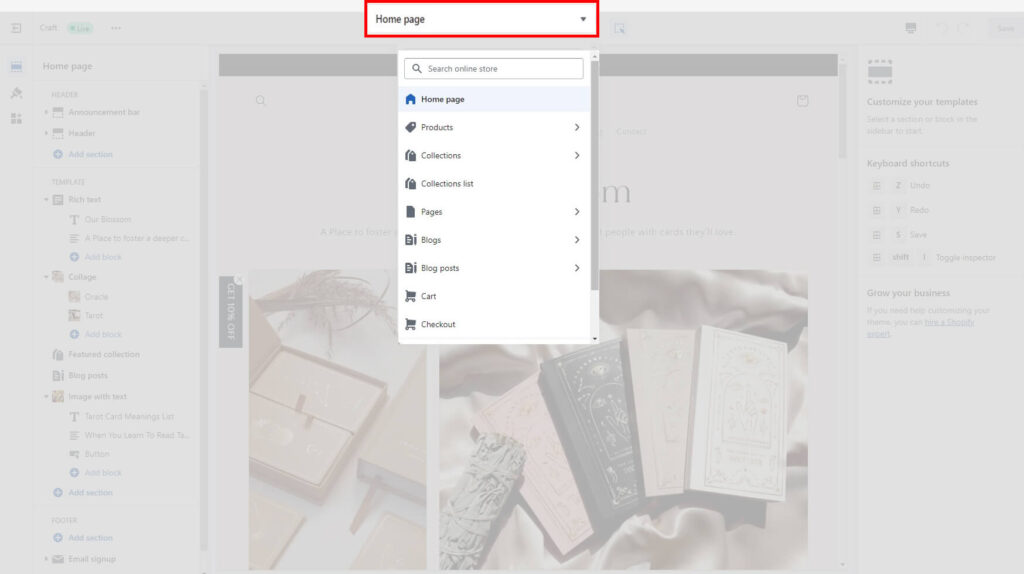
Whatever page template you choose will appear on the main edit screen. You can see the current page’s section layout on the left. While Online Store 2.0 themes allow this functionality for each page template, all themes allow section customization in the theme editor on the Homepage template.
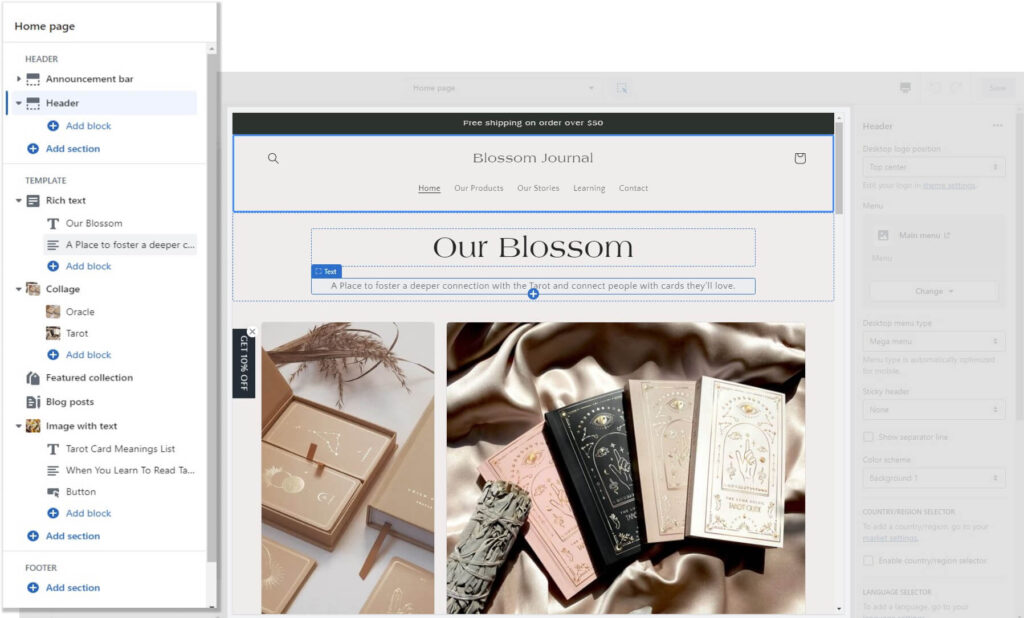
We should point out that when you customise page templates in the theme editor, you are not doing so for the actual pages themselves.
Consequently, any modifications made to a specific template will be reflected on all pages that use that template.
How to change the template sections in Shopify
You can have some influence over the look and feel of your store while staying within the parameters of your theme by customising sections for your page templates.
On your page templates, you can use a variety of sections, some of which are mobile and some of which are fixed.
The page’s Headers and Footers are indisputable fixed elements. Other sections, such as image blocks and featured collections, can be moved between your header and footer to suit your requirements.
There are individual customization options for each of these sections.
Customising the Header section
There are several ways you can modify your header section. These changes will be visible on all store pages because the Header appears on every page of your store.
The following are some of the elements you can modify in your header (which is currently using the Dawn theme):
- Desktop logo position
- Logo
- Desktop menu type
- Sticky header
- Color Scheme
- Country/Region Selector
- Language Selection
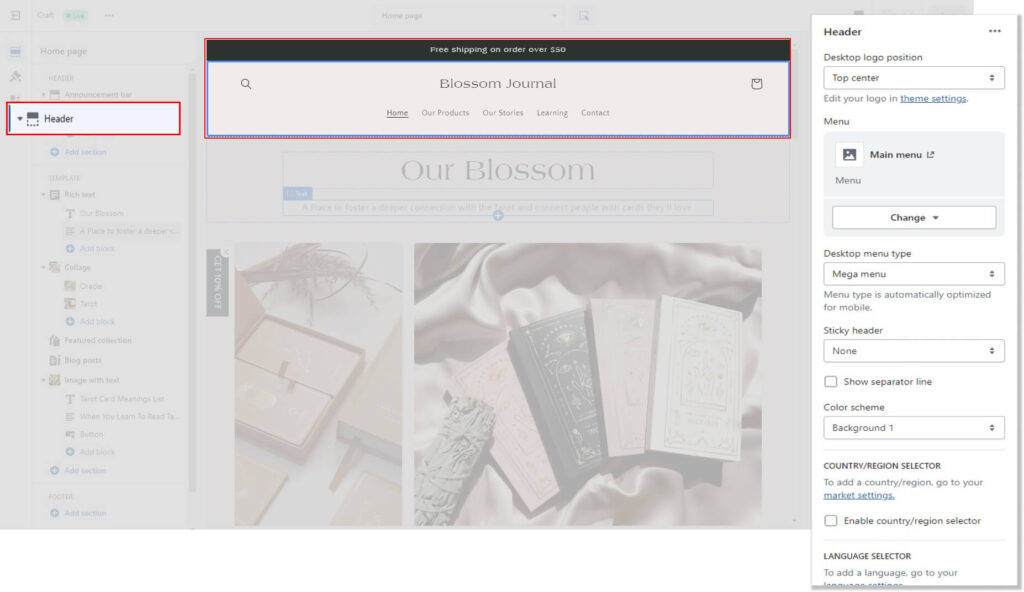
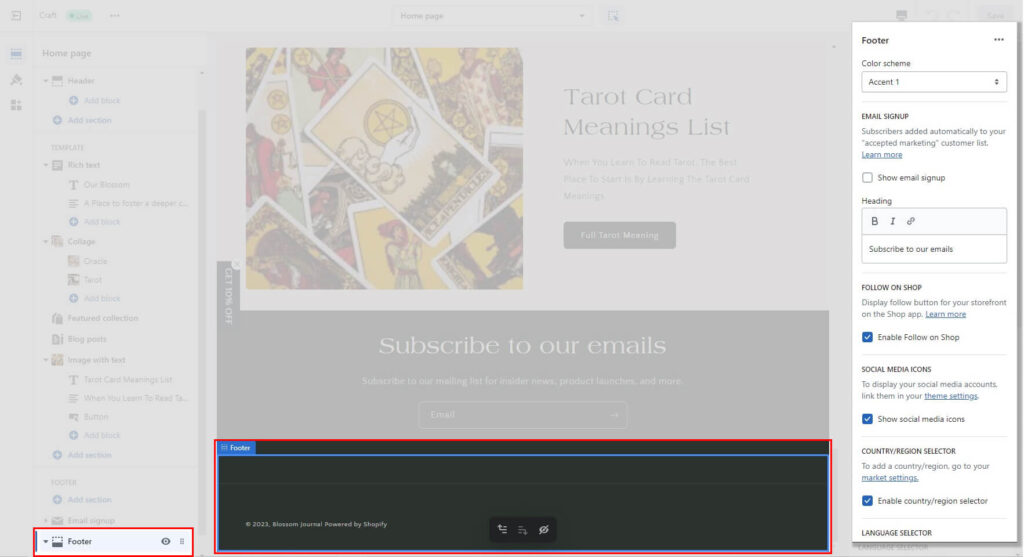
Changing the footer
Similar to the Header, any changes you make to the Footer section will affect all of your store pages. Again, depending on your particular theme, the options you see here will vary. The customization options have an impact on the following for Dawn:
- Colour scheme
- Email Sigup
- Heading
- Follow On Shop
- Social Media Icons
- Country/region selector
- Language selector
- Payment method icons
Blocks can be added to your footer section as well. By default, quick links are included; you can update them to include crucial navigation.
A heading block, which gives you a content block for a heading and subtext, is another option.
Editing specific sections
The modifications only impact that specific page template, not any other sections.
You can choose from a menu of changes by clicking on any section. There will be individual customization options for each section.
You can make changes while viewing the preview screen, and only the Header and Footer will be affected.
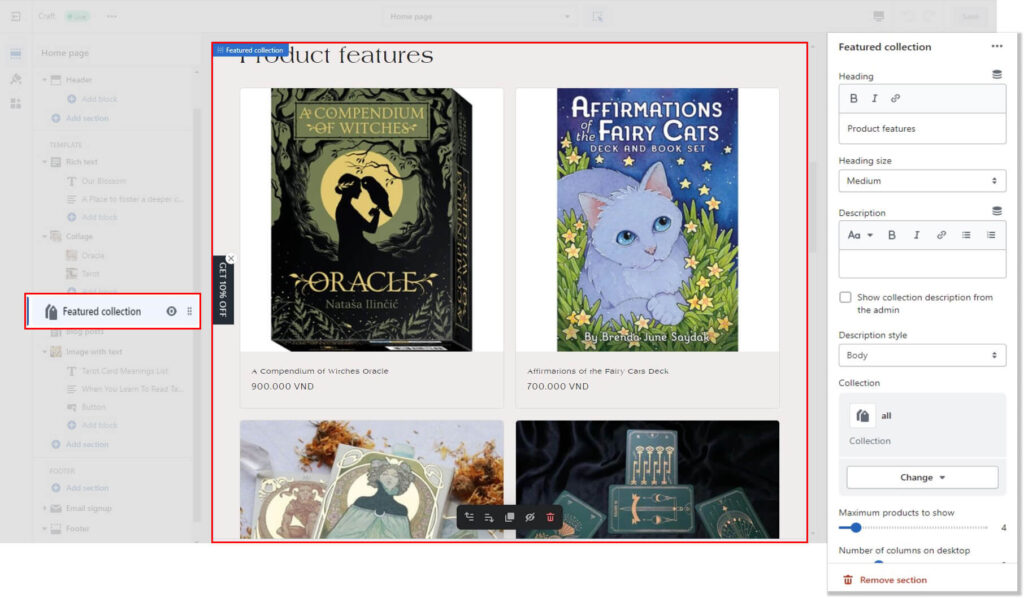
You can decide which collection to display, how many products to show, and how the image display settings will be applied to the Featured Collection section, for example.
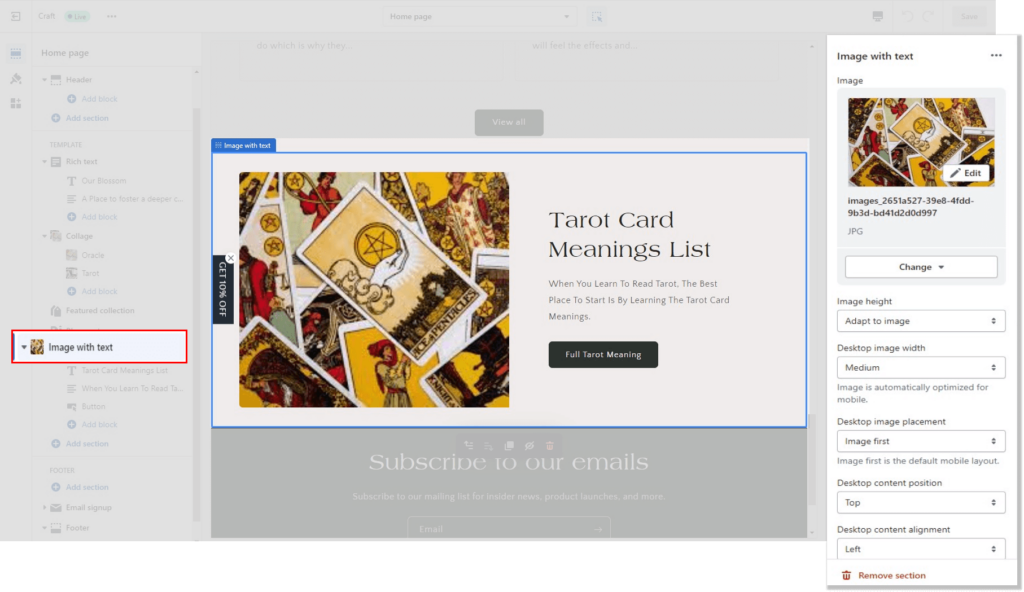
However, the selection is much more constrained for the Image with text section. You can select your image, change the display options for it, and then click inside the content blocks to add the desired information.
Adding a section/block
However, you are not constrained by the sections/blocks that are displayed on each page template. For even more customisation, you can add sections and blocks to your pages.
Simply click Add Section/Add Block and select the theme section you’d like to add from the list (or use the search bar to find what you want) to add a section to your page template.
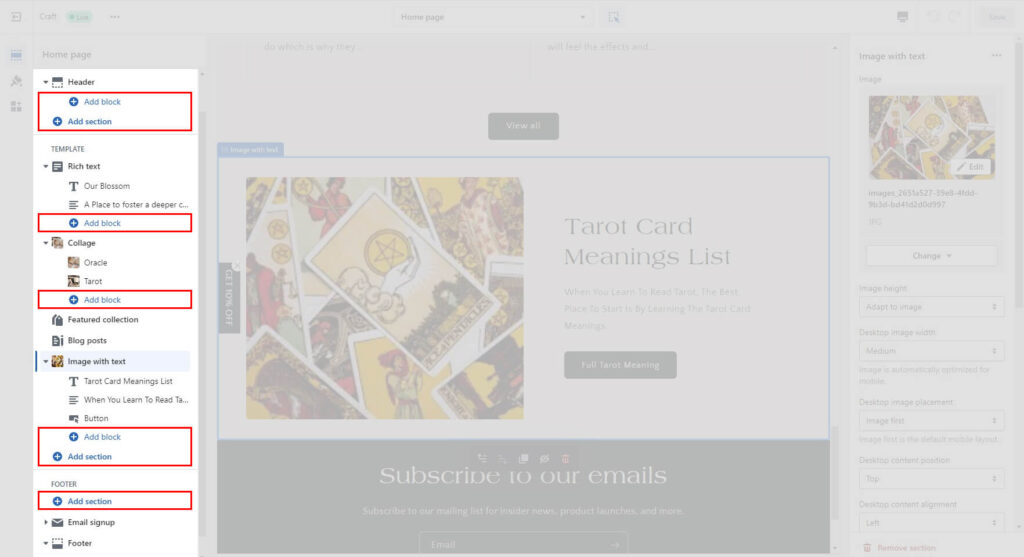
You are not forced to have it at the bottom once it has been added. It can be adjusted up or down to suit your requirements.
Moving a section
Simply move your cursor over a section to see the six dotted icons to move it. Your cursor will change to a hand holding a white glove.
Drag your section to the desired location by clicking the icon. When you drag a section up and down the page, the preview screen will zoom out to show how it appears.
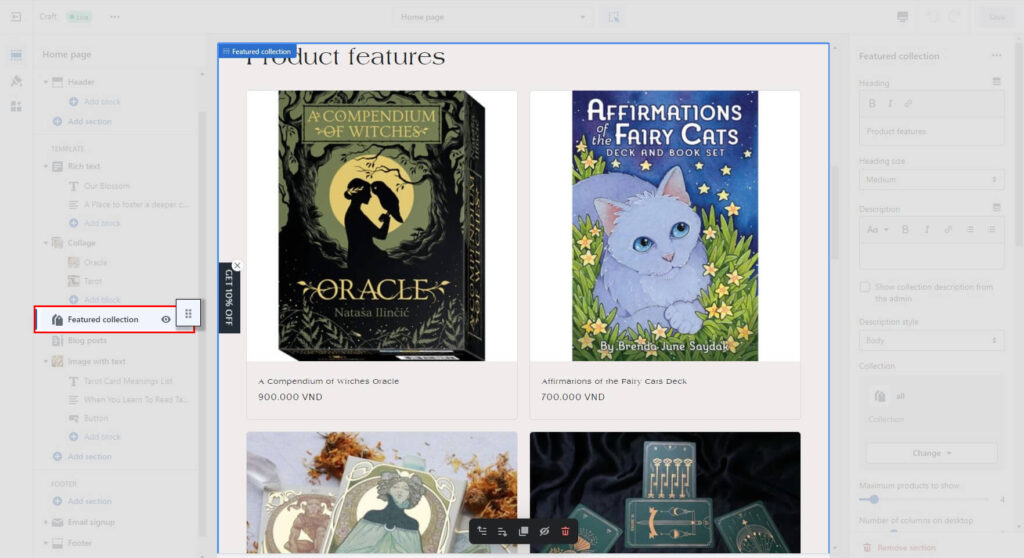
Release it when you believe it is in the proper location, and it will take up residence in your new location.
You’ve now thoroughly investigated the options you have for modifying your page templates. I strongly advise you to carefully review all of your unique customization options, which will vary depending on the theme.
Making changes to your Shopify theme options
In addition to modifying your theme from template to template, you can also alter some of the broad settings that control how your theme appears and functions.
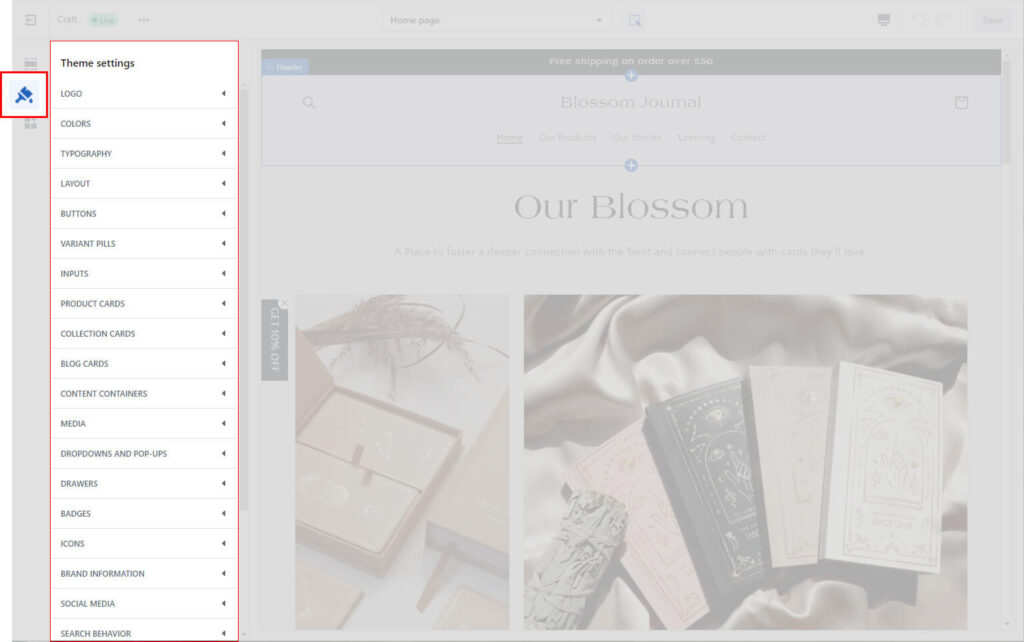
Look in the leftmost row of your editor to find these settings. The options are displayed when you click Theme Settings.
Depending on the theme you use, the categories you can update change. Here are a few examples of ones you can find in various themes:
- Logo
- Colors
- Typography
- Layout
- Buttons
- Variant pills
- Inputs
- Product/Collection/Blog Cards
- Content containers
- Media
- Dropdowns and pop-ups
- Drawers
- Badges
- Icons
- Brand information
- Social media
- Search behavior
- Currency format
- Cart
- Checkout
- Custom CSS (New)
- Change theme styles
The modifications you make to your theme settings will impact how your page templates are customized because they control some features.
Several of these settings will be discussed below.
Logo
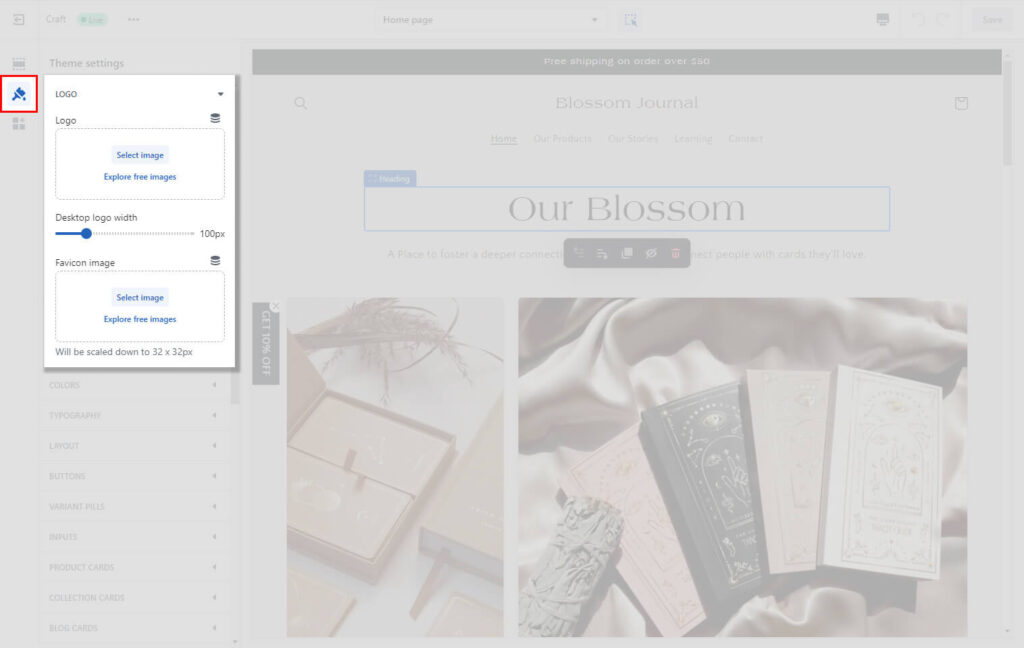
Logo: You can add a logo for your business to your online store. Your logo shows in the following places:
- Your header across all pages
- Your password page
Logo images have a maximum width of 300 px.
Favicon: You can add a favorites icon, or a favicon, which can help to brand your online store. A favicon shows in the following places:
- Your web browser tab
- Your web browser’s history
- Icons on your desktop
- Beside your online store name when it’s bookmarked
Colour
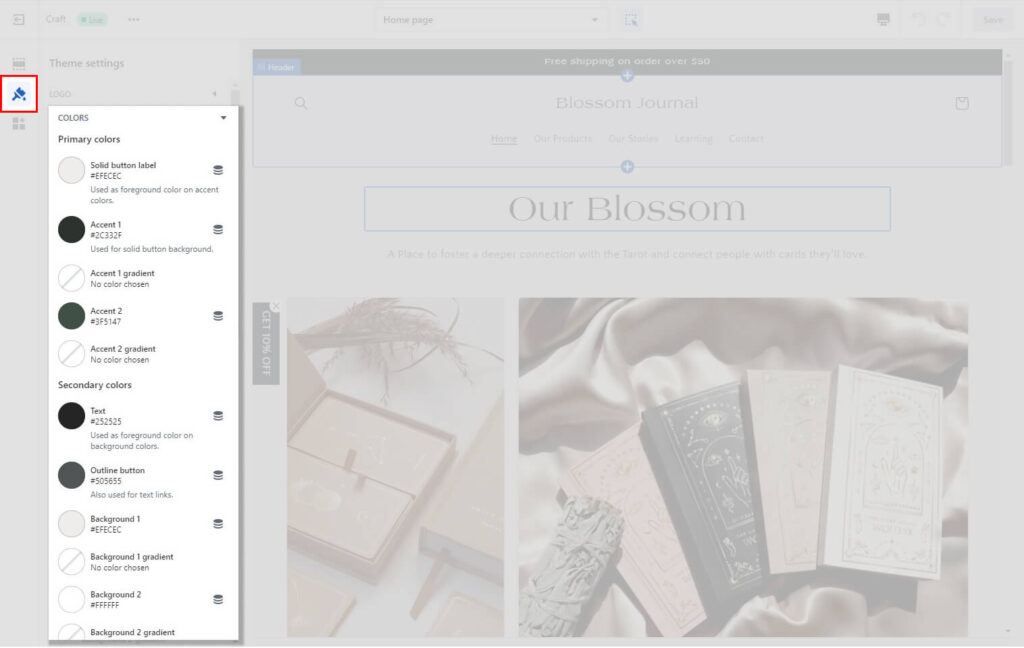
You can alter the colours used throughout your store to represent your brand using this menu.
If your brand has a specific colour scheme, updating these settings will help your store match your brand’s aesthetic.
Typography
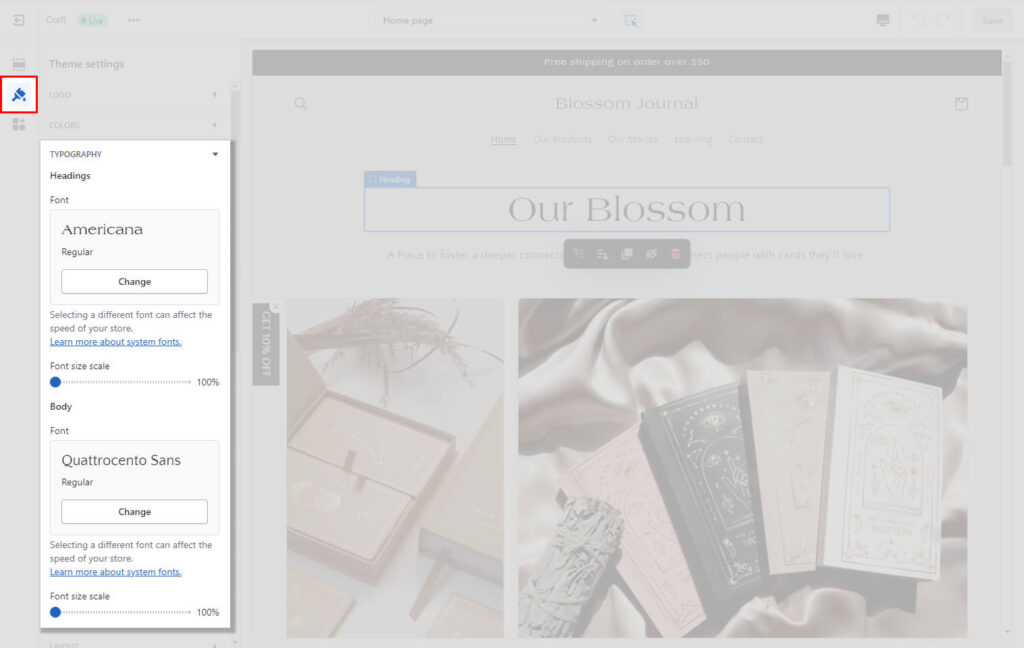
Here, you can change how your text appears throughout your store. Again, with a few easy updates like this, your brand can stand out.
You can learn how to add custom (or Google) fonts to your store here if you want to do that. You can select them from the theme settings once you’ve added them to your Shopify store.
Simple options for modernising your typography include Body and Headings fonts. You might have different options here if you were outside of Dawn.
Layout
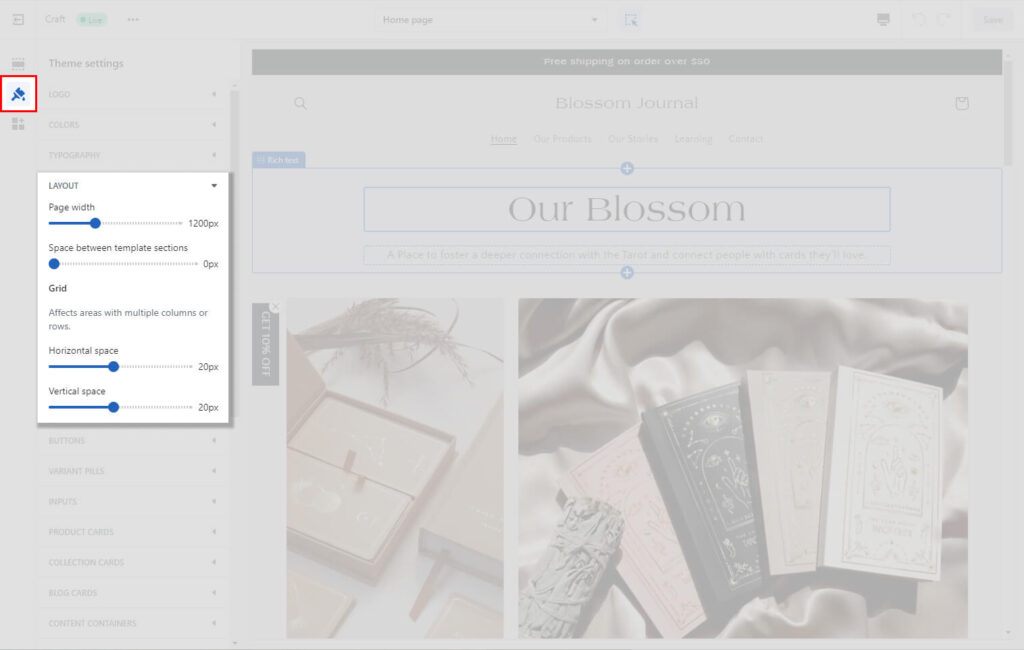
You can specify a maximum width for your online store’s display using layout.
Button
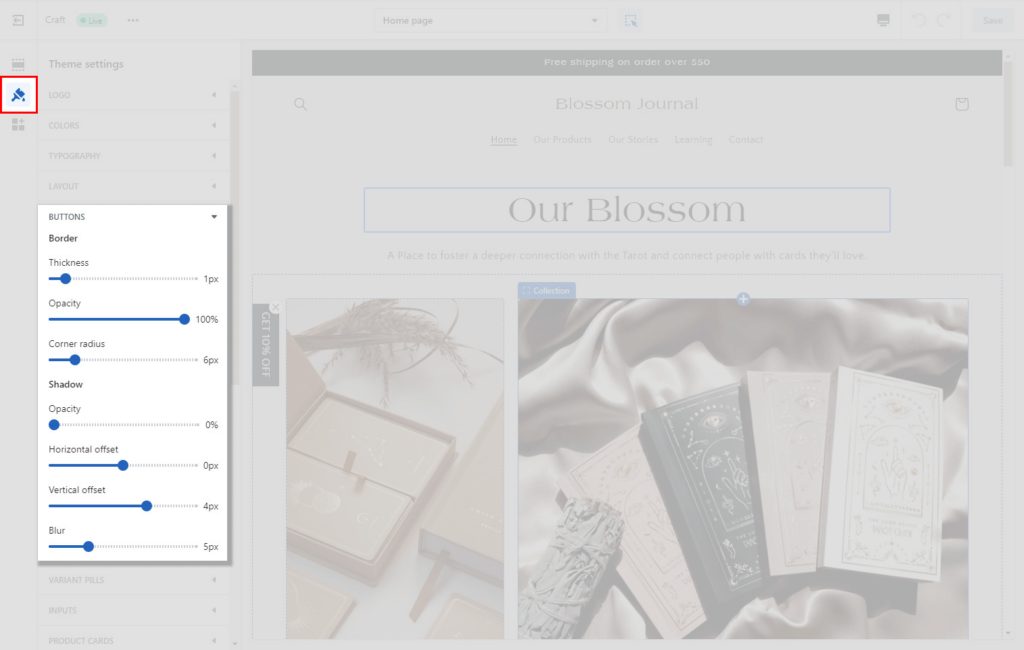
By including shadows, altering the spacing or opacity, and modifying the design of your buttons, you may personalise the settings for call to action buttons on your online store.
Variant Pills
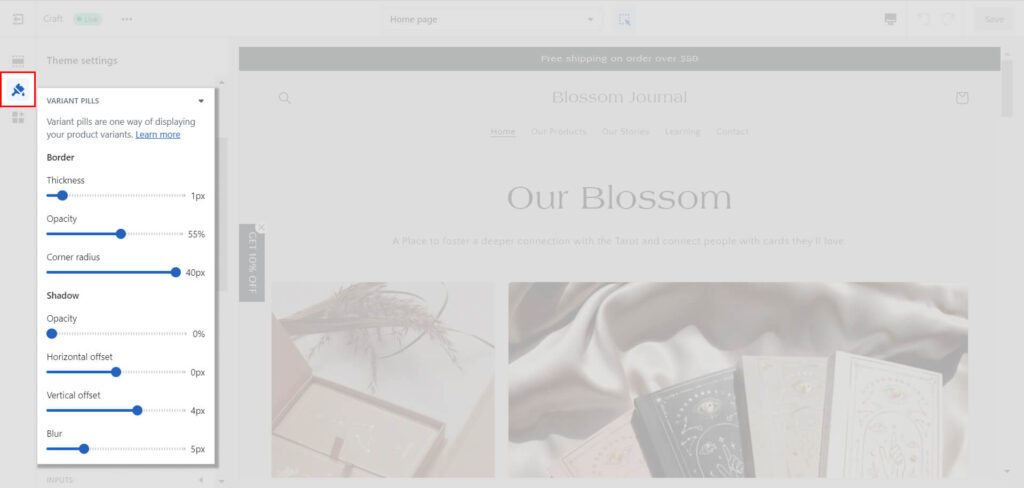
Using variant pills, you can showcase a product’s variations on its product page or in its featured products area. Customers don’t need to switch between product pages in order to add the desired variant to their cart.
Inputs
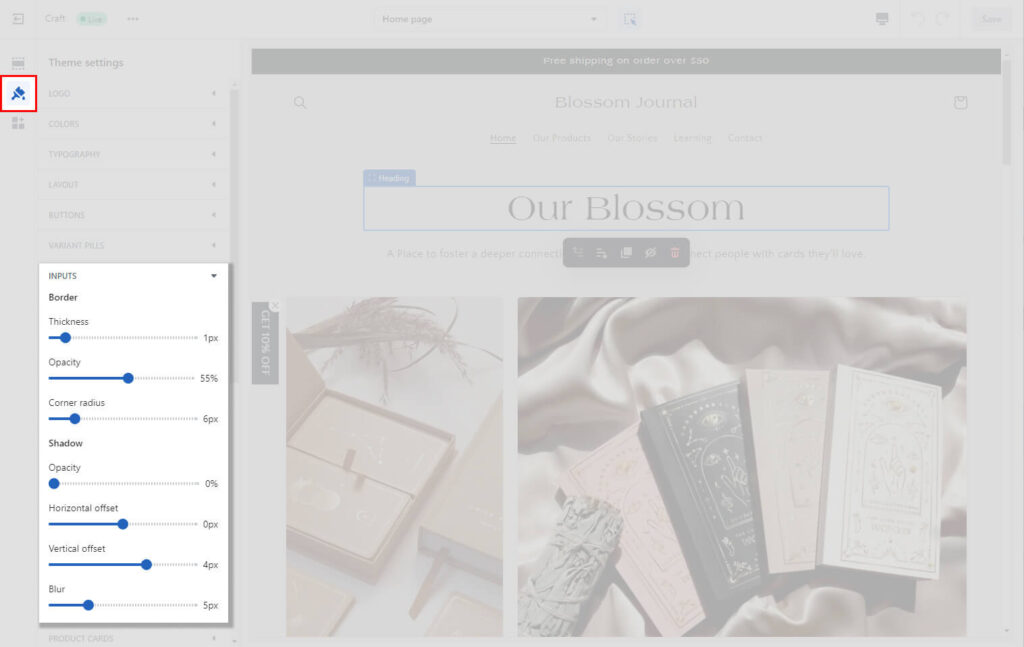
Inputs are interactive places that demand input from the user, such as quantity selectors, email signup forms, and cart notes. Theme options allow you to customise how your online store inputs look.
Product/Collection/Blog Cards
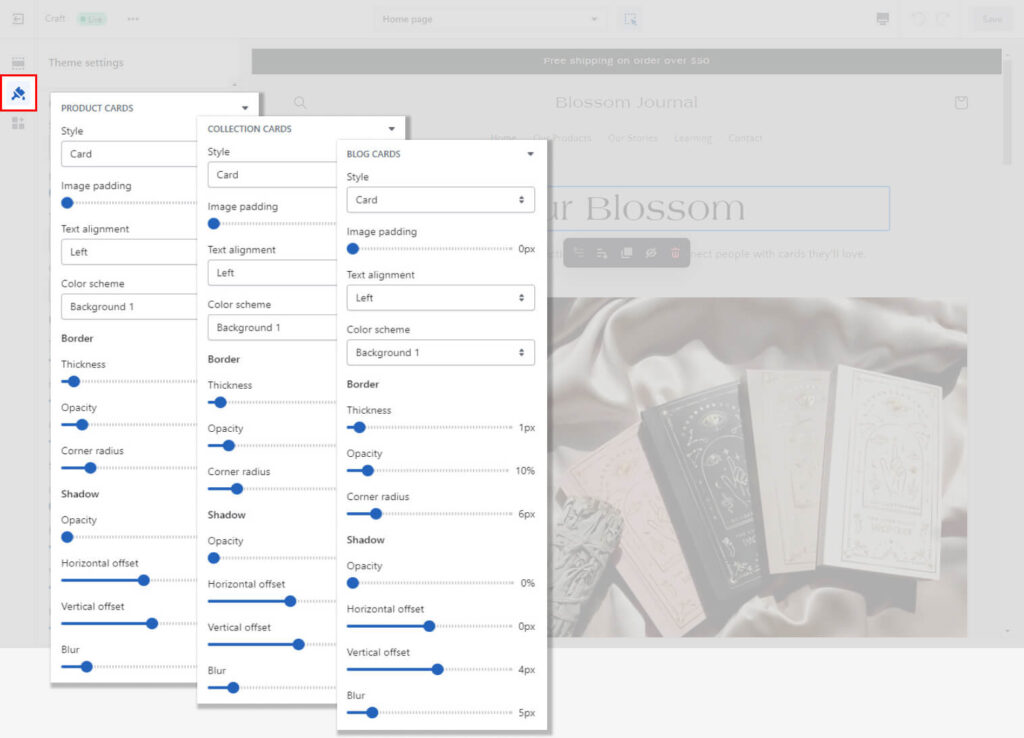
The options for product cards, collection cards, and blog cards let you alter the appearance of each sort of section-displayed separate area. These three different styles of section cards’ colours, alignments, image padding, borders, and shadows can all be modified.
Content containers
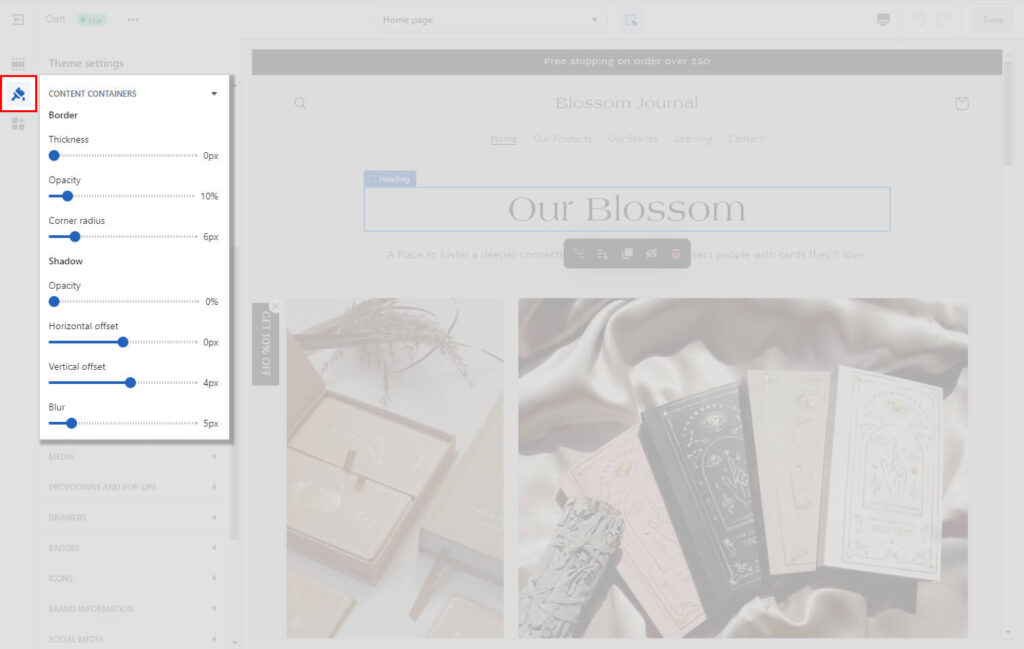
Containers are the text portions of content sections, such as a slideshow’s text box, an image banner, or the columns in sections with several columns. For your online store, you can alter how content containers look.
Media
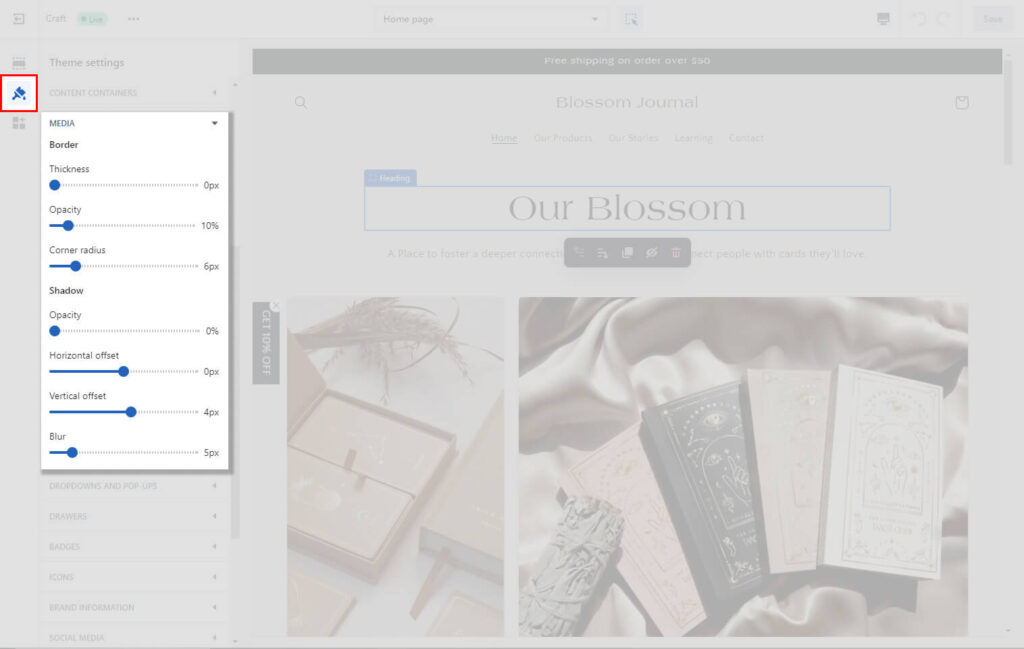
The visual element of a section is called a media, like a product image or an image in an Image with Text section. To your media, you can apply borders and shadows.
Dropdowns and Pop-ups
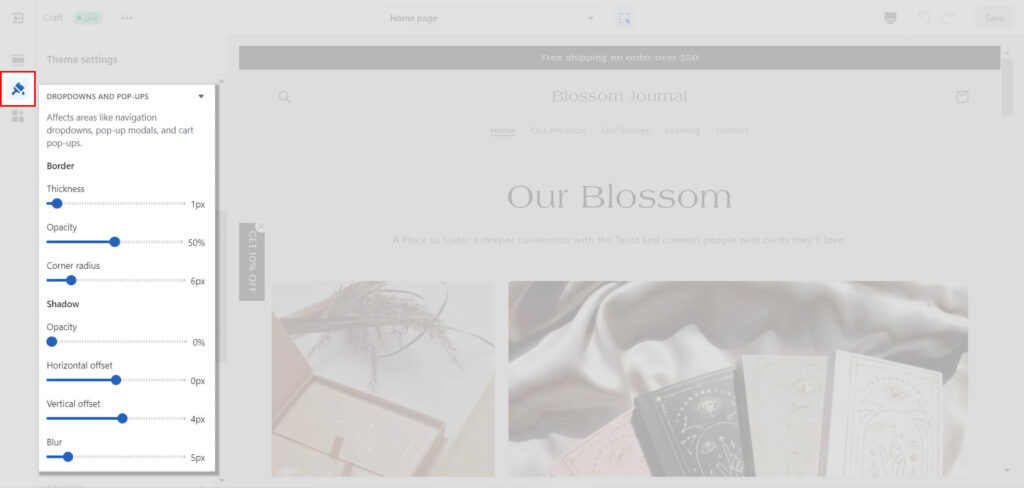
Modify the way that cart pop-ups, pop-up modals, and dropdown menus appear.
Drawers
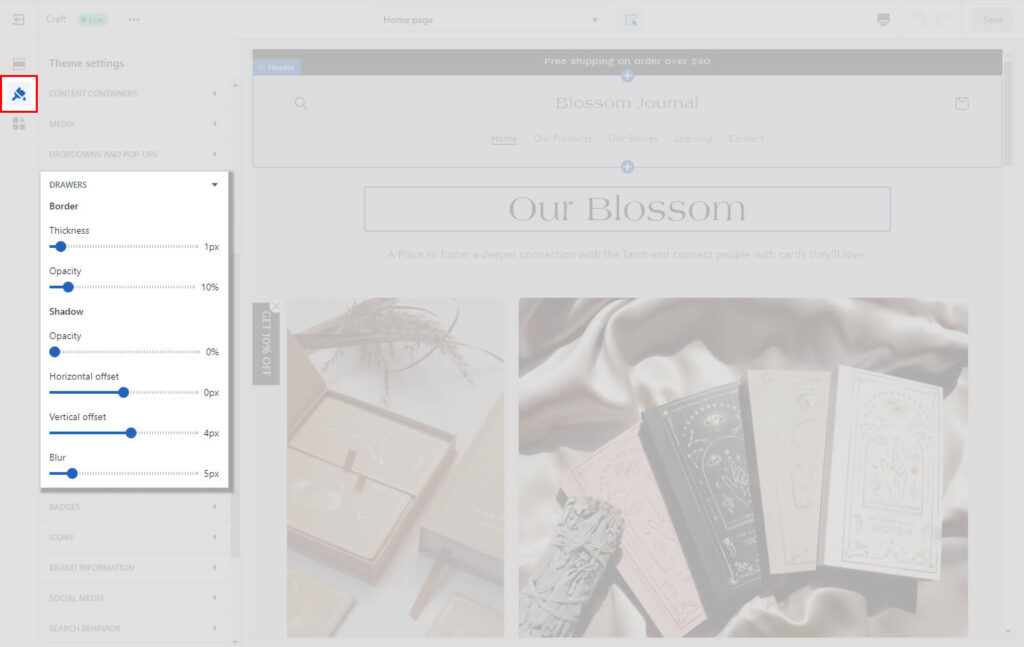
When pressed or clicked, hidden interactive containers known as Drawers—such as a collapsible navigation menu or filter options—appear and vanish.
Badges
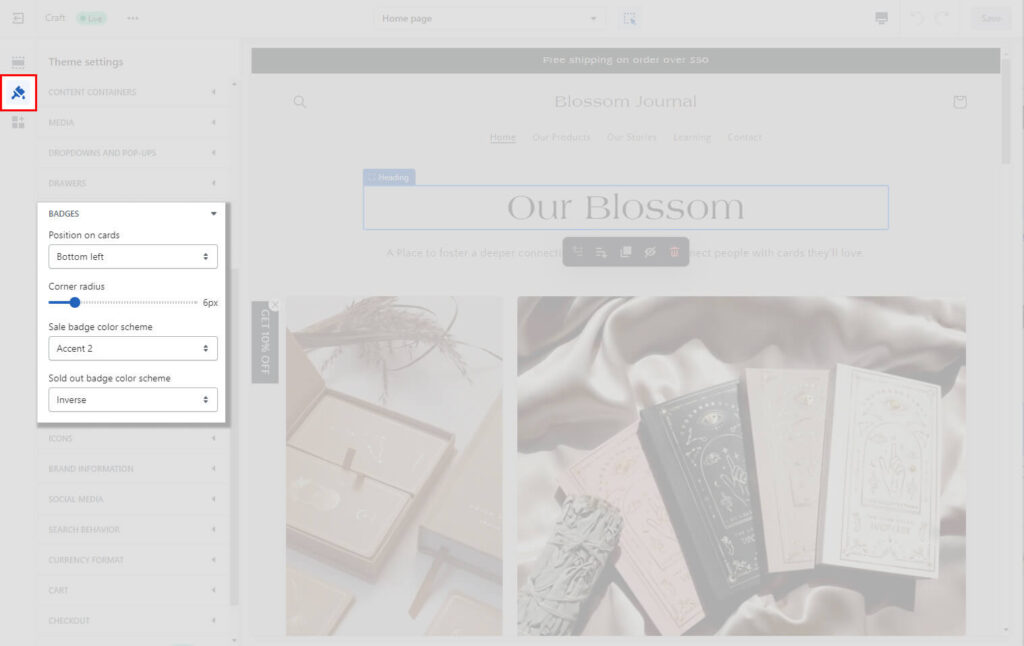
When the price decreases or when the inventory level approaches 0, Sale and Sold Out badges are automatically placed on your product photos. Your badges’ placement, design, and colour are all customizable.
Icons
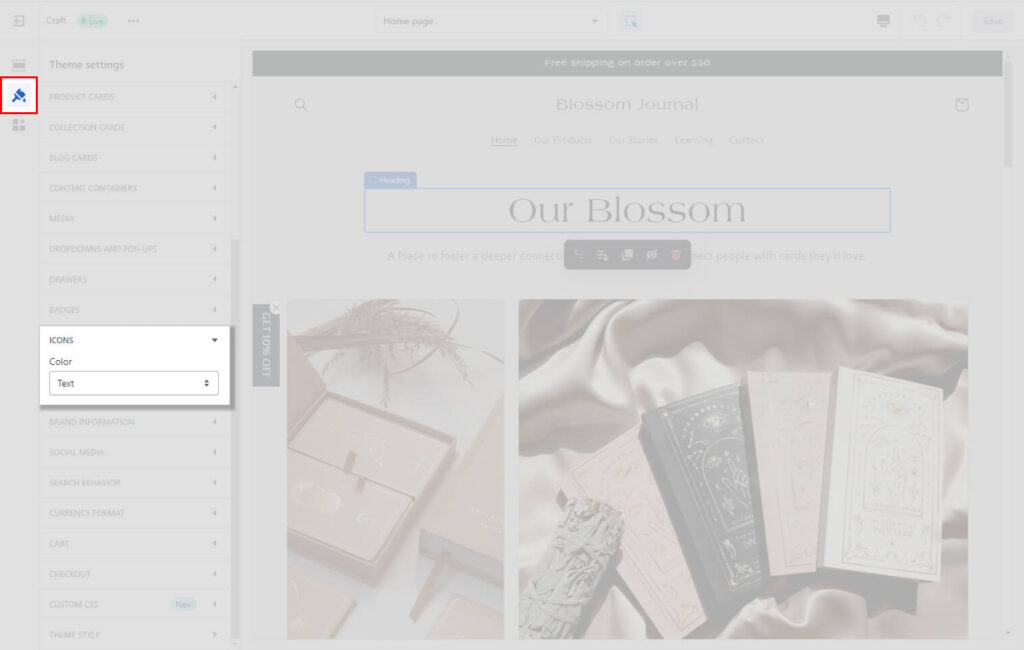
Small graphics known as icons can be added to specific blocks or sections. In the theme settings, choose the colour scheme for your icons.
Brand Information
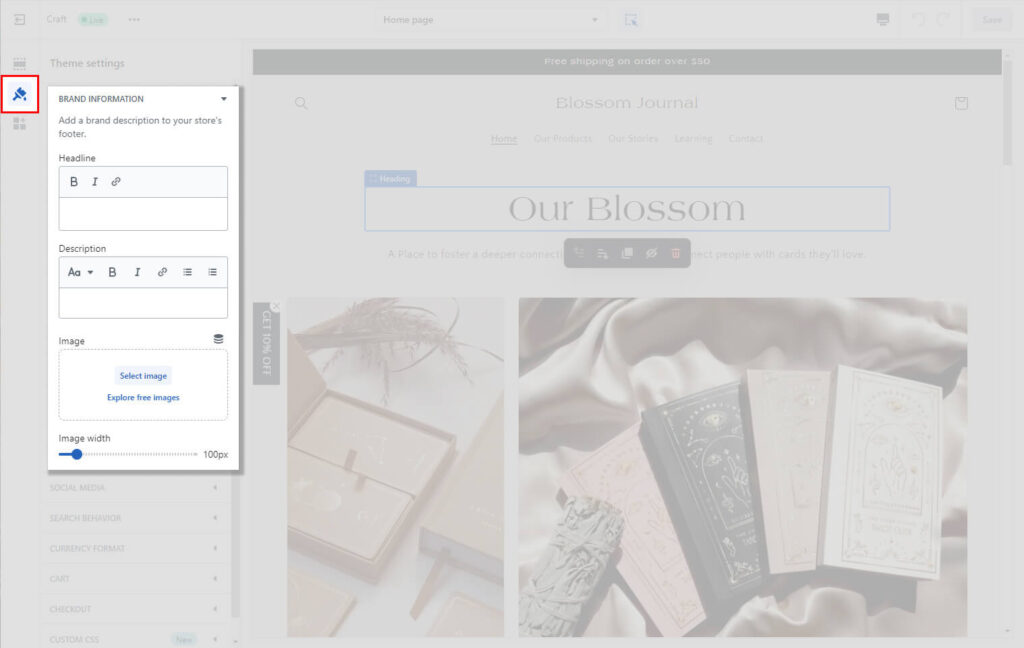
You may provide details about your brand. The brand information block can be added to your footer.
Social Media
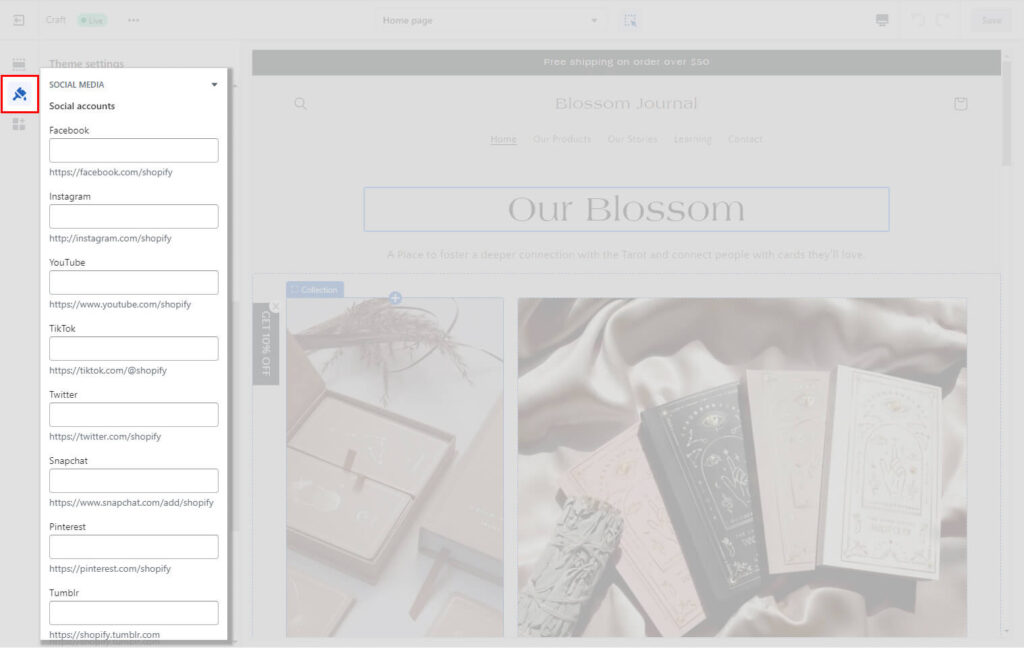
You must make your social media accounts visible so that users can click on them. Don’t slack off on developing a strong social following because it can bring you new traffic and conversions.
You can add your social media accounts here and use them across your entire store; that’s all.
Additionally, you have control over which sharing options visitors see.
Search Behavior
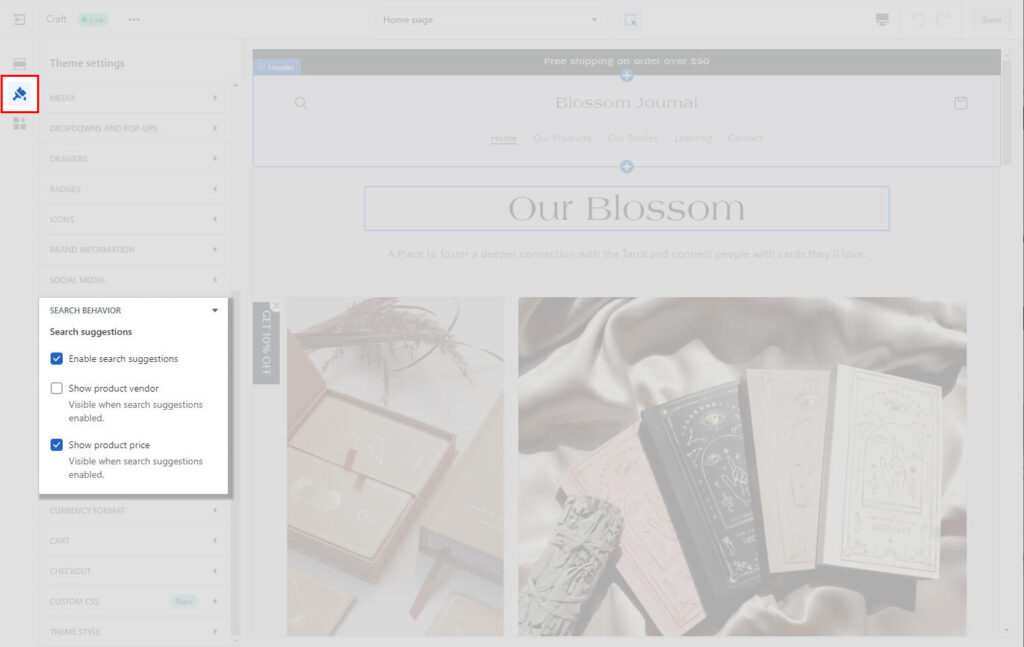
Predictive search is a feature of the online store that displays ideas as users begin to type in the search area. Customers who use search suggestions can better express and hone their search terms and discover fresh ways to browse an online store. Customers can also rapidly browse matches without having to leave their current page in order to view a different list of search results thanks to these tools.
The following search settings are customizable:
- Enable search suggestions – Change the search suggestions’ state.
- Show product vendor – Vendors might be displayed or hidden in search results.
- Show product price – Product pricing might be displayed or hidden in search results.
Currency Format
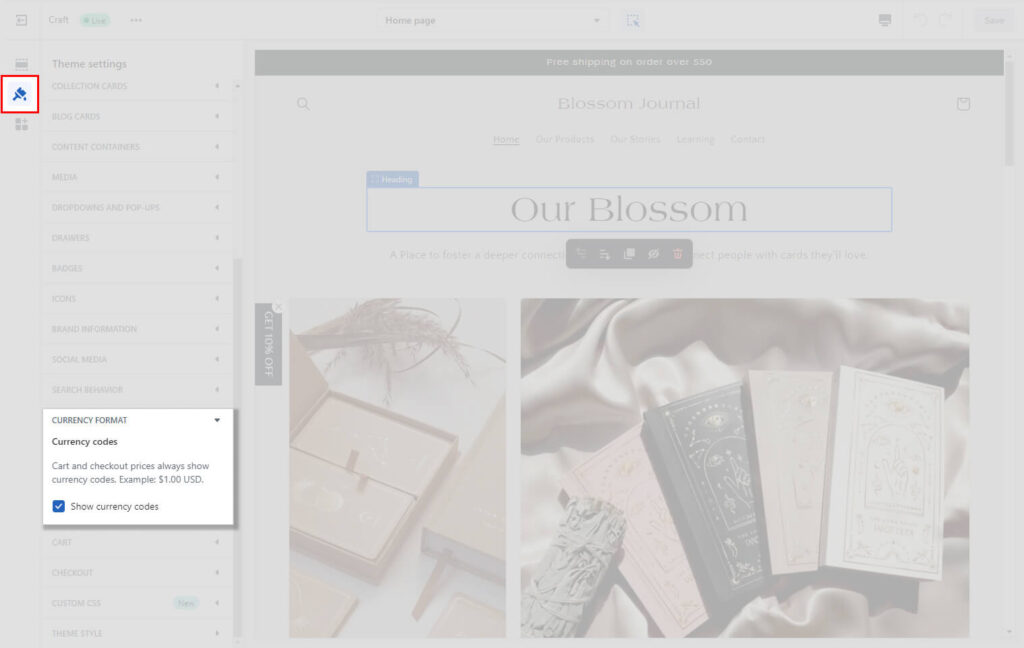
You can decide whether to always have currency codes displayed for product, cart, and checkout pricing.
Cart
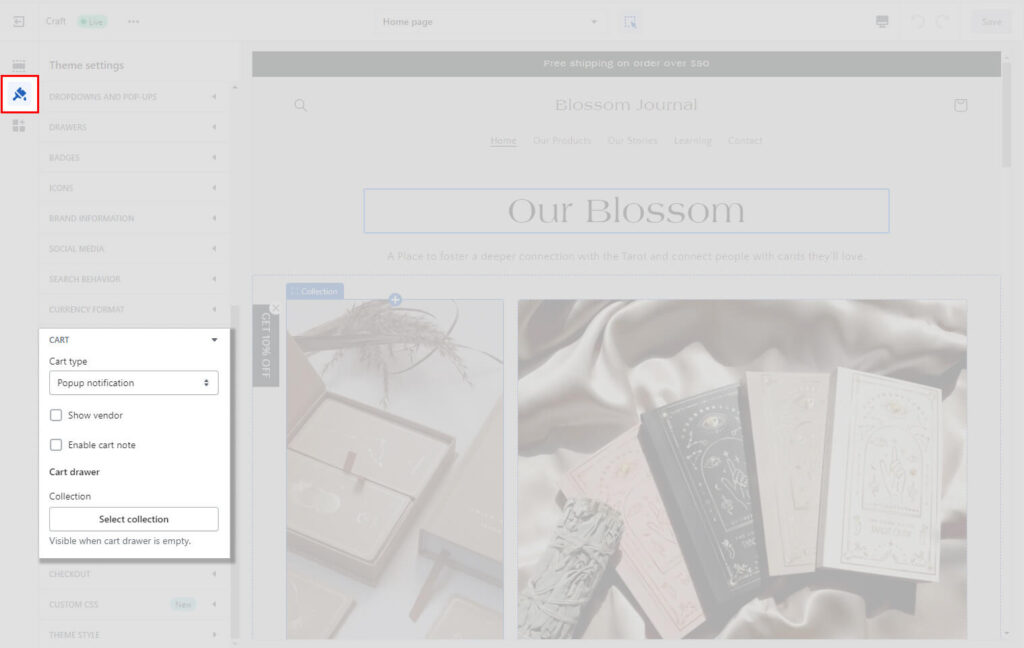
Your online store’s cart design is customizable. The cart can show up as a drawer, a page, or a pop-up message when a customer adds a product from your store to their shopping cart. You can show a featured collection on the cart drawer when the customer’s cart is empty.
Checkout
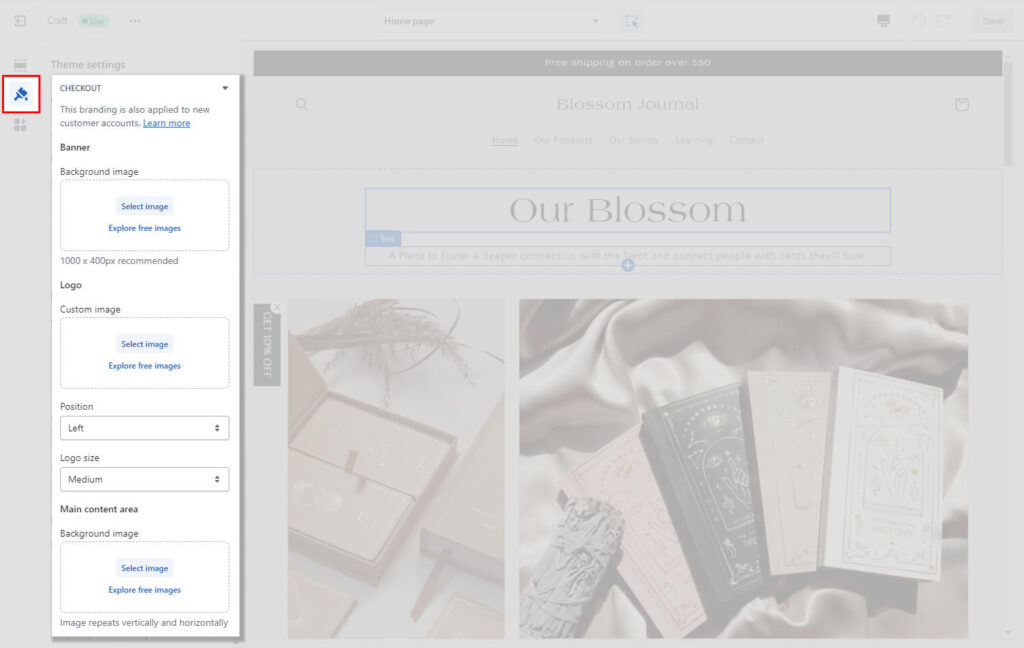
The proper checkout page is the most crucial component for an online store to have. It makes sense that it has a menu for theme settings.
You can exert some control over how your store appears to customers by making changes to the theme’s settings and altering your page templates in the theme editor. But in the end, without a developer’s assistance, Shopify only allows you to modify themes so much.
Update your Footer, don’t forget! In a few easy steps, get rid of “Powered by Shopify” and replace it with something more appropriate for your brand.
Custom CSS (NEW)
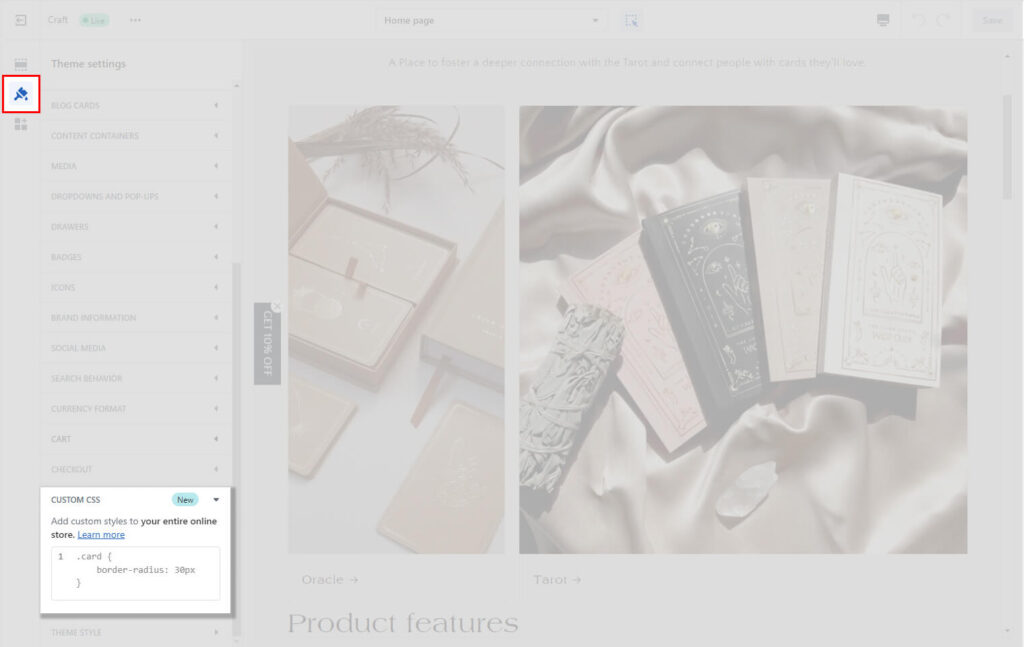
Colours, fonts, button styles, and other design elements for both the general theme and specific page templates can be changed using the theme editor.
Shopify sections can be added, moved, and customised on any page template using Online Store 2.0 themes.
Change Theme Style
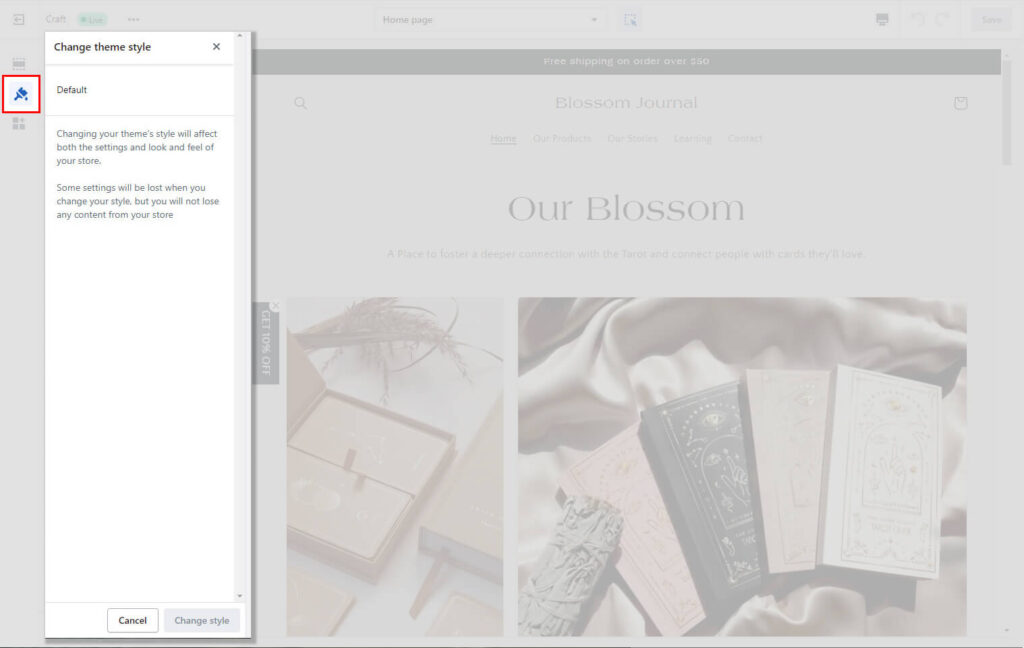
A theme designer will compile settings into a theme style. Applying a theme style will offer your store a professional look and feel. A theme style is automatically applied to all themes. When a theme is customised, your own style settings are used in place of the default ones. When you apply a theme style to your theme, you modify the settings already in place, including the font and colour scheme.
Conclusion
Customising your own online store can appear to be a difficult task for a business owner. There is a lot to take in at once, from picking the ideal design and colours for your store to becoming familiar with the theme editor.
Creating your own theme, too? That is a totally different creature.
We hope that this Shopify customization guide will enable you to establish yourself and build a website that converts customers at an incredible rate.


