

You may add products to your blog updates and external websites with the Shopify Buy Button. By removing the need for customers to visit another website to finish their order, they also make it easier for customers to purchase the products.
What Is Shopify Buy Button?

Buy Buttons help you give customers quick access to your products. On a blog or website that is not powered by Shopify, you can add Buy Buttons. Shopify Buy Buttons enable customers to make purchases without leaving the page by showing product images, descriptions, and prices. The Shopify Buy Button for a product will show any changes made to its details in your Shopify admin.
From your Shopify admin, you can track Buy Button orders. To create Shopify Buy Buttons, use the Buy Button sales channel. All Shopify subscription options offer access to the Buy Button sales channel.
To use the Shopify Buy Button, you have to use an approved payment gateway. Refer to Payment Information by Country or Region to view a list of supported payment gateways in your country or region.
The Shopify Buy Button channel can also be used for creating cart permalinks, which you can send later to customers via email campaigns, direct messages, or social media posts.
And now, we will find out how to use the Shopify Buy Button by following the step-by-step guide below.
Add The Shopify Buy Button Sales Channel
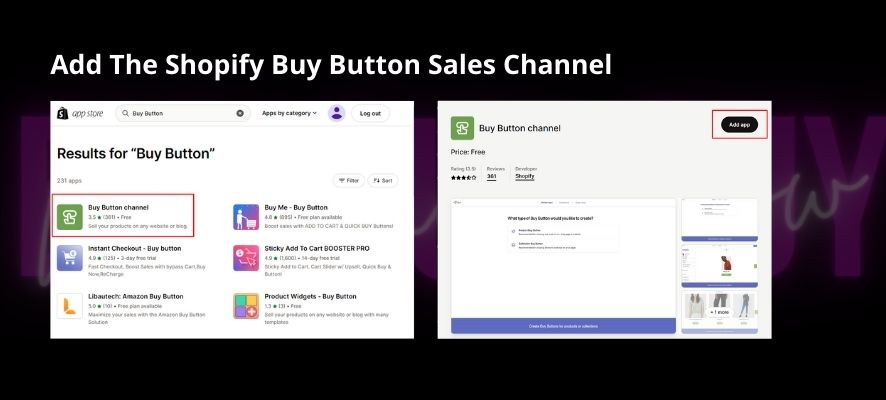
Before you are able to create a new Buy Button or embedded cart, the Shopify Buy Button sales channel must first be added to the Sales Channels section of your Shopify admin.
Desktop:
Step 1 – From your Shopify admin, click Settings > Apps and sales channels
Step 2 – From the Apps and sales channels page, click Shopify App Store
Step 3 – If applicable, log in to continue to the Shopify App Store
Step 4 – From the Shopify App Store, search for Buy Button to learn more about the sales channel
Step 5 – Click Add channel or Add app.
iOS:
Step 1 – From the Shopify app, tap Store
Step 2 – Tap Add channel beside Sales channels
Step 3 – From the Add sales channel screen, tap Buy Button
Step 4 – Tap Add Buy Button
Android:
Step 1 – From the Shopify app, tap Store
Step 2 – Tap the + button beside Sales channels
Step 3 – From the Add sales channel screen, tap Buy Button
Step 4 – Tap Add Buy Button
After you’ve added the Shopify Buy Button sales channel, you can create a new Buy Button.
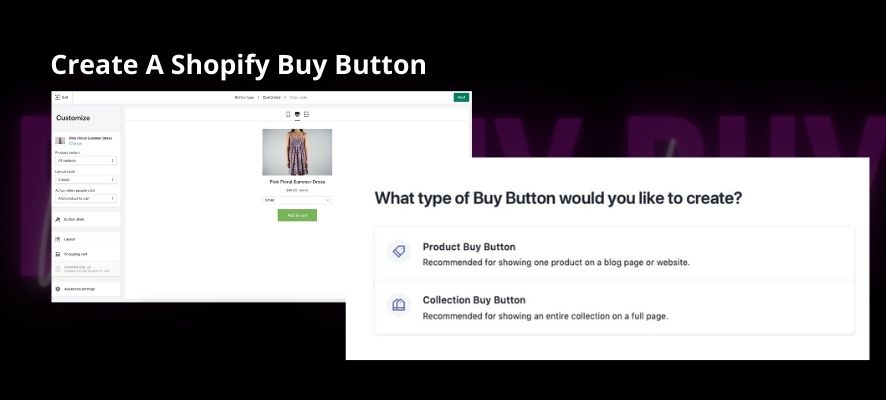
Creating a Shopify Buy Button
You can create a Buy Button for a product or a collection after adding the Buy Button sales channel in your Shopify admin.
You copy the code that is automatically produced after creating a Shopify Buy Button and paste it where you want the button to appear on the website or blog post.
Once you install the Shopify Buy Button on your website, it cannot be improved in appearance. Create a new button in the channel and change out the old code for the new one if you wish to update it.
Customizing Shopify Buy Button
You can customize a Buy Button’s appearance and how it behaves:
- Color
- Size
- Font
- The action that happens when the button is clicked
- Whether the checkout opens in a new browser window
You may get a preview of your changes as you make them to the button. By clicking the preview, you can see how the Shopify Buy Button works.
The Buy Button’s layout is customizable. You can choose one of these Layout Styles below:
Basic | To add a Shopify Buy Button without a product image, choose this layout. If you already advertise your products online somewhere but just want to add a button to complete the purchase, you might want to do this. |
Classic | To place a product image and price next to the Buy button, choose this layout. For a brief product preview, such as in a blog post, this layout is helpful. |
Full view | Choose this layout to place the Buy button next to a product image, price, and description. This design represents a page with product details in your online store. |
You can decide what action happens when someone clicks a Shopify Buy Button when you create one. The action is applicable to each item in the collection if the Buy Button is for a collection.
- Add product to cart adds the product to a shopping cart. Customers can keep shopping and add more items to their carts.
- Direct to Checkout brings the customer directly to your checkout, where they can purchase the product. Customers can’t increase the number of items they order.
- Open product details display a View product button. The buyer can view the product description, choose from any available product variants, and add the item to their shopping cart by clicking the button. If a product has more than one image, all of them will appear.
- Since the Full view layout already displays all of the product details, this option is not available when you select it.
You can also decide whether the checkout opens in the same tab as your website or a new browser window. The checkout often opens in a new window by default.\
Note: If you have more than one Buy Button on a page, then you need to configure all of them with the same action
Next, we need to know the Shopify Buy Button’s appearance:
- Shape, colour, and font are all part of the button style for the Buy Button.
- Layout depending on the layout type you select, you may change variables like button alignment, picture size, button text, font, color, and size.
- The embedded Shopping cart has font and color customization options. The Order note field’s label can also be enabled and changed. Order notes can be used to get extra instructions from clients on how to prepare and deliver an order. You can provide information to your consumers using the Additional information area.
- Only if you have chosen to do so are you able to change the shopping cart’s settings. The button’s actions are Add Product to Cart or Open Product Details.
- The options for the product Details pop-up window are included in the detailed pop-up. The button’s content, whether or not a quantity field is displayed, the background and label colors, as well as the font and font size of the labels, can all be changed. Only if you selected Open product details as the button’s action will you be able to change these options.
Create A Shopify Buy Button For A Single Product
A Buy Button can be created to purchase a single product. The Buy Button may display just one of the product’s variations or all of them. The layout type you select when creating the Shopify Buy Button allows you to customize the button’s color, text, appearance, and the action that takes place when the customer clicks it.
A product must be added to your Shopify Admin and made available to the Buy Button sales channel before you can create a Buy Button for it.
On Desktop
Step 1 – From your Shopify admin, click Settings > Apps and sales channels
Step 2 – From the Apps and sales channels page, click Buy Button
Step 3 – Click Open sales channel
Step 4 – Click Create a Buy Button
Step 5 – Click Product Buy Button
Step 6 – Select the product from your catalogue or use the search to find a product. Click Select
Step 7 – Optional: customize the Shopify Buy Button
- Select All variants if your product has them, or choose the variant you want to have.
- Choose the action that takes place when the customer clicks the button and the layout style. The look of the button can also be changed.
- You have the option to launch the checkout in the same browser tab as your website, even if the checkout action by default opens a new window. In the same menu, select Advanced settings > Redirect
Step 8 – Click Next
Step 9 – Click Copy code
Step 10 – Open the HTML editor for the webpage where you want to display the Buy Button
Step 11 – Paste the code within the HTML where you want the Buy Button to appear, and then save your changes
On Mobile
Step 1 – From the Shopify app, tap Store
Step 2 – From the Sales channel section, click Buy Button
Step 3 – Click the Create a Buy Button
Step 4 – Click Product Buy Button
Step 5 – Select the product from your catalogue or use the search to find a product. Click Select
Step 6 – Optional: customize the Buy Button
- Select All variants if your product has them, or choose the variant you want to have.
- Choose the action that takes place when the customer clicks the button and the layout style. The look of the button can also be changed.
- You have the option to launch the checkout in the same browser tab as your website, even if the checkout action by default opens a new window. In the same menu, select Advanced Settings> Redirect
Step 7 – Click Next
Step 8 – Click Copy code
Step 9 – Open the HTML editor for the webpage where you want to display the Buy Button
Step 10 – Paste the code within the HTML where you want the Buy Button to appear, and then save your changes
Note: At any time, to see what your button looks like, tap Preview.
Create A Buy Button For A Collection
You basically generate a button for each item in the collection when you create a buy button for a collection.
The layout type you select when creating the Shopify Buy Button allows you to customize the button’s colour, text, appearance, and the action that takes place when a consumer clicks it.
On Desktop
Step 1 – From your Shopify admin, click Settings > Apps and Sales channels
Step 2 – From the Apps and sales channels page, click Buy Button
Step 3 – Click Open sales channel
Step 4 – Click Create a Buy Button
Step 5 – Click Collection Buy Button
Step 6 – Select the collection or, use the search to find the collection. Click Select
Step 7 – Optional: customize the Buy Button
- Choose the action that happens when a customer clicks the button. You can also customize the button’s appearance
- By default, the checkout behavior opens a new window, but you can choose to open the checkout in the same browser tab as your website. Click Advanced settings > Redirect in the same tab
Step 8 – Click Next
Step 9 – Click Copy code
Step 10 – Open the HTML editor for the webpage where you want to display the Buy Button. Refer to Adding Buy Button code to HTML
Step 11 – Paste the code within the HTML where you want the Buy Button to appear, and then save your changes
On Mobile
Step 1 – From the Shopify app, tap Store
Step 2 – In the Sales channel section, click Buy Button
Step 3 – Click Create a Buy Button
Step 4 – Click Collection Buy Button
Step 5 – Select the collection or, use the search to find the collection. Click Select
Step 6 – Optional: customize the Buy Button
- Choose the action that happens when a customer clicks the button. You can also customize the button’s appearance
- By default, the checkout behavior opens a new window, but you can choose to open the checkout in the same browser tab as your website. Click Advanced settings > Redirect in the same tab
Step 7 – Click Next
Step 8 – Click Copy code
Step 9 – Open the HTML editor for the webpage where you want to display the Buy Button. Refer to Adding Buy Button code to HTML
Step 10 – Paste the code within the HTML where you want the Buy Button to appear, and then save your changes
Adding Shopify Buy Button Code To HTML
You are now prepared to add a Buy Button to your website or blog after creating one in your Shopify admin.
Depending on your publishing platform, the theme you’re using on that platform, how and where you want your Buy Button and a cart to display, and other factors, the process of adding embed code to your website’s source HTML varies a little.
Note: Contact your website host or publishing platform directly for support if you need support adding embed code to platforms other than Shopify (such as Squarespace or WordPress). Learn more about steps on how to add buy button code to HTML here.
Editing Or Deleting A Shopify Buy Button Or Embedded Cart
The code snippets that you copy from your Shopify admin and paste into the source HTML of your website are what create the Shopify Buy Buttons and carts. The term “embed code” refers to these small pieces of code. Editing the related embed code is required if you wish to customise the look or behaviour of a button or cart.
Note: Since it is an advanced tutorial, Shopify does not support it. It’s necessary to be familiar with web design languages like HTML, CSS, JavaScript, and Liquid. Hire a Shopify specialist if you need assistance.
To discover more, go to Editing or Deleting A Buy Button Or Embedded Cart.
In Conclusion
In future blog posts, we will have more topics that explain more about the Shopify Buy Button. Follow us to get more information in the future!

