A gadget used to count down to a certain occasion is called a countdown timer. They come in a variety of designs, from straightforward mechanical appliances like those seen in kitchens to electronic equivalents that can be downloaded and set up on a PC.
A countdown timer is used on many websites to indicate the number of days, hours, minutes, and seconds until a significant event. Some websites offer countdown timer scripts that may be used on individual websites.
Add New Countdown
Display Position

From in-depth research on the trends of stores on Shopify and other eCommerce platforms in the market, ShineTrust provides you with 5 pre-designed templates for you to quickly choose and set up your store:
- Show in TopBar
- Show on Product Page
- Show in Other Pages
- Show in Product Image
- Show in Product Title
Message & Setting

Preview

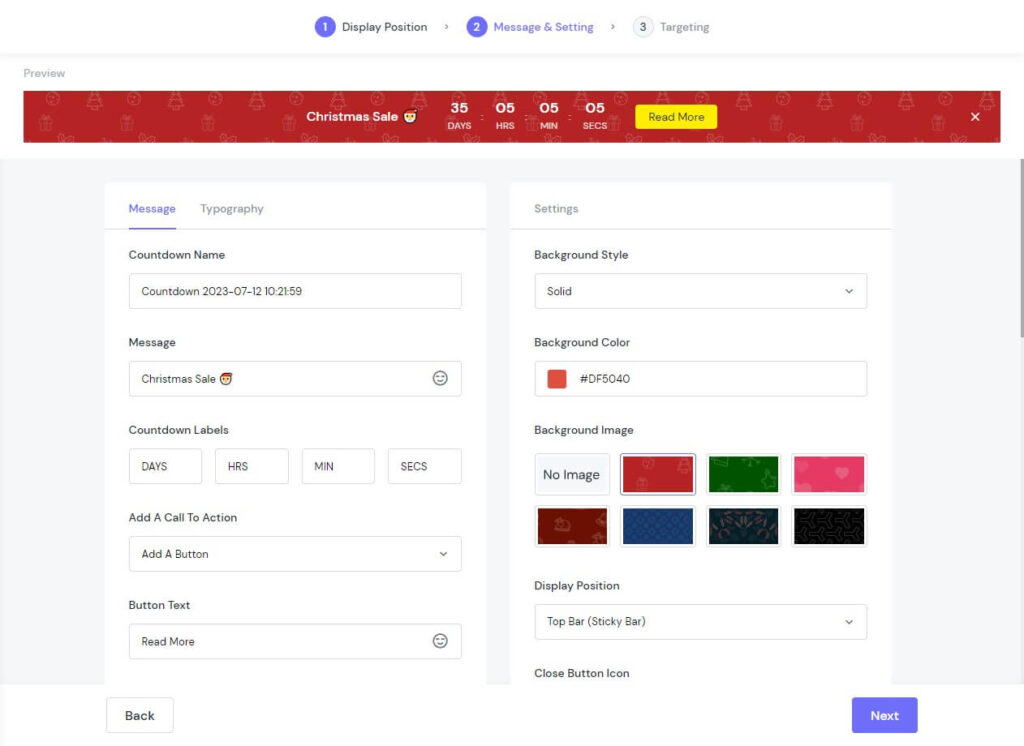
You can preview your Countdown Timer on your Desktop, and then you can customise it with the parts that I will introduce in the next section.
Message

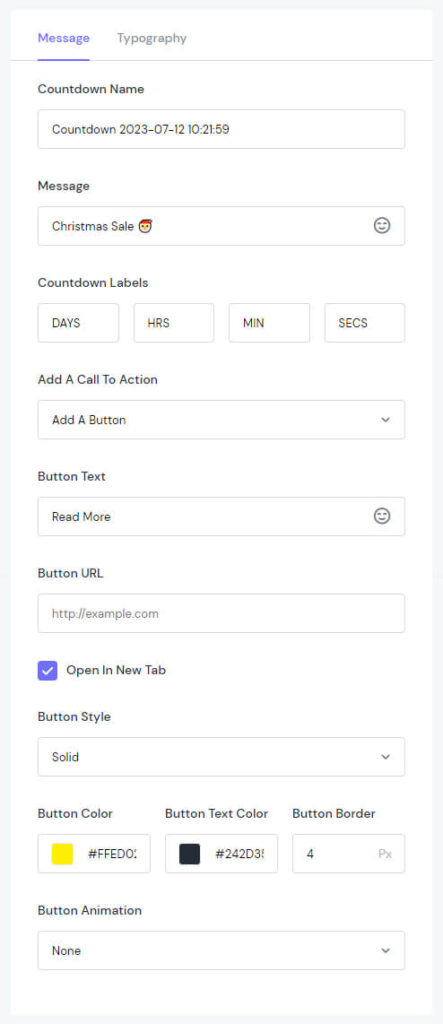
Message gives you general edits when displayed on the store:
- Countdown Name: Change your campaign’s name.
- Message: Change the text of the message.
- Countdown Labels: Set the display order of the countdown.
- Add A Call To Action: choose one of 5 options below:
- None
- Add A Button
- Add A Simple Link
- Add A Coupon
- Make The Entire Bar Clickable
- Button Text: Change the text of the button.
- Button URL: Add the URL to the button.
- Open In The New Tab: Choose to open the link in a new tab.
- Button Style: Select the style of the button.
- Button Color: Modify the colour of the button.
- Button Text Color: Modify the colour of the button text.
- Button Border: Add the percentage if you want to change specifications.
- Button Animation: Choose how to make the button move.
Typography

Typography helps you change the text display in Countdown Timer:
Font Family | Choose a typeface to be the core design. |
Title | Title Weight: Determine how bold or light your title will appear. |
Font Size: Make your font size smaller or larger. | |
Text Color: Choose the colour for the displayed text. | |
Subtitle | Subtitle Weight: Determine how bold or light your subtitle will appear. |
Font Size: Make your font size smaller or larger. | |
Text Color: Choose the colour for the displayed text. | |
Number | Number Weight: Determine how bold or light your number will appear. |
Font Size: Make your font size smaller or larger. | |
Text Color: Choose the colour for the displayed text. | |
Label | Label Weight: Determine how bold or light your label will appear. |
Font Size: Make your font size smaller or larger. | |
Text Color: Choose the colour for the displayed text. |
Settings

Settings has a tonne of settings that you can use to fine-tune the presentation of the information for the highest conversion rate. You may edit the following 5 sections:
- Background Style: Choose between 2 styles ‘Solid’ and ‘Gradient’.
- Solid
- Background Color: Modify the colour of the background.
- Background Image: Choose 1 of our suggestions.
- Gradient
- Color 1: Choose your first colour.
- Color 2: Choose your second colour.
- Angle: Set the angle to make a colour mixture.
- Border Radius: Rounds the corners of the outer border edge.
- Border Size: Modify the size of the border.
- Border Color: Modify the colour of the border.
- Padding: Create space around the element, inside any defined border.
Countdown Setting

Countdown Setting gives you general edits when displayed on the store:
- Countdown Type:
- Right Now: Visible immediately after customers visit your store.
- End Time: Choose the time (hour, minute, and session) and date to end the countdown.
- Definite Time: Displayed according to the time period you have installed.
- Start Time: Choose the time (hour, minute, and session) and date to start the countdown.
- End Time: Choose the time (hour, minute, and session) and date to end the countdown.
- Fixed Minutes: Display an unlimited number of minutes.
- Right Now: Visible immediately after customers visit your store.
- Action when the countdown ends: Select the action between “Hide the bar”, “Repeat it”, and “Do nothing”.
Page Targeting

Page Targeting has a tonne of settings that you can use to fine-tune the presentation of the information for the highest conversion rate. You may edit the following 2 sections:
- Display Position: We suggest 1 fixed position and 1 position that you can customise yourself.
- Product Page – Above The ‘Add To Cart’ Button
- Product Page – Custom: Customise with the elements as ‘Fulfil Css selector’ or ‘Position’ (Above or Below).
- All Products: This element allows you to choose any product and quantity you desire.
My Activity

You can easily check the campaigns created at My Activity:
Name
Preview
Status
Actions
